
You know those days when you need something sweet but don’t want to turn on the oven? That’s exactly how I fell in love with these no-bake cheesecake cups! Last summer, my niece showed up unexpectedly with friends, and I whipped these up in 15 minutes flat. The best part? They’re endlessly customizable – swap toppings, change the crust, make them fancy or simple. These little cups deliver all the creamy cheesecake goodness without any fuss!
Why You’ll Love This No-Bake Cheesecake Cups Recipe
Let me tell you why these little cups have become my go-to dessert for every occasion:
- No oven required – perfect for hot summer days when baking sounds like torture
- Ready in 15 minutes (plus chilling) – faster than ordering takeout!
- Endlessly customizable – I love switching up toppings based on what’s in season
- Perfect portion control – no fighting over who got the bigger slice
- Total crowd-pleaser – I’ve served these at everything from book club to kids’ birthday parties
Trust me, once you try these, you’ll wonder how you ever lived without them!
Ingredients for No-Bake Cheesecake Cups
Here’s what you’ll need to make these dreamy little cups – I promise it’s all simple stuff you probably have already:
- 1 cup graham cracker crumbs (finely crushed – I just whiz mine in the food processor)
- 2 tbsp melted butter (the glue that holds our crust together!)
- 8 oz cream cheese, softened (leave it out for an hour – trust me, lumpy cheesecake is sad cheesecake)
- 1/4 cup granulated sugar (or powdered sugar if you want extra smooth filling)
- 1 tsp vanilla extract (the good stuff makes all the difference)
- 1 cup whipped topping (thawed if frozen)
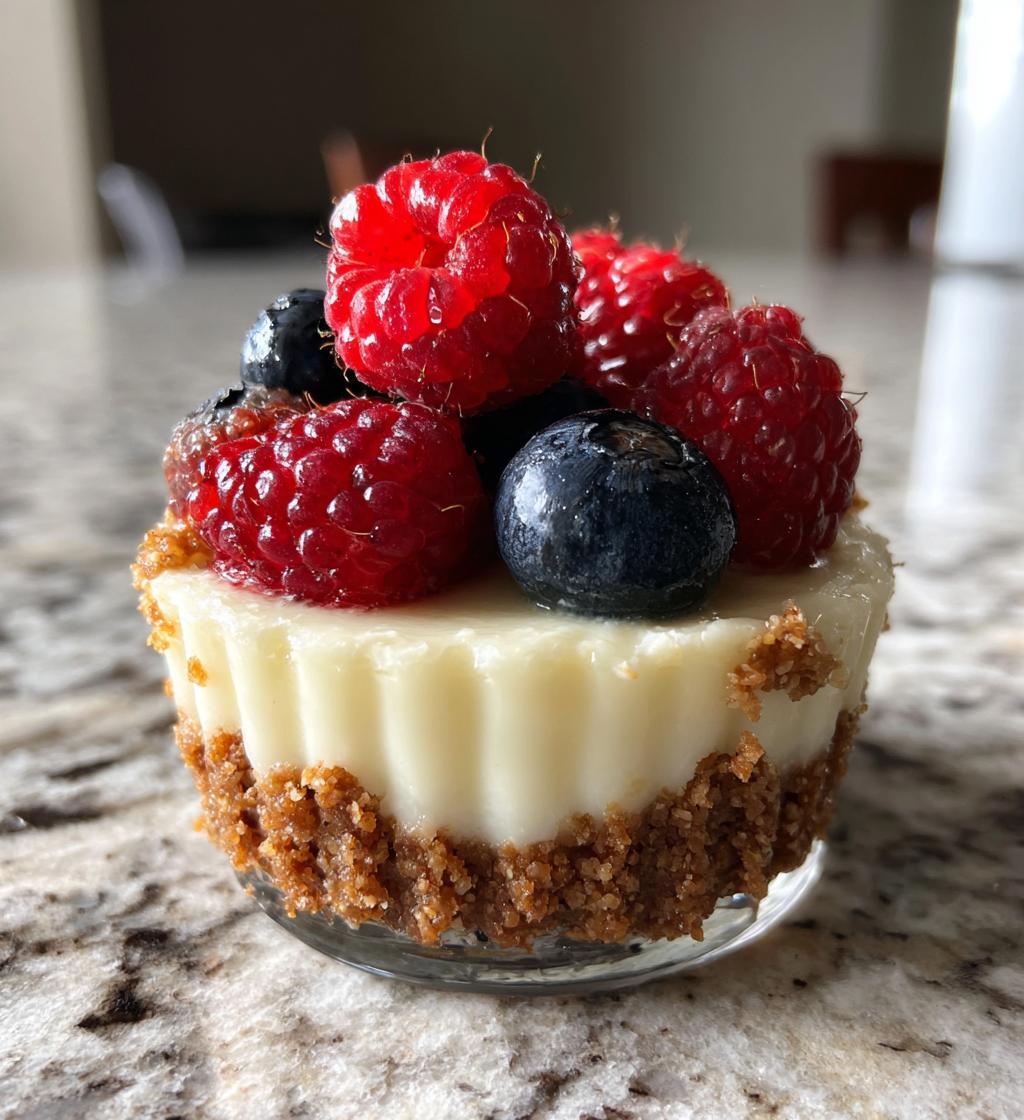
- Fresh berries for topping (my favorites are strawberries, blueberries, or raspberries – whatever looks good at the market)
See? Nothing fancy – just pantry staples that come together into something magical!
How to Make No-Bake Cheesecake Cups
Okay, let’s get to the fun part – making these dreamy little cups! I promise it’s easier than you think. Just follow these simple steps and you’ll have perfect cheesecake cups every time.
Step 1: Prepare the Crust
First, grab those graham cracker crumbs and melted butter. Mix them together in a bowl until they look like wet sand – you want all the crumbs nicely coated. Now here’s my trick: press about 2 tablespoons firmly into the bottom of each cup or jar. I mean really press it down with the back of a spoon – this keeps the crust from crumbling when you eat it later!
Step 2: Make the Cheesecake Filling
Now for the creamy magic! Beat your softened cream cheese first – just by itself – until it’s completely smooth. No lumps allowed! Then add the sugar and vanilla, mixing until it’s silky. This step makes all the difference – I learned the hard way that adding everything at once gives you lumpy filling.
Step 3: Assemble and Chill
Gently fold in the whipped topping – don’t stir vigorously or you’ll deflate all that airy goodness. Spoon this cloud-like mixture over your crusts, then pop them in the fridge for at least 2 hours (though overnight is even better). The waiting is the hardest part, but trust me – patience gives you that perfect cheesecake texture!
Tips for Perfect No-Bake Cheesecake Cups
After making dozens (okay, maybe hundreds) of these little cups, I’ve picked up some foolproof tricks:
- Use full-fat cream cheese – the low-fat stuff just doesn’t set up right and lacks that rich flavor we love
- Don’t overmix – once you add the whipped topping, gentle folds keep it light and fluffy
- Let cream cheese soften properly – 30 minutes at room temp makes all the difference in getting that silky texture
- Chill before serving – that 2-hour wait? Non-negotiable for perfect consistency!
- Make ahead magic – these actually taste better the next day as flavors meld
Follow these tips and you’ll have cheesecake cups that look and taste professional – promise!
Creative Variations for No-Bake Cheesecake Cups
The best part about these little cups? You can dress them up a million different ways! My kids go crazy when I swap the graham crackers for crushed Oreos – instant cookies and cream magic. For summer parties, I love adding lemon zest to the filling and topping with blueberries. Feeling fancy? A Nutella drizzle and chopped hazelnuts make them restaurant-worthy. The possibilities are endless – have fun with it!
Serving and Storing No-Bake Cheesecake Cups
Here’s how I serve these beauties – straight from the fridge with extra toppings on the side! Fresh berries, chocolate shavings, or even a dollop of whipped cream make them extra special. Store any leftovers (ha – like you’ll have any!) in the fridge with plastic wrap over the tops. They’ll keep beautifully for up to 3 days – though in my house, they never last that long!
Nutritional Information for No-Bake Cheesecake Cups
Okay, let’s talk numbers – but remember, these are just estimates! Depending on your exact ingredients and how generous you are with toppings, your cheesecake cups might vary a bit. But here’s the general idea for one serving (because let’s be real – nobody stops at just one!).
Each little cup gives you that perfect balance of creamy, crunchy, and sweet while keeping things reasonable. The graham cracker crust adds just enough texture without going overboard, while the cream cheese filling gives you that rich, satisfying taste we all crave in dessert.
Remember – nutritional values can change based on the specific brands you use or if you decide to get creative with extras like chocolate drizzle or extra berries. That’s the beauty of homemade treats – you’re in control! But no matter how you tweak it, these cups will always be better than anything you’d buy pre-made at the store.
Frequently Asked Questions
I get so many questions about these no-bake cheesecake cups – here are the ones that pop up most often in my kitchen and inbox:
Can I use Greek yogurt instead of whipped topping? Absolutely! I’ve done this when I wanted a tangier version. Just strain regular yogurt first (overnight in cheesecloth works best) to remove excess liquid. The texture will be slightly denser but still delicious.
How long do the cheesecake cups last in the fridge? About 3 days max – though they rarely last that long at my house! The crust starts getting soggy after day two, so I recommend eating them within 48 hours for the best texture.
Can I freeze them? Yes! Freeze without toppings for up to a month. Thaw in the fridge overnight, then add fresh berries before serving. The texture changes slightly but still tastes amazing!
What if my filling is too runny? Oh honey, we’ve all been there! Just pop the cups in the freezer for 30 minutes to firm up. Next time, make sure your cream cheese is truly room temp before mixing – cold cheese = lumpy, thin filling.
Share Your No-Bake Cheesecake Cups Creation
Nothing makes me happier than seeing your beautiful cheesecake cup creations! When my cousin texted me a photo of her strawberry-topped cups last week, I actually squealed – that’s how much I love seeing your twists on this recipe. Tag me on Instagram @CheesecakeCupQueen (yes, I made that handle just for these!) or leave a comment below showing off your masterpiece.
Did you try the Oreo crust version? Maybe you went wild with caramel drizzle? I want to see all your brilliant ideas – your creativity might just inspire my next batch! And if you’ve got any special tips or tricks you discovered, share those too. After all, the best recipes grow when we cook together.
Happy snapping, happy baking, and most importantly – happy eating, my fellow cheesecake cup lovers!
Print
15-Minute No-Bake Cheesecake Cups Bliss
- Total Time: 2 hours 15 minutes
- Yield: 6 servings 1x
- Diet: Vegetarian
Description
Easy no-bake cheesecake cups recipe for a quick dessert.
Ingredients
- 1 cup graham cracker crumbs
- 2 tbsp melted butter
- 8 oz cream cheese, softened
- 1/4 cup sugar
- 1 tsp vanilla extract
- 1 cup whipped topping
- Fresh berries for topping
Instructions
- Mix graham cracker crumbs and melted butter.
- Press the mixture into the bottom of small cups.
- Beat cream cheese, sugar, and vanilla until smooth.
- Fold in whipped topping.
- Spoon the mixture over the crust.
- Chill for at least 2 hours.
- Top with fresh berries before serving.
Notes
- Use room temperature cream cheese for smoother mixing.
- Chill the cups for best results.
- Try different toppings like chocolate sauce or caramel.
- Prep Time: 15 minutes
- Cook Time: 0 minutes
- Category: Dessert
- Method: No-Bake
- Cuisine: American
Nutrition
- Serving Size: 1 cup
- Calories: 250
- Sugar: 15g
- Sodium: 180mg
- Fat: 18g
- Saturated Fat: 10g
- Unsaturated Fat: 6g
- Trans Fat: 0g
- Carbohydrates: 20g
- Fiber: 1g
- Protein: 3g
- Cholesterol: 45mg
Keywords: no-bake cheesecake, cheesecake cups, easy dessert


