
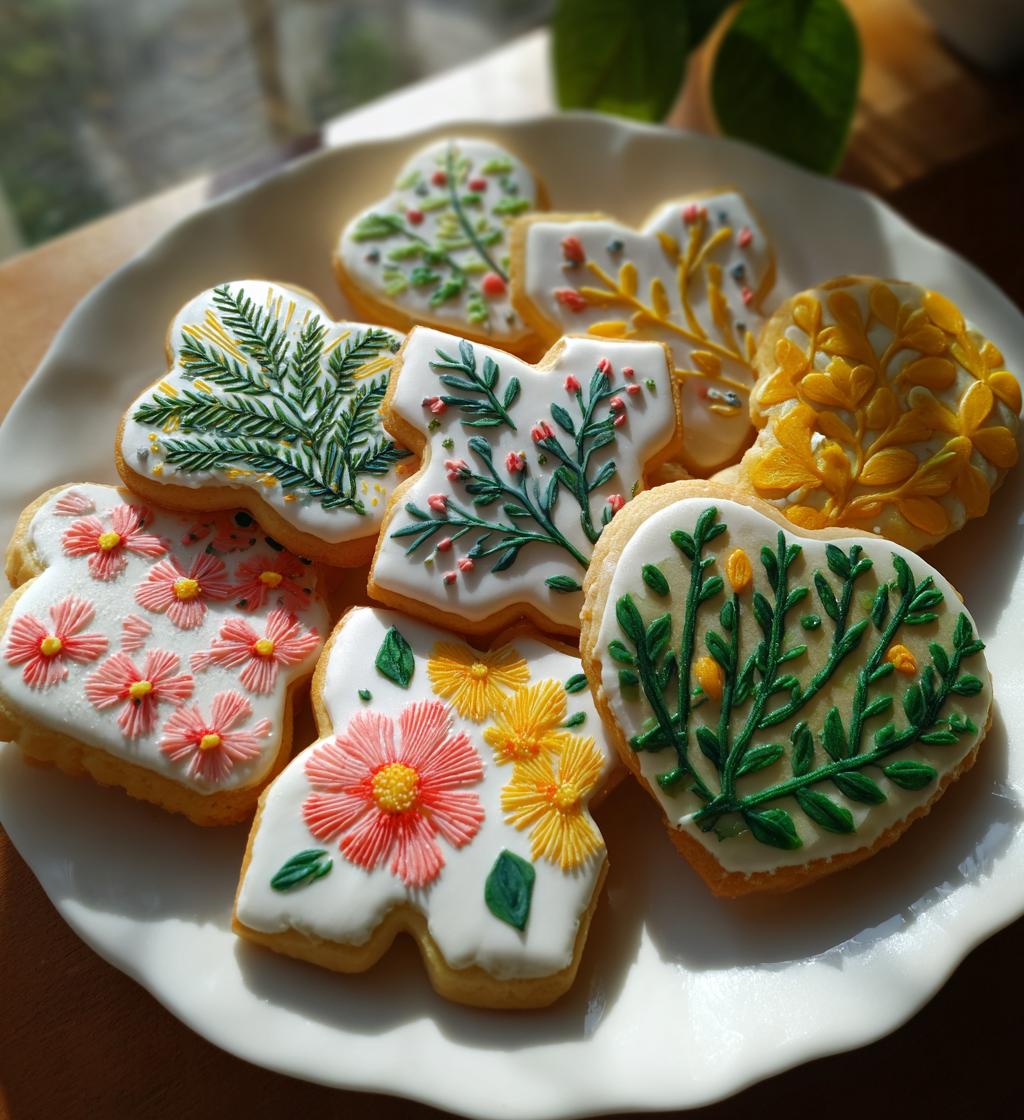
Ah, springtime! It’s that magical season when the world bursts into color, and I can’t help but feel inspired to bake. Every year, as flowers bloom and the sun shines a little brighter, I gather my family in the kitchen to whip up the most delightful treat—*spring decorated cookies*. These cookies aren’t just a feast for the taste buds; they’re a celebration of the season’s vibrant spirit! With a palette of pastel colors and whimsical designs, each cookie becomes a canvas for our creativity.
One of my favorite memories is from last year when my kids and I spent a sunny afternoon making these cookies together. We laughed, chatted, and let our imaginations run wild as we decorated them with royal icing in every color imaginable—think cheerful yellows, soft pinks, and refreshing greens. The joy on their faces as they created little masterpieces was absolutely priceless. The best part? We enjoyed them together at our spring picnic, sharing bites of sweetness while surrounded by blooming flowers. Trust me, there’s nothing quite like the taste of love baked into each *spring decorated cookie*!
Ingredients for Spring Decorated Cookies
To create these delightful *spring decorated cookies*, you’ll need a handful of simple ingredients that come together in a joyful mix. Here’s what you’ll need, along with some tips to make sure you get the best results:
- 2 cups all-purpose flour: Make sure to spoon and level your flour for accuracy. This helps prevent dense cookies!
- 1/2 teaspoon baking powder: This little leavening agent gives the cookies a light texture, so don’t skip it!
- 1/4 teaspoon salt: A pinch of salt enhances the sweetness and balances the flavors beautifully.
- 1/2 cup unsalted butter, softened: Let your butter sit at room temperature for about an hour before baking to ensure it creams well with the sugar.
- 1 cup granulated sugar: This adds sweetness and helps with the cookie’s structure. The finer the sugar, the better it will cream with the butter!
- 1 egg: Use a large egg for the best results; it helps bind everything together nicely.
- 1 teaspoon vanilla extract: Opt for pure vanilla extract if you can; it adds a wonderful depth of flavor.
- Royal icing: This is essential for decorating! You can make it ahead of time and store it in an airtight container until you’re ready to use it.
- Food coloring: Get creative and use various colors to decorate your cookies in fun spring themes!
With these ingredients on hand, you’re all set to start your cookie-making adventure! Each one plays a crucial role in creating those colorful, cheerful treats that are perfect for any spring celebration.
How to Prepare Spring Decorated Cookies
Now that you’ve got your ingredients ready, let’s dive into the fun part—preparing those delightful *spring decorated cookies*! I promise it’s easier than you might think, and each step brings you closer to a colorful treat that’ll impress everyone. Here’s a step-by-step guide to help you along the way:
Step-by-Step Instructions
- Preheat your oven: Start by preheating your oven to 350°F (175°C). This way, it’ll be just right when you’re ready to pop those cookies in!
- Mix the dry ingredients: In a medium bowl, whisk together the flour, baking powder, and salt. This ensures even distribution and helps avoid any lumps.
- Cream the butter and sugar: In a large mixing bowl, grab your softened unsalted butter and granulated sugar. Use a hand mixer or a stand mixer to cream them together until the mixture is light and fluffy—about 3-4 minutes. This step allows air to incorporate, making your cookies nice and soft!
- Add the egg and vanilla: Beat in the egg and the vanilla extract until well combined. You’ll want to scrape down the sides of the bowl to make sure everything is mixed evenly.
- Combine wet and dry: Gradually add the flour mixture to the butter mixture, mixing on low speed until just combined. Avoid over-mixing; we want tender cookies, not tough ones!
- Chill the dough: Here comes the secret sauce! Wrap the dough in plastic wrap and chill it in the refrigerator for about 30 minutes. This helps the cookies hold their shape while baking.
- Roll and cut: Once chilled, sprinkle a clean surface with flour and roll out the dough to about 1/4-inch thickness. Use your favorite cookie cutters to create fun shapes—think bunnies, flowers, and eggs for that spring vibe!
- Bake the cookies: Place the cut-out cookies on a baking sheet lined with parchment paper, leaving some space between them. Bake in the preheated oven for 10-12 minutes or until the edges are lightly golden. Keep an eye on them; you want them to be just set, not too dark!
- Cool and decorate: Once baked, let the cookies cool on the baking sheet for a few minutes before transferring them to a wire rack to cool completely. Once cooled, it’s time to unleash your creativity! Decorate with royal icing and food coloring to bring those spring designs to life!
And there you have it! Follow these steps, and your kitchen will be filled with the sweet aroma of freshly baked *spring decorated cookies*. Enjoy the process and let your creativity shine while decorating!
Tips for Success
To ensure your *spring decorated cookies* turn out perfect every time, here are some of my favorite pro tips:
- Chill the dough: Don’t skip the chilling step! It’s essential for keeping your cookies from spreading too much while baking, resulting in beautifully shaped treats.
- Use quality food coloring: When decorating, opt for gel food coloring instead of liquid. Gel colors provide vibrant hues without altering the consistency of your royal icing.
- Let icing dry completely: After decorating, give your cookies plenty of time to dry. I usually leave them out for at least 6 hours or overnight before stacking them. This way, you won’t end up with smudged designs!
- Experiment with flavors: Feel free to add a hint of lemon or almond extract to the cookie dough for an extra burst of flavor that pairs beautifully with the royal icing.
With these tips in your back pocket, you’ll be well on your way to creating stunning and delicious *spring decorated cookies*!
Variations of Spring Decorated Cookies
Once you’ve mastered the basics of *spring decorated cookies*, the fun really begins with decorating and flavoring! Here are some creative ideas to personalize your cookies:
- Flavor Infusions: Try adding lemon zest or almond extract to the dough for a refreshing twist. These flavors harmonize beautifully with the sweet royal icing!
- Seasonal Sprinkles: Top your decorated cookies with pastel-colored sprinkles or edible glitter to give them an extra festive touch that captures the essence of spring.
- Unique Shapes: Use cookie cutters in different spring-themed designs like butterflies, flowers, or even raindrops to create a delightful assortment. Each shape can inspire a new decoration theme!
- Chocolate Drizzle: After icing, drizzle some melted chocolate over the cookies for a rich contrast that adds both flavor and visual appeal.
Feel free to mix and match these ideas to create your own signature *spring decorated cookies*! Let your imagination run wild, and enjoy the creative process!
Equipment Needed
To whip up these delightful *spring decorated cookies*, you’ll need a few essential tools that will make your baking experience smooth and enjoyable. Here’s what I recommend having on hand:
- Mixing bowls: A set of various sizes will help you mix your dry and wet ingredients comfortably.
- Hand mixer or stand mixer: This will make creaming the butter and sugar a breeze!
- Baking sheets: Use sturdy, rimmed baking sheets lined with parchment paper to prevent sticking.
- Cookie cutters: Grab a selection of spring-themed shapes like flowers, bunnies, and eggs to make your cookies extra festive.
- Rolling pin: A good rolling pin is essential for rolling out your dough to the perfect thickness.
- Wire rack: This is great for cooling your cookies after baking, ensuring they don’t get soggy.
With these tools in your kitchen arsenal, you’ll be well-prepared to create beautiful and tasty *spring decorated cookies* that everyone will love!
Nutritional Information
When you indulge in one of these delightful *spring decorated cookies*, it’s nice to know what you’re treating yourself to! Here’s the estimated nutritional information per cookie:
- Calories: 120
- Fat: 5g
- Sugar: 10g
- Protein: 1g
Keep in mind that these numbers are estimates and can vary based on specific ingredients and portion sizes. Enjoy these cookies as a sweet treat during your spring celebrations, and remember—it’s all about balance and joy in the kitchen!
FAQ Section
As you embark on your journey to create these *spring decorated cookies*, you might have a few questions along the way. Don’t worry, I’ve got you covered! Here are some common inquiries that pop up, along with my best answers:
How should I store my cookies?
To keep your *spring decorated cookies* fresh, store them in an airtight container at room temperature. They’ll stay delicious for about a week. If you want to keep them longer, you can freeze them! Just make sure to separate layers with parchment paper before freezing to prevent sticking.
What’s the best way to decorate with royal icing?
When using royal icing for decorating, it’s best to start with a thicker consistency for outlining your designs and then thin it out slightly for flooding the cookies. A good tip is to let your icing dry completely between layers to avoid smudging. Practice makes perfect, so don’t be afraid to experiment with different techniques!
Can I substitute ingredients in this recipe?
Absolutely! If you’re looking for gluten-free options, you can use a 1:1 gluten-free flour blend instead of all-purpose flour. For a dairy-free version, swap the butter for a plant-based alternative. Just keep in mind that these substitutions may slightly alter the texture.
With these tips in mind, you’re all set to tackle any challenges while making your beautiful *spring decorated cookies*! Happy baking!
Why You’ll Love This Recipe
- Quick and Easy: With just a few simple steps, you can whip up a batch of delightful cookies in no time!
- Perfect for Spring Celebrations: These colorful cookies are ideal for Easter, spring picnics, or any festive gathering.
- Creative Outlet: Decorating with royal icing allows everyone, from kids to adults, to express their artistic flair!
- Customizable: You can easily adjust flavors and designs, making each batch uniquely yours!
- Family Fun: Baking and decorating together creates cherished memories that last a lifetime.

Spring Decorated Cookies: 5 Joyful Recipes to Try Today
- Total Time: 1 hour
- Yield: 24 cookies 1x
- Diet: Vegetarian
Description
Colorful cookies decorated for spring.
Ingredients
- 2 cups all-purpose flour
- 1/2 teaspoon baking powder
- 1/4 teaspoon salt
- 1/2 cup unsalted butter, softened
- 1 cup granulated sugar
- 1 egg
- 1 teaspoon vanilla extract
- Royal icing
- Food coloring
Instructions
- Preheat the oven to 350°F (175°C).
- In a bowl, mix flour, baking powder, and salt.
- In another bowl, cream butter and sugar until light.
- Add egg and vanilla, mix well.
- Gradually add dry ingredients to wet ingredients.
- Chill dough for 30 minutes.
- Roll out dough and cut into shapes.
- Bake for 10-12 minutes.
- Let cool and decorate with royal icing.
- Add food coloring for spring designs.
Notes
- Use different cookie cutters for variety.
- Let icing dry completely before stacking.
- Store cookies in an airtight container.
- Prep Time: 30 minutes
- Cook Time: 12 minutes
- Category: Dessert
- Method: Baking
- Cuisine: American
Nutrition
- Serving Size: 1 cookie
- Calories: 120
- Sugar: 10g
- Sodium: 50mg
- Fat: 5g
- Saturated Fat: 3g
- Unsaturated Fat: 2g
- Trans Fat: 0g
- Carbohydrates: 15g
- Fiber: 0g
- Protein: 1g
- Cholesterol: 15mg
Keywords: spring decorated cookies


