
Did you know that sourdough starters have been around for thousands of years? They’re one of the oldest forms of leavening agents used in bread making! When I first decided to embark on my sourdough journey, I was a mix of excitement and nervousness. I remember standing in my kitchen, flour dusting my hands, thinking, “What have I gotten myself into?” But let me tell you, creating your own sourdough starter is so much simpler than you’d think. Just flour and water! My first attempt was a bit chaotic—I accidentally left it in a cooler spot, and I was convinced it was a flop. But a little patience and some warm love later, I had my bubbly starter ready to bake with! Trust me, you’ll fall in love with the process and the delicious bread it produces. Let’s dive into this simple sourdough starter recipe and get you started on your own baking adventure!
Ingredients for Sourdough Starter Recipe
Creating your own sourdough starter is incredibly straightforward and requires just two simple ingredients. Here’s what you’ll need:
- 1 cup all-purpose flour: Make sure it’s fresh and free from any additives. This will give your starter the right texture and flavor.
- 1 cup water: It’s best to use filtered or bottled water for optimal results. Tap water can sometimes contain chlorine or other chemicals that might hinder the fermentation process.
That’s it! Just two ingredients that you probably already have in your kitchen. This simplicity is what makes sourdough so accessible and enjoyable—no fancy tools or hard-to-find ingredients!
How to Prepare the Sourdough Starter Recipe
Now that you’ve gathered your ingredients, let’s get started on this exciting journey! Making your sourdough starter is all about patience and a little bit of love. Follow these simple steps, and you’ll be well on your way to bubbly goodness!
Step 1: Combine Flour and Water
Grab a clean glass jar—this is your starter’s cozy home! In the jar, mix 1 cup of all-purpose flour with 1 cup of water. I usually use a fork or a spatula for this; it’s easy to combine everything without creating a mess. Just mix until there are no dry bits left. It should look like a thick, pasty mixture. Trust me, this is where the magic begins!
Step 2: Allow for Airflow
Now, it’s time to cover the jar. But here’s the trick: don’t seal it tight! I like to use a clean cloth or a loose lid to cover it. This allows the air to flow in while keeping out pesky dust. Airflow is super important because wild yeast and bacteria from the environment need to mingle with your mixture. This is what will kickstart the fermentation process!
Step 3: Let it Sit
Let your mixture sit at room temperature for 24 hours. It’s crucial to keep it warm and cozy, ideally around 70°F to 75°F. If your kitchen is too cold, the fermentation might slow down, and we don’t want that! Just think of it as giving your starter a little vacation to ferment and get bubbly.
Step 4: Feeding the Starter
After the first 24 hours, it’s feeding time! Discard half of your starter (don’t worry, this helps keep it balanced). Then, add another 1 cup of flour and 1 cup of water to the remaining mixture. Stir well, cover it loosely again, and let it sit. You’ll want to repeat this feeding process every 24 hours for the next 5 to 7 days. It’s like giving your starter a daily meal to help it grow strong!
Step 5: Observing Growth
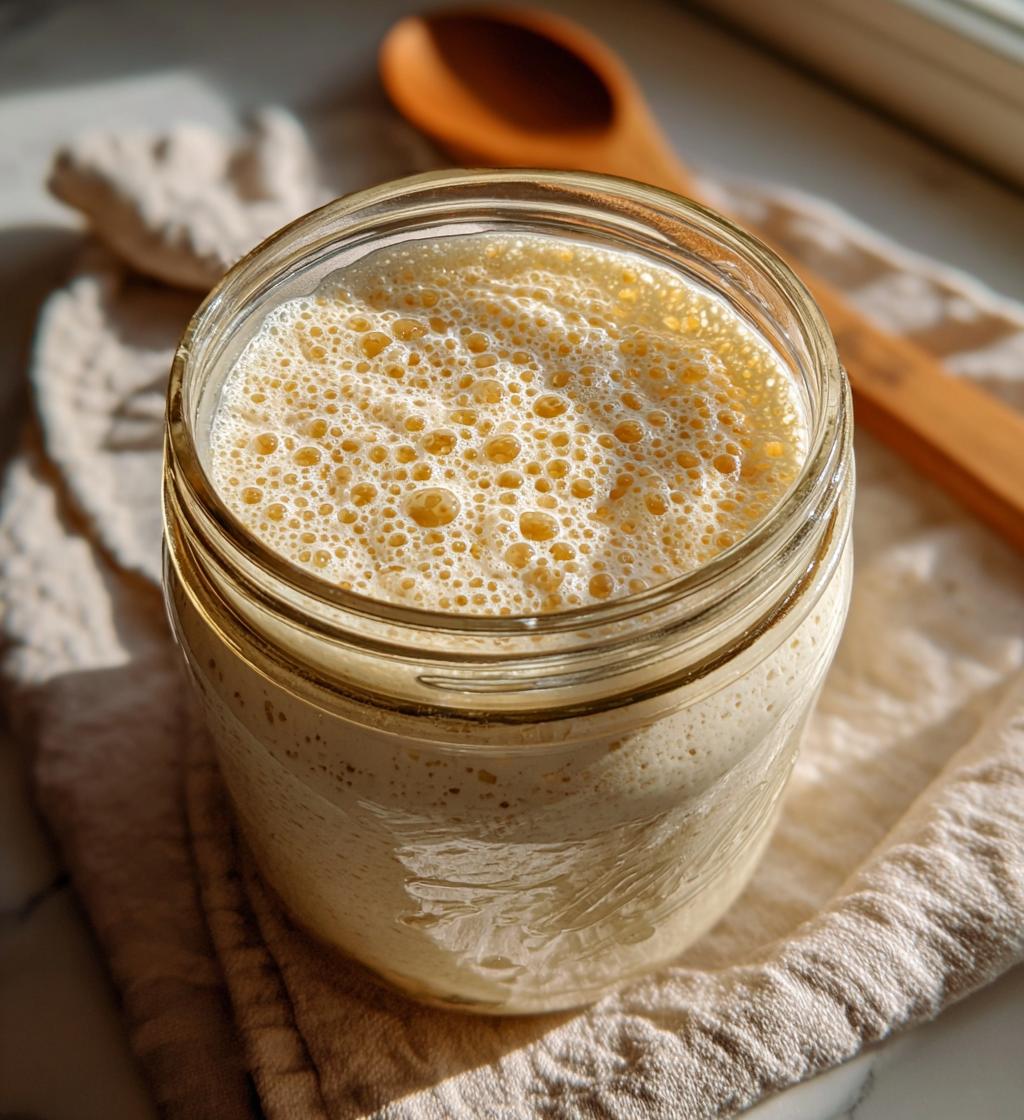
Keep an eye on your starter! After a few days, you should start to see bubbles forming, and it will begin to double in size. This is your sign that the fermentation is working, and your starter is coming to life! Once it’s bubbly and has a pleasant sour aroma, you’re ready to bake. It’s such a rewarding feeling to see your starter thrive!
Tips for Success with Your Sourdough Starter Recipe
Now that you’re on your way to creating your own sourdough starter, let’s make sure it stays healthy and happy! Here are some of my top tips that will help you nurture your starter and keep it bubbling with life.
Use Filtered Water
This one’s a biggie! Always use filtered or bottled water for your starter. Tap water often contains chlorine and other chemicals that can kill off the wild yeast you’re trying to cultivate. Trust me, it’s worth the small effort to ensure your water is as pure as possible for those little yeasties to flourish!
Keep It Warm
Your starter loves warmth! Aim for a cozy spot in your kitchen, ideally around 70°F to 75°F. If it’s too cold, the fermentation process can slow down, and we don’t want that. If your kitchen tends to be on the cooler side, you can place your jar in an oven with the light on or wrap it in a towel to keep it snug.
Be Consistent with Feedings
Stick to a regular feeding schedule! Consistency is key to a thriving starter. Make it part of your daily routine—maybe right after breakfast? This will help create a strong culture. And remember to always discard half of the starter before each feeding to maintain balance between flour and water.
Observe and Adjust
Keep an eye on your starter’s behavior. If it’s rising and falling predictably, you’re on the right track! But if it’s sluggish or not bubbling, you might need to adjust your feeding schedule, the water quality, or the temperature. It’s a bit like having a pet—you get to know its habits and needs!
Don’t Stress Over Mistakes
Oops! If things don’t go as planned, don’t panic. Sourdough starters can be forgiving. If you forget to feed it one day or it looks a little off, just assess it carefully. If it smells sour (but not rotten) and has bubbles, it’s likely still good. Just give it a good feeding, and it should bounce back!
With these tips, you’re setting yourself up for sourdough success! Remember, the journey of making your starter is just as rewarding as the baking itself. Enjoy every bubbly moment!
Nutritional Information
Let’s take a moment to look at the estimated nutritional data for your homemade sourdough starter. Keep in mind that these values are approximate and can vary based on the specific ingredients and amounts used. Here’s what you can expect per tablespoon of your starter:
- Calories: 30
- Fat: 0g
- Protein: 1g
- Carbohydrates: 7g
- Sugar: 0g
- Sodium: 0mg
- Fiber: 0g
- Cholesterol: 0mg
These numbers give you a good idea of what you’re working with, but remember, the real magic happens when you bake that starter into a loaf of delicious sourdough bread! The nutrition can change quite a bit once you start making those lovely loaves. So, while you’re nurturing your sourdough starter, know that it’s not just a project—it’s the beginning of many tasty adventures in your kitchen!
FAQ About the Sourdough Starter Recipe
As you embark on your sourdough starter journey, you might have a few questions popping up along the way. Don’t worry—I’ve been there! Here are some common questions and answers that will help you feel more confident in nurturing your starter.
How can I tell if my sourdough starter is active?
Great question! You’ll know your starter is active if it has doubled in size, is bubbly, and has a pleasant, slightly tangy aroma. The bubbles indicate that fermentation is happening, which is essential for a healthy starter. If your starter is rising and falling predictably, you’re definitely on the right track!
What should I do if my starter isn’t bubbling?
If your starter isn’t bubbling, it might be too cold or not getting enough food. Make sure it’s in a warm spot, ideally between 70°F to 75°F. Also, double-check that you’re sticking to the feeding schedule. If it’s sluggish, you may want to give it a bit more flour and water during the next feeding to encourage some activity!
How do I store my sourdough starter?
If you plan to bake regularly, keep your starter at room temperature and continue with daily feedings. However, if you need a break, you can store it in the fridge! Just make sure to feed it once a week while it’s stored in there. When you’re ready to use it again, take it out, let it come to room temperature, and feed it a couple of times to revive it.
Can I use tap water for my starter?
It’s best to avoid tap water if you can. Many municipalities add chlorine and other chemicals to tap water, which can hinder the wild yeast you’re trying to cultivate. Using filtered or bottled water is a simple way to ensure your starter has the best chance at thriving!
What should I do if my starter develops an off smell or mold?
While sourdough starters can have a tangy smell, if it starts to smell off or shows signs of mold, it’s best to discard it and start fresh. Always trust your nose! If you notice any unusual colors or fuzz, it’s a sign that something’s gone wrong. But don’t let that discourage you—starting another batch is part of the journey!
These FAQs should help ease your mind as you create your sourdough starter. Remember, every starter has its personality and quirks, and learning to care for it is part of the fun!
Why You’ll Love This Sourdough Starter Recipe
This sourdough starter recipe isn’t just a fun kitchen project—it’s a gateway to a world of delicious baking! Here’s why you’ll absolutely adore making your own starter:
- Easy to make: With just two simple ingredients, anyone can create their own starter at home. If I can do it, so can you!
- Cost-effective: Forget those pricey store-bought starters! You’ll save money by making your own, using ingredients you likely already have in your pantry.
- Base for delicious sourdough bread: Once your starter is bubbling and active, you’re just a step away from baking crusty, tangy sourdough bread that’ll impress your friends and family!
- Contributes to baking skills: Nurturing a sourdough starter helps you understand fermentation and bread-making processes better. It’s like a little science experiment in your kitchen that pays off with scrumptious results!
Trust me, once you dive into the world of sourdough, you’ll wonder how you ever baked without it!
Storage & Reheating Instructions
Storing your sourdough starter properly is key to keeping it healthy and active! Here’s how to do it right:
Storing Your Sourdough Starter
If you’re planning to bake regularly, keep your starter at room temperature. Just remember to feed it daily—this will keep it bubbly and strong! I like to place my jar in a cozy spot on the counter, away from direct sunlight. If life gets busy and you need a break from baking, you can easily store your starter in the fridge.
When storing in the fridge, it’s best to feed it once a week. Just give it a good feeding, cover it loosely, and pop it in the fridge. This way, it will slow down the fermentation process but still stay alive and well. When you’re ready to use it again, take it out and let it come back to room temperature before giving it a couple of feedings to wake it up.
Reviving a Dormant Starter
If your starter has been sitting in the fridge for a while and seems a bit sluggish, don’t worry! It’s totally normal for it to be a little less bubbly after a break. To revive it, take your starter out, let it warm up for a couple of hours, and then feed it as usual with equal parts flour and water. You might need to repeat this feeding process a couple of times over the next few days until it’s back to its bubbly self. Just be patient and give it some love!
And here’s a little tip: if you notice any liquid pooling on top of your starter (often called “hooch”), it’s not a bad sign! Just pour it off before your next feeding. It’s simply a sign that your starter is hungry and needs more food.
With these storage tips, you can keep your sourdough starter thriving for many baking adventures to come! Enjoy the journey, and happy baking!
Print
Sourdough Starter Recipe: 5 Steps to Bubbly Success
- Total Time: 7 days
- Yield: 1 sourdough starter 1x
- Diet: Vegetarian
Description
A simple recipe to create your own sourdough starter from scratch.
Ingredients
- 1 cup all-purpose flour
- 1 cup water
Instructions
- In a clean glass jar, mix the flour and water until combined.
- Cover the jar loosely with a cloth or lid to allow airflow.
- Let the mixture sit at room temperature for 24 hours.
- After 24 hours, feed the starter with another cup of flour and another cup of water.
- Repeat the feeding process every 24 hours for 5 to 7 days until bubbles form and it doubles in size.
Notes
- Use filtered or bottled water for best results.
- Keep the starter in a warm place, ideally around 70°F to 75°F.
- Discard half of the starter before each feeding to maintain balance.
- Prep Time: 5 minutes
- Cook Time: 0 minutes
- Category: Baking
- Method: Fermentation
- Cuisine: American
Nutrition
- Serving Size: 1 tablespoon
- Calories: 30
- Sugar: 0g
- Sodium: 0mg
- Fat: 0g
- Saturated Fat: 0g
- Unsaturated Fat: 0g
- Trans Fat: 0g
- Carbohydrates: 7g
- Fiber: 0g
- Protein: 1g
- Cholesterol: 0mg
Keywords: sourdough starter recipe, homemade sourdough, starter for sourdough


