
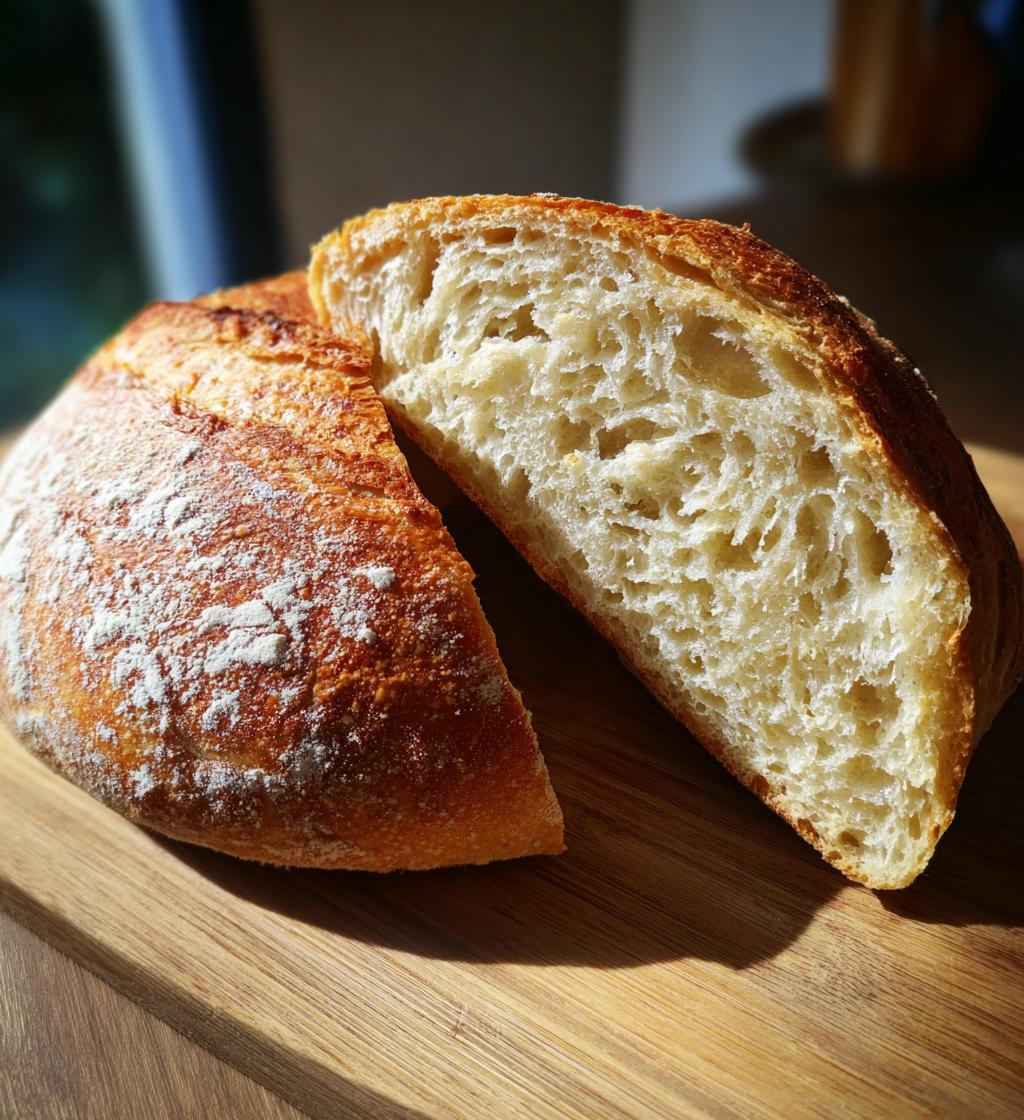
There’s something truly magical about baking your own bread at home, and my absolute favorite is this homemade sourdough sandwich bread! Not only is it incredibly satisfying to create something so delicious from just a few simple ingredients, but the flavor and texture are unmatched. I remember the first time I pulled a fresh loaf out of the oven; the warm, nutty aroma filled my kitchen, and I could hardly wait to slice into it. It’s perfectly crusty on the outside and soft on the inside, making it ideal for sandwiches, toast, or just slathering with butter. What sets this recipe apart is the use of an active sourdough starter, which gives the bread that signature tang and fluffiness. Trust me, once you try making this sourdough sandwich bread, you’ll never want store-bought again!
Ingredients List
To whip up this delightful sourdough sandwich bread, you’ll need just a handful of ingredients, each playing a vital role in creating that perfect loaf:
- 500g bread flour: This is the backbone of your bread, giving it structure and chewiness.
- 350ml water: The hydration level is crucial for a soft, airy texture. You can adjust based on your flour type.
- 100g sourdough starter: Make sure it’s active and bubbly for the best rise and flavor.
- 10g salt: Essential for flavor and controlling the fermentation process.
Gather these ingredients, and you’re ready to dive into the wonderful world of sourdough baking!
How to Prepare Sourdough Sandwich Bread
Now that you have your ingredients ready, let’s dive into the process of making this incredible sourdough sandwich bread! Don’t worry; I’ll guide you through each step, and soon you’ll be rewarded with a beautiful loaf that fills your kitchen with delightful aromas.
Step 1: Mixing the Dough
Start by grabbing a large mixing bowl. Combine the 500g of bread flour and 350ml of water together. Use a sturdy wooden spoon or your hands to mix until everything is just combined. You’re looking for a shaggy, slightly sticky mixture. This is the foundation of your dough!
Step 2: Incorporating the Starter and Salt
Next, it’s time to add the 100g of sourdough starter and 10g of salt. Mix everything together until you can no longer see dry flour. The salt will help enhance the flavor and control fermentation, so make sure to incorporate it well. Get your hands in there; it’s a messy but fun step!
Step 3: Kneading the Dough
Now for the workout! Transfer the dough onto a lightly floured surface and knead it for about 10 minutes. You want a smooth, elastic dough that springs back when you poke it. Don’t rush this step; it’s crucial for developing gluten and that lovely texture.
Step 4: First Rise
Once your dough is kneaded, place it into a greased bowl and cover it with a clean kitchen towel. Let it rise in a warm area for 4-6 hours, or until it has doubled in size. This is where the magic happens; the dough will become light and airy!
Step 5: Shaping the Loaf
After the first rise, gently punch down the dough to release the air. Shape it into a loaf by flattening it slightly, then rolling it tightly from one end to the other. Place it seam-side down in a greased loaf pan. This step is key to getting that lovely shape!
Step 6: Second Rise
Cover your shaped loaf with the towel again and let it rise for another 2-3 hours. This second rise is important as it allows the dough to expand further, making it fluffy and tender. You’ll notice it puffing up beautifully!
Step 7: Baking the Bread
Preheat your oven to 220°C (425°F). Once the dough has risen, pop it into the oven and bake for 30-35 minutes, or until the top is golden brown and sounds hollow when tapped. Your kitchen is about to smell amazing!
Tips for Success
Making the perfect sourdough sandwich bread is all about those little details! Here are my top tips to ensure your loaf turns out beautifully every time:
- Use an active starter: Make sure your sourdough starter is bubbly and has been fed within the last few hours. This will give your bread the best rise and flavor.
- Adjust the water: Depending on your flour and humidity, you might need to tweak the water amount. Start with 350ml, but feel free to add a splash more if the dough feels too dry.
- Be patient: Don’t rush the rising times. The dough needs time to develop those lovely flavors, so if it’s not doubled yet, give it a bit more love.
- Check for doneness: Tap the bottom of the loaf when it’s out of the oven. If it sounds hollow, it’s perfect! If not, pop it back in for a few more minutes.
With these tips, you’ll be a sourdough pro in no time!
Nutritional Information
Here’s the estimated nutritional breakdown for each slice of this delightful homemade sourdough sandwich bread, perfect for those mindful of their diet:
- Calories: 150
- Fat: 1g
- Saturated Fat: 0g
- Trans Fat: 0g
- Carbohydrates: 30g
- Fiber: 2g
- Protein: 5g
- Sodium: 200mg
- Cholesterol: 0mg
- Sugar: 0g
Keep in mind that these values are approximate and can vary based on the specific ingredients you use. Enjoy your delicious bread while being aware of what’s in it!
FAQ Section
Got questions about sourdough sandwich bread? You’re not alone! Here are some common queries I often hear, along with my tried-and-true answers to help you on your baking journey.
What can I use if I don’t have a sourdough starter?
If you don’t have a sourdough starter, don’t fret! You can use store-bought yeast as an alternative. Just mix about 2 teaspoons of active dry yeast with warm water and a bit of sugar to create a quick rise. However, keep in mind that you’ll miss out on that unique tangy flavor sourdough brings!
How long does sourdough sandwich bread last?
This homemade sourdough sandwich bread is best enjoyed fresh, but it can last up to about 3-5 days at room temperature when stored in a paper bag or bread box. Just make sure to keep it away from direct sunlight and moisture to maintain its deliciousness!
Can I freeze sourdough sandwich bread?
Absolutely! Freezing is a great way to preserve your sourdough sandwich bread for later. Just slice the loaf, wrap each slice in plastic wrap, and then place them in a freezer-safe bag. When you’re ready to enjoy, simply take out a slice and toast it directly from the freezer. Yum!
Why You’ll Love This Recipe
- Incredible Flavor: The tangy notes from the sourdough starter create a depth of flavor that store-bought bread simply can’t match.
- Perfect Texture: With a crispy crust and a soft, airy interior, this bread is perfect for sandwiches or toast.
- Simple to Make: Even if you’re new to sourdough, this easy recipe will guide you through each step with confidence.
- Freshness Guaranteed: There’s nothing like the smell of homemade bread filling your kitchen, making every bite a delight!
- Customizable: Feel free to experiment by adding herbs, seeds, or grains for a fun twist on the classic recipe!

Sourdough Sandwich Bread: 7 Steps to Irresistible Flavor
- Total Time: 5 hours
- Yield: 1 loaf 1x
- Diet: Vegetarian
Description
A simple recipe for homemade sourdough sandwich bread.
Ingredients
- 500g bread flour
- 350ml water
- 100g sourdough starter
- 10g salt
Instructions
- In a large bowl, mix the flour and water until combined.
- Add the sourdough starter and salt. Mix until a dough forms.
- Knead the dough for about 10 minutes until smooth.
- Place the dough in a greased bowl and cover. Let it rise for 4-6 hours or until doubled in size.
- Shape the dough into a loaf and place it in a greased loaf pan.
- Cover and let it rise for another 2-3 hours.
- Preheat the oven to 220°C (425°F).
- Bake for 30-35 minutes until golden brown.
- Let it cool before slicing.
Notes
- Use active sourdough starter for best results.
- Adjust water based on humidity and flour type.
- Prep Time: 20 minutes
- Cook Time: 35 minutes
- Category: Bread
- Method: Baking
- Cuisine: American
Nutrition
- Serving Size: 1 slice
- Calories: 150
- Sugar: 0g
- Sodium: 200mg
- Fat: 1g
- Saturated Fat: 0g
- Unsaturated Fat: 0g
- Trans Fat: 0g
- Carbohydrates: 30g
- Fiber: 2g
- Protein: 5g
- Cholesterol: 0mg
Keywords: sourdough sandwich bread, homemade bread, sourdough recipe


