
Oh, let me tell you about these *Oreo cheesecake balls*! They are absolutely divine and unbelievably easy to whip up. Honestly, who can resist the classic combo of Oreos and cream cheese? It’s like the ultimate mash-up of flavors and textures that just makes my taste buds dance with joy. And the best part? No baking involved! Just a few simple steps and you’ll have a delightful treat that’s perfect for any occasion.
I remember the first time I made these for a family gathering. I was a little nervous, but once I saw everyone’s faces light up after taking their first bite, I knew I had struck gold! The creamy, rich filling paired with that satisfying chocolate coating is something you’ll want to share with everyone. Trust me, these little bites of heaven are bound to become a favorite in your dessert repertoire!
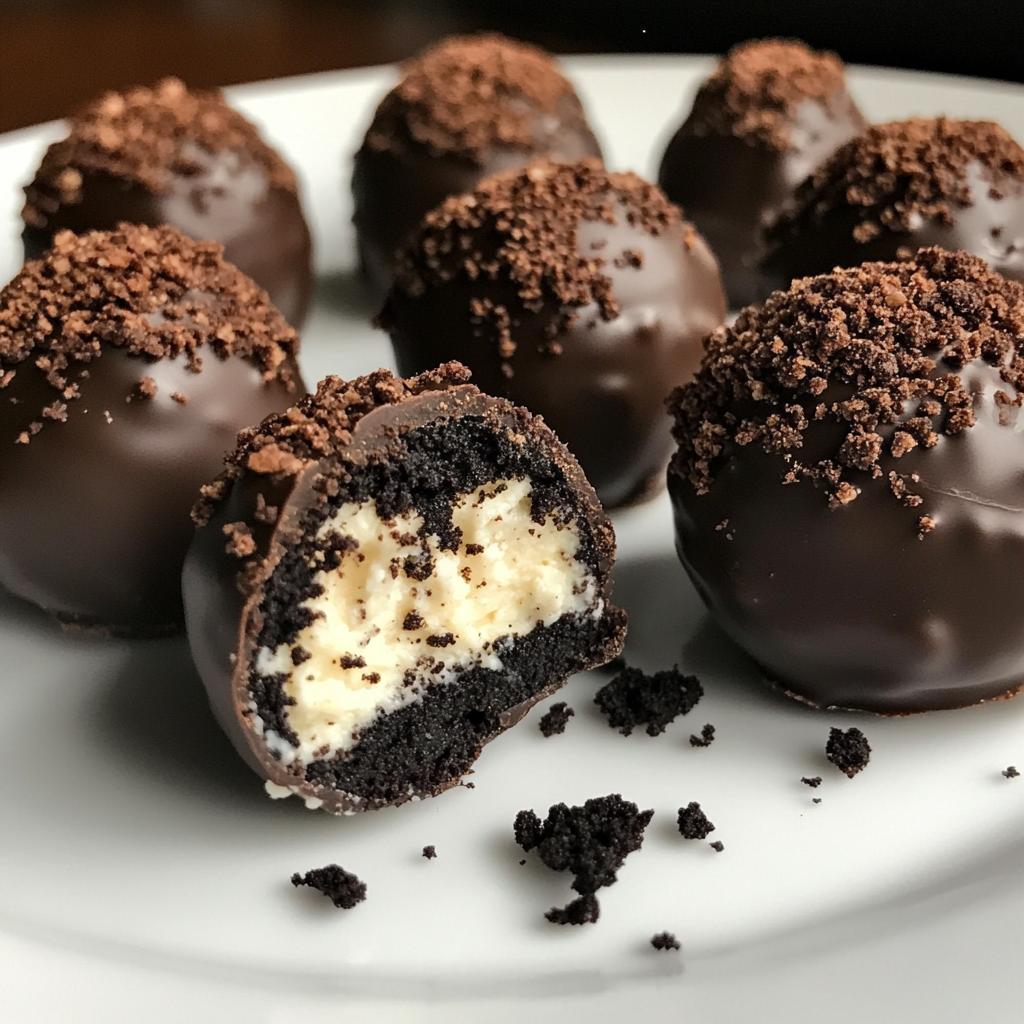
Ingredients for Oreo Cheesecake Balls
Gather these simple ingredients to create your scrumptious *Oreo cheesecake balls*:
- 1 package Oreo cookies (approximately 36 cookies) – You’ll want the classic Oreos for that perfect balance of chocolate and cream.
- 8 oz cream cheese, softened – Make sure it’s softened to room temperature so it blends beautifully with the crushed Oreos.
- 1 cup chocolate chips – Choose your favorite chocolate chips for the coating; I love semi-sweet for that rich flavor!
How to Prepare Oreo Cheesecake Balls
Now that you have your ingredients ready, let’s dive into the fun process of making these *Oreo cheesecake balls*! It’s super straightforward, and I promise you’ll be snacking on these little delights in no time.
Step-by-Step Instructions
- Crush the Oreos: Start by placing the Oreo cookies in a food processor. Pulse them until you have fine crumbs. Don’t worry if you have a few larger pieces; they’ll mix in just fine!
- Mix with cream cheese: In a large bowl, combine the crushed Oreos with the softened cream cheese. Use a spatula or your hands to mix until everything is well blended. You want a uniform dough-like texture, so make sure there are no dry patches!
- Roll into balls: Now, it’s time to get your hands a bit messy! Take small portions of the mixture and roll them into bite-sized balls, about 1 inch in diameter. Place them on a baking sheet lined with parchment paper.
- Chill the balls: Pop the baking sheet in the refrigerator for about 30 minutes. This chilling time helps firm up the balls, making them easier to dip in chocolate later.
- Melt the chocolate: While the balls are chilling, melt your chocolate chips. You can do this in a microwave-safe bowl, heating in 30-second intervals and stirring in between until smooth. Be careful not to overheat it!
- Dip the balls: Once the balls are chilled and firm, take each one and dip it into the melted chocolate. Make sure to coat them completely for that delicious chocolate shell. Use a fork to lift them out, letting any excess chocolate drip off.
- Return to the baking sheet: Place the chocolate-covered balls back on the parchment-lined baking sheet. If you want to get fancy, sprinkle some crushed Oreos on top before the chocolate sets!
- Refrigerate until set: Finally, return the baking sheet to the fridge and let the chocolate set completely. This usually takes about 15-20 minutes.
And just like that, you’ve got a batch of *Oreo cheesecake balls* ready to impress your friends and family! They’re so good, you might want to keep a few for yourself!
Why You’ll Love This Recipe
- Quick and Easy: You can whip these up in just 20 minutes of prep time! With no baking involved, they’re perfect for those last-minute dessert cravings.
- No-Bake Delight: Who doesn’t love a no-bake dessert? These *Oreo cheesecake balls* are ideal for hot summer days or when you just want to skip the oven.
- Fun for Everyone: Kids and adults alike will adore these little treats. They’re a hit at parties, picnics, or just for a cozy movie night at home.
- Customizable: Feel free to get creative! You can mix in different flavors or toppings, making it easy to adapt for any occasion.
- Perfectly Indulgent: With that creamy cheesecake filling and a rich chocolate coating, these bites are a sweet escape with every delicious mouthful!
Tips for Success
Want to make sure your *Oreo cheesecake balls* turn out absolutely perfect? Here are some of my top tips that guarantee success every time!
Chill Time is Key
Don’t skip the chilling step! It may seem like a hassle, but letting the balls chill for at least 30 minutes really helps them firm up. This makes them way easier to dip in chocolate without falling apart. Plus, it gives the flavors time to meld together beautifully!
Melting Chocolate Like a Pro
When it comes to melting your chocolate chips, patience is your best friend. Heat them in 30-second intervals in the microwave, stirring each time until smooth. This prevents burning and ensures a silky coating. If you find the chocolate gets too thick, just add a teaspoon of vegetable oil to thin it out!
Get Creative with Coatings
While I love a classic chocolate coating, don’t be afraid to experiment! Try using white chocolate, dark chocolate, or even colored candy melts for a fun twist. You can also roll the balls in crushed nuts, sprinkles, or coconut flakes for an extra crunch!
Fresh Ingredients Matter
Using fresh cream cheese and new packages of Oreos makes a difference in flavor and texture. Stale ingredients can lead to a lackluster taste, so make sure everything is fresh for that rich, creamy goodness!
Have Fun with Shapes
If you’re feeling creative, try forming the mixture into different shapes! Instead of traditional balls, you can make little squares or even hearts for special occasions. Just adjust the chilling time as needed.
With these tips in your back pocket, you’ll be well on your way to creating the most delightful *Oreo cheesecake balls* your friends and family will rave about! Happy snacking!
Variations on Oreo Cheesecake Balls
Once you’ve mastered the classic *Oreo cheesecake balls*, you might find yourself wanting to mix things up a bit! The great thing about this recipe is its versatility. Here are some fun and delicious variations to get your creative juices flowing:
Different Cookie Bases
Sure, Oreos are iconic, but why stop there? You can switch things up by using other types of cookies for the base! Here are a few ideas:
- Chocolate Chip Cookies: Use crushed chocolate chip cookies for a sweet and gooey twist. The creaminess of the cheesecake filling pairs perfectly with those little bursts of chocolate.
- Golden Oreos: For a lighter flavor, try using Golden Oreos. They provide a lovely vanilla base that’s both sweet and subtly decadent.
- Peanut Butter Cookies: If you’re a peanut butter lover, crushed peanut butter cookies will add a nutty, rich flavor that complements the cheesecake beautifully!
Flavor Add-Ins
Want to take your cheesecake balls to the next level? Try adding some flavoring extracts or mix-ins into the cream cheese filling:
- Mint Extract: A few drops of mint extract will give you a refreshing mint chocolate flavor that’s perfect for the holidays!
- Vanilla Extract: Adding vanilla extract can enhance the creaminess and make the flavor even richer. It’s a simple touch that makes a big difference!
- Cocoa Powder: For a deep chocolate flavor, mix a couple of tablespoons of unsweetened cocoa powder into the cream cheese mixture.
Coating Alternatives
While chocolate is a classic choice, don’t be afraid to get creative with your coatings:
- White Chocolate: Drizzle or dip in white chocolate for a sweet and creamy alternative. You can also add a bit of food coloring for a fun pop!
- Crushed Nuts: Roll the balls in chopped nuts like almonds or walnuts after dipping in chocolate for a delightful crunch.
- Sprinkles or Coconut Flakes: For a festive touch, coat your cheesecake balls in colorful sprinkles or shredded coconut. They’ll look as good as they taste!
These variations can add a whole new dimension to your *Oreo cheesecake balls*, making them even more fun to create and share! So, don’t hesitate to experiment and come up with your own favorite combinations. The possibilities are endless, and I can’t wait to hear what you come up with!
Storage & Reheating Instructions
After making your delicious *Oreo cheesecake balls*, you might have a few leftovers (if you’re lucky!). Here’s how to store them properly so they stay fresh and tasty:
Storing Your Cheesecake Balls
To keep your *Oreo cheesecake balls* at their best:
- Refrigerate: Place the balls in an airtight container, layering them with parchment paper to prevent sticking. They’ll stay fresh in the fridge for up to a week.
- Freeze for Longer Life: If you want to keep them for a longer period, you can freeze them! Just make sure they are fully set, then place them in a single layer on a baking sheet in the freezer until firm. After that, transfer them to a freezer-safe container or bag. They can last up to 3 months in the freezer.
Reheating (if needed)
Now, these little bites are best enjoyed cold, but if you happen to freeze them and want to enjoy them warm, here’s how:
- Thawing: Simply take the frozen *Oreo cheesecake balls* out of the freezer and let them thaw in the fridge for a few hours before serving. This helps them regain their original texture.
- Warming Up: If you want a little warmth, you can microwave them for about 10-15 seconds. Just be careful not to overheat them, or they might lose that creamy goodness!
By following these storage tips, you can enjoy your *Oreo cheesecake balls* for days to come, keeping that delightful flavor intact. Happy snacking!
Nutritional Information Disclaimer
Just a little note about the nutritional information for these *Oreo cheesecake balls*: the values can vary quite a bit based on the specific ingredients and brands you choose. So, while I’ve provided estimates for calories, fat, sugar, and other nutrients, keep in mind that they’re not set in stone. Always check your labels for the most accurate information! Enjoy these treats while being mindful of your dietary needs!
FAQ Section
Q1. Can I make *Oreo cheesecake balls* ahead of time?
Absolutely! In fact, these little treats are perfect for making ahead of time. You can prepare them a day or two in advance and store them in the refrigerator until you’re ready to serve. Just be sure to keep them in an airtight container to maintain their freshness!
Q2. How do I keep my chocolate coating smooth?
To achieve that smooth, glossy finish on your chocolate coating, make sure you melt the chocolate gently. Heat it in 30-second intervals in the microwave, stirring in between. If it gets too thick, add a teaspoon of vegetable oil to help thin it out. This trick will keep your chocolate silky and easy to work with!
Q3. Can I use other cookies instead of Oreos?
Definitely! While Oreos are classic, you can get creative with different cookies. Chocolate chip cookies, Golden Oreos, or even peanut butter cookies work wonderfully. Just remember, the flavor of the cookie will influence the final taste, so choose ones you love!
Q4. What’s the best way to serve *Oreo cheesecake balls*?
These treats are delightful served chilled! You can place them on a pretty platter for parties, or keep them in a fun container for movie nights. They also make great additions to dessert tables or as party favors. Just be prepared for everyone to ask for seconds!
Q5. How long do *Oreo cheesecake balls* last in the fridge?
When stored properly in an airtight container, your *Oreo cheesecake balls* will stay fresh for up to a week in the refrigerator. If you want to keep them longer, consider freezing them for up to 3 months. Just remember to thaw them in the fridge before enjoying!

Oreo Cheesecake Balls: 7 Irresistible Delights
- Total Time: 50 minutes
- Yield: 24 balls 1x
- Diet: Vegetarian
Description
Oreo cheesecake balls are a delicious no-bake dessert made with crushed Oreos and cream cheese.
Ingredients
- 1 package Oreo cookies (approximately 36 cookies)
- 8 oz cream cheese, softened
- 1 cup chocolate chips
Instructions
- Crush Oreos in a food processor until fine crumbs form.
- Mix crushed Oreos with softened cream cheese until well combined.
- Roll the mixture into small balls and place on a baking sheet.
- Chill the balls in the refrigerator for 30 minutes.
- Melt chocolate chips in a microwave-safe bowl.
- Dip each chilled ball into the melted chocolate, covering completely.
- Return the chocolate-covered balls to the baking sheet.
- Refrigerate until the chocolate sets.
Notes
- For a decorative touch, sprinkle crushed Oreos on top before the chocolate sets.
- Store leftovers in the refrigerator.
- Prep Time: 20 minutes
- Cook Time: 0 minutes
- Category: Dessert
- Method: No-bake
- Cuisine: American
Nutrition
- Serving Size: 1 ball
- Calories: 120
- Sugar: 10g
- Sodium: 50mg
- Fat: 7g
- Saturated Fat: 4g
- Unsaturated Fat: 2g
- Trans Fat: 0g
- Carbohydrates: 14g
- Fiber: 1g
- Protein: 2g
- Cholesterol: 15mg
Keywords: oreo cheesecake balls, dessert, no-bake dessert, easy recipes


