

There’s something magical about waking up to the smell of maple walnut scones baking in the oven – that sweet, nutty aroma filling the kitchen just makes the whole house feel cozier. I first fell in love with this recipe on a crisp autumn morning when my neighbor brought over a batch still warm from her oven. That first bite won me over completely – the flaky layers shattering to reveal tender crumbs, the rich maple flavor mingling with toasty walnuts in every bite. Now these scones are my go-to when I want to treat myself (or impress weekend guests). They’re simple enough for beginner bakers but special enough to feel like a real indulgence.
Why You’ll Love These Maple Walnut Scones
Trust me, once you try these, they’ll become your new weekend staple. Here’s why:
- That perfect texture: Flaky layers that shatter, with a tender crumb inside – just like your favorite bakery scones, but homemade!
- Not too sweet: The pure maple syrup gives just the right amount of caramel-like sweetness without overpowering the toasty walnuts.
- Easy does it: No fancy equipment needed – just a bowl, a pastry cutter (or even your fingers), and about 30 minutes from start to golden-brown finish.
- Smells like heaven: Your kitchen will smell like a Vermont sugar shack while these bake. Bonus: the aroma alone will get everyone out of bed!
Ingredients for Maple Walnut Scones
Gathering the right ingredients makes all the difference with scones – trust me, I’ve learned this through many (many) batches! Here’s exactly what you’ll need, organized so you can prep like a pro:
- Dry Team: 2 cups all-purpose flour (spoon & level it!), 1/4 cup granulated sugar, 1 tbsp baking powder (yes, a full tablespoon – it’s not a typo!), 1/2 tsp salt
- Star Players: 1/2 cup COLD unsalted butter, cubed (I pop mine in the freezer for 15 minutes first), 1/2 cup chopped walnuts (toast them for extra flavor if you’re feeling fancy)
- Wet Wonders: 1/4 cup pure maple syrup (the real stuff – pancake syrup won’t give the same depth), 1/2 cup heavy cream, 1 large egg, 1 tsp vanilla extract
See how I grouped them? This way you can whisk the dry, mix the wet, and bring them together without running around the kitchen. Pro tip: measure everything before starting – scone dough waits for no one!
How to Make Maple Walnut Scones
Okay, let’s get to the fun part – making these beauties! I’ve made this recipe so many times I could probably do it in my sleep, but I’ll walk you through each step carefully. The key is keeping everything cold and not overworking the dough – promise me you’ll resist the urge to keep mixing!
- Preheat your oven to 400°F (200°C) right away – we want it nice and hot when our scones go in. Line a baking sheet with parchment paper (trust me, you don’t want to skip this – nobody likes stuck scones!).
- Whisk together the dry ingredients in a large bowl: flour, sugar, baking powder, and salt. Give it a good whisk to distribute everything evenly – no one wants a bite with too much baking powder, yuck!
- Cut in the cold butter using a pastry cutter or two knives (I sometimes just use my fingers when I’m feeling impatient). You want pea-sized crumbs throughout – some bigger flakes are okay though! This is what creates those wonderful flaky layers.
- Stir in the walnuts gently – just enough to distribute them evenly. I like to save a few pieces to press into the tops before baking for that pretty, rustic look.
- In another bowl, whisk together the maple syrup, cream, egg, and vanilla until smooth. Make a well in the center of your dry ingredients and pour this in.
- Stir gently just until the dough comes together – it will be shaggy and might look a bit dry at first. That’s perfect! Overmixing is the enemy of tender scones.
Shaping and Baking the Scones
Turn the dough out onto a lightly floured surface and gently pat it into a 1-inch thick circle – no rolling pin needed! Use a sharp knife to cut into 8 wedges (like a pizza). Arrange them on your prepared baking sheet, leaving some space between each. Bake for 15-18 minutes until they’re beautifully golden with slightly darker edges. That heavenly maple aroma will tell you when they’re done before the timer does!
Expert Tips for Perfect Maple Walnut Scones
After burning through more batches than I’d care to admit, I’ve picked up some foolproof tricks that’ll make your scones bakery-perfect every time:
- Butter is everything: I actually freeze my cubed butter for 10 minutes before starting – those ice-cold bits create steam pockets during baking for the flakiest layers imaginable.
- Chill before baking: If you’ve got time, pop the shaped scones in the fridge for 15 minutes before baking. This relaxes the gluten and gives you that perfect rise.
- Egg wash magic: For that gorgeous golden sheen, brush the tops with a beaten egg mixed with a teaspoon of cream before baking – just don’t let it drip down the sides!
- The squeeze test: When mixing, the dough should hold together when squeezed – if it’s crumbly, add cream 1 tablespoon at a time until it just comes together.
Remember: scones forgive most mistakes, but they’ll never forgive overmixing! When in doubt, walk away from the bowl.
Ingredient Substitutions and Variations
Don’t have walnuts? No problem! Pecans make a fabulous substitute – they’ve got that same toasty crunch. For nut-free versions, try toasted pumpkin seeds or just leave them out (the maple flavor will shine even more). Out of maple syrup? Honey works in a pinch, though it’ll taste more floral than woodsy. Just promise me one thing – never skip the cold butter! That’s the secret to flaky layers. And if you’re feeling adventurous, add a sprinkle of cinnamon or orange zest to the dough for a fun twist.
Serving and Storing Maple Walnut Scones
Oh, you’ve gotta try these warm from the oven – the butter practically melts into those flaky layers! I always split mine open and let a pat of good butter melt right in. If you’ve got leftovers (unlikely!), pop them in an airtight container for up to 2 days. Want to get ahead? Freeze the unbaked wedges on a tray, then bag them – you can bake straight from frozen, just add a few extra minutes. Perfect for lazy Sunday mornings when you’re still in your pajamas!
Maple Walnut Scones Nutritional Information
Here’s the scoop on what’s in these tasty treats (but remember – estimates vary based on your exact ingredients): Each scone packs about 320 calories, with 18g fat (9g saturated), 35g carbs, and 5g protein. Not bad for something that tastes this indulgent!
FAQs About Maple Walnut Scones
I’ve gotten so many questions about these scones over the years – here are the ones that pop up most often with my tried-and-true answers!
Can I use milk instead of heavy cream?
You can, but your scones won’t be quite as tender. The extra fat in cream makes all the difference! If you must substitute, use whole milk and add an extra tablespoon of cold butter to the dry ingredients.
Why did my scones turn out dense?
Oh honey, you probably overmixed the dough! Scones need a light touch – mix just until the dough comes together. Also, check your baking powder isn’t expired (I’ve made that mistake before).
Can I freeze the baked scones?
Absolutely! Let them cool completely, then freeze in an airtight bag for up to 3 months. Reheat straight from frozen at 350°F for 10 minutes – they’ll taste fresh-baked!
My dough is too sticky – help!
No worries! Just sprinkle a little extra flour on your hands and work surface. Remember – it’s better to have slightly sticky dough than overwork it trying to fix it.
Share Your Maple Walnut Scones Experience
I’d love to see your scone masterpieces! Snap a pic and tag me on Instagram – nothing makes me happier than seeing your golden-brown creations. Don’t forget to leave a comment below telling me how yours turned out!
Print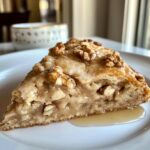
Irresistible Maple Walnut Scones for Blissful Mornings
- Total Time: 33 minutes
- Yield: 8 scones 1x
- Diet: Vegetarian
Description
Enjoy these delicious maple walnut scones, perfect for breakfast or a snack. They are lightly sweetened with maple syrup and packed with crunchy walnuts.
Ingredients
- 2 cups all-purpose flour
- 1/4 cup granulated sugar
- 1 tbsp baking powder
- 1/2 tsp salt
- 1/2 cup cold unsalted butter, cubed
- 1/2 cup chopped walnuts
- 1/4 cup pure maple syrup
- 1/2 cup heavy cream
- 1 large egg
- 1 tsp vanilla extract
Instructions
- Preheat oven to 400°F (200°C). Line a baking sheet with parchment paper.
- In a large bowl, whisk together flour, sugar, baking powder, and salt.
- Cut in cold butter using a pastry cutter until the mixture resembles coarse crumbs.
- Stir in chopped walnuts.
- In a separate bowl, mix maple syrup, heavy cream, egg, and vanilla extract.
- Pour wet ingredients into dry ingredients and stir until just combined.
- Turn dough onto a floured surface and shape into a 1-inch thick circle.
- Cut into 8 wedges and transfer to the prepared baking sheet.
- Bake for 15–18 minutes until golden brown.
- Let cool slightly before serving.
Notes
- Use cold butter for flaky scones.
- Do not overmix the dough to avoid toughness.
- Store leftovers in an airtight container for up to 2 days.
- Prep Time: 15 minutes
- Cook Time: 18 minutes
- Category: Breakfast
- Method: Baking
- Cuisine: American
Nutrition
- Serving Size: 1 scone
- Calories: 320
- Sugar: 12g
- Sodium: 220mg
- Fat: 18g
- Saturated Fat: 9g
- Unsaturated Fat: 7g
- Trans Fat: 0g
- Carbohydrates: 35g
- Fiber: 1g
- Protein: 5g
- Cholesterol: 55mg
Keywords: maple walnut scones, breakfast scones, easy scone recipe


