

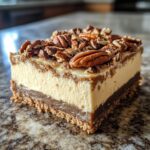
Let me tell you about my obsession with these maple pecan cheesecake bars – they’re the perfect blend of rich, creamy, and crunchy that’ll have everyone begging for the recipe. I first made them for a family reunion last fall, and now they’ve become our must-have dessert for every gathering. The magic is in that dreamy combination of real maple syrup and toasted pecans, which gives these bars their signature sweet-nutty flavor. After testing countless versions (my neighbors were very willing taste-testers!), I’ve perfected the balance between the buttery crust, smooth cheesecake layer, and that irresistible pecan topping. What I love most? They come together with just a few simple ingredients but taste like you spent all day in the kitchen.
Why You’ll Love These Maple Pecan Cheesecake Bars
Let me count the ways these bars will become your new favorite dessert – trust me, I’ve had plenty of experience convincing people (my brother ate four at Thanksgiving and still asked to take some home). Here’s what makes them so special:
- That perfect texture contrast – the crunchy pecans on top give way to creamy cheesecake, all sitting on a buttery graham cracker base. Every bite is pure happiness.
- Not too sweet, not too rich – the maple syrup adds just the right amount of sweetness without overpowering, while the pecans bring that earthy balance. Even my ‘I don’t like desserts’ uncle asks for seconds.
- Easy enough for weeknights, fancy enough for parties – you probably have most ingredients already, and the simple steps mean you can whip these up whenever the craving hits (or when you need an impressive last-minute dessert).
- No-bake crust option – if you’re really in a hurry, skip baking the crust (just chill it for 30 minutes instead). I’ve done this for emergency dessert situations, and no one could tell the difference!
Ingredients for Maple Pecan Cheesecake Bars
Gathering your ingredients is the first step to cheesecake bliss – and I promise, you won’t need anything fancy. Here’s everything you’ll need, broken down so you can measure as you go (my method to avoid forgetting anything mid-recipe!):
For the Crust:
- 1 1/2 cups graham cracker crumbs – about 12 full sheets crushed (I use a rolling pin in a zip-top bag – it’s oddly therapeutic)
- 1/4 cup granulated sugar – just enough to sweeten the base without overpowering the maple
- 6 tbsp melted butter – unsalted is best here so you control the saltiness (and trust me, melted is way easier to mix than softened!)
For the Cheesecake Filling:
- 16 oz cream cheese – that’s 2 standard blocks, softened at room temperature for at least 2 hours (cold cream cheese = lumpy filling, and we don’t want that!)
- 1/2 cup maple syrup – use the real stuff! The fake pancake syrup just won’t give you that deep, caramel-like flavor
- 2 large eggs – I crack mine into a separate bowl first to avoid any shell surprises in the batter
- 1 tsp vanilla extract – the good-quality kind makes all the difference here
For the Pecan Topping:
- 1 cup chopped pecans – that’s about 110g if you’re weighing (I like some bigger pieces for extra crunch)
- 1/4 cup packed brown sugar – press it firmly into your measuring cup for accurate sweetness
- 1 tbsp butter, melted – just enough to help the topping clump together beautifully
See? Nothing too crazy – just quality ingredients that work together perfectly. Now let’s get baking!
Equipment You’ll Need
Now let’s talk tools – because having the right equipment makes all the difference between “good enough” and “oh wow, these are incredible!” Here’s what I always pull out when making these maple pecan cheesecake bars:
- 8×8-inch baking pan (not glass!) – metal conducts heat better for that perfect golden crust. Glass can make the bottom soggy, and nobody wants that.
- Parchment paper – my secret weapon for clean removal! Leave some overhang on two sides for easy lifting. No more sad, stuck-on cheesecake bits.
- Electric mixer – a hand mixer works great for the filling. You could use a whisk, but your arm will thank you for the electric help.
- Mixing bowls – I use one medium for the crust and one large for the filling (less cleanup than using multiple small bowls).
- Rubber spatula – essential for scraping every last bit of that delicious filling into the pan. Waste not, want not!
- Measuring cups & spoons – because eyeballing measurements with cheesecake is a dangerous game, my friend.
That’s it! No fancy gadgets needed – just the basics that most home bakers already have. The only specialty item is the parchment paper, and trust me, it’s worth keeping a roll in your pantry just for recipes like this.
How to Make Maple Pecan Cheesecake Bars
Alright, let’s dive into the fun part – making these irresistible maple pecan cheesecake bars! I’ve broken it down into simple steps so you can nail it on your first try. Just follow along, and before you know it, you’ll have a pan of pure deliciousness ready to wow everyone.
Preparing the Crust
First things first – that buttery graham cracker base. Here’s how to get it perfect:
- Preheat your oven to 350°F (175°C) and line that 8×8-inch pan with parchment paper. Pro tip: spray a tiny bit of cooking spray under the parchment to help it stick to the pan.
- Mix your graham cracker crumbs, sugar, and melted butter in a bowl until it looks like wet sand. You’ll know it’s right when you can squeeze a handful and it holds its shape.
- Now for the secret to an even crust: dump the mixture into your prepared pan and use the bottom of a measuring cup to press it down firmly. Start from the center and work outward, applying even pressure. This prevents thick edges and thin centers!
- Pop it in the oven for exactly 10 minutes – this sets the crust so it won’t get soggy later. Let it cool slightly while you make the filling, but don’t let it cool completely – a slightly warm crust helps prevent that gap between crust and filling.
Making the Cheesecake Filling
This is where the magic happens – that creamy, dreamy maple cheesecake layer:
- In your large mixing bowl, beat the softened cream cheese first (all by itself) for about 30 seconds. This breaks it down and ensures no lumps – because lumpy cheesecake is just sad.
- Add the maple syrup gradually while mixing. I pour it in a slow stream as the mixer runs – this helps everything incorporate smoothly.
- Next come the eggs – one at a time, mixing well after each addition. Scrape down the sides of the bowl with your rubber spatula between eggs to make sure everything gets evenly mixed.
- Finish with the vanilla extract and give it one last quick mix. The filling should be completely smooth and pourable, but not runny. If you lift the beaters, it should ribbon off but disappear back into the mixture within a couple seconds.
Adding the Pecan Topping
Now for that glorious crunchy crown:
- In a small bowl, combine your chopped pecans, packed brown sugar, and melted butter. Use a fork to mix gently – you want everything coated but not mushed together. Those pecan pieces should stay distinct for maximum crunch!
- Pour your smooth cheesecake filling over the slightly cooled crust, then sprinkle the pecan mixture evenly over the top. Don’t press it in – let it float naturally so it toasts beautifully in the oven.
- Bake at 350°F for 30-35 minutes. You’ll know it’s done when the edges are set but the center still has a slight jiggle (like Jell-O) when you gently shake the pan. The pecans will be golden and smell amazing.
- Here’s the hardest part – let it cool completely at room temperature, then chill in the fridge for at least 4 hours (overnight is even better). I know it’s tempting to cut in early, but patience gives you those clean, perfect slices!
See? Not complicated at all – just a few careful steps between you and cheesecake perfection. Now let’s talk about how to make these bars absolutely foolproof…
Tips for Perfect Maple Pecan Cheesecake Bars
After making these bars more times than I can count (my waistline can attest to this), I’ve learned all the little tricks that take them from good to “oh my goodness, what is this magic?” Here are my best tips for cheesecake bar success:
- Splurge on real maple syrup – that fake pancake stuff just won’t cut it. Grade A dark amber has the deepest flavor. Once you taste the difference, you’ll never go back – it makes the whole kitchen smell like a Vermont sugar shack!
- Toast your pecans first – just 5 minutes in a 350°F oven deepens their flavor incredibly. Watch them like a hawk though – nuts go from perfectly toasted to burnt in seconds. I’ve learned this the hard way.
- The cream cheese must be SOFT – I leave mine out for at least 2 hours before baking. If you’re in a hurry, cut it into chunks and microwave at 50% power in 15-second bursts, turning between each. No lumps allowed in this kitchen!
- Hot knife trick for clean cuts – run your sharp knife under hot water and wipe dry between each slice. The heat glides through the layers like butter, giving you those bakery-perfect edges. Bonus: licking the knife between cuts is totally allowed.
- Chill time is non-negotiable – I know it’s torture waiting, but that 4-hour chill (or better yet, overnight) lets the flavors meld and the texture set properly. My early attempts at impatient slicing turned into cheesecake soup – not cute.
- Room temp eggs blend better – cold eggs can make the filling separate. I pop mine in warm water for 5 minutes if I forgot to take them out earlier. Your cheesecake will thank you with ultra-smooth texture.
One last pro tip from my many cheesecake experiments: if your pecans start browning too quickly in the oven, tent the pan with foil for the last 10 minutes. This keeps that topping golden instead of blackened – because nobody likes bitter, burnt nuts ruining their dessert bliss!
Variations & Substitutions
Listen, I’m all about sticking to the original recipe (because it’s perfect), but I get it – sometimes you need to mix things up based on what’s in your pantry or dietary needs. Here are my tried-and-true swaps that still deliver amazing results:
- Gluten-free? No problem! Use gluten-free graham crackers or even crushed gluten-free vanilla cookies for the crust. I’ve done this for my celiac friend, and she swore they were better than the original (though I think she was just being nice).
- Out of maple syrup? Honey works beautifully – just use 1/3 cup instead of 1/2 cup since it’s sweeter. The flavor changes, sure, but you’ll still get that lovely golden color and rich sweetness.
- Not a pecan person? Walnuts make a great substitute with their slightly bitter edge. For nut-free versions, try toasted coconut flakes or even crushed pretzels for that salty-sweet crunch.
- Want more decadence? Stir 1/2 cup chocolate chips into the filling or drizzle melted chocolate over the cooled bars. My husband’s “improvement” that I can’t argue with.
- Dairy-free? Use plant-based cream cheese and vegan butter. The texture might be slightly softer, but still delicious – my vegan niece approves!
One substitution I don’t recommend? Skimping on the chilling time. No matter what variations you try, that fridge time is what turns good bars into legendary ones. Trust me on this!
Storing & Serving Maple Pecan Cheesecake Bars
Now that you’ve made these glorious maple pecan cheesecake bars (and resisted eating the entire pan), let’s talk about how to keep them fresh and serve them like a pro. I’ve learned a few tricks through trial and error – mostly error, if we’re being honest!
Storing Your Bars
These bars last beautifully in the fridge for up to 5 days when stored properly. Here’s how I do it:
- Chill completely first – Never cover warm bars! That condensation will make your crust soggy, and we’ve worked too hard for that.
- Use parchment paper – Leave those overhanging edges and use them to lift the whole slab out before cutting. Then store the uncut bars in an airtight container with a paper towel underneath
Storing & Serving Maple Pecan Che
Storing & Serving Maple Pecan Cheesecake Bars
Don’t let those leftovers go to waste! Here’s how I keep my maple pecan cheesecake bars fresh and flavorful for days (because we both know you won’t have leftovers (but just in case…)
- Wrap and Refrigerate After enjoying, promptly store your maple pecan cheesecake bars in the refrigerator to keep that perfect texture. I use an airtight container or wrap mine in plastic wrap so they stay perfect.
- Avoid the freezer (for whole bars)
- Whole bars After cooling completely, wrap individual portions tightly in plastic wrap then aluminum foil before freezing. They’ll stay fresh for weeks in your freezer.
- Serve chilled with a dollop of fresh whipped cream if you are proper cheesecake bar connoisseur, or enjoy them on their own. The minute my fork slides through that layered texture and suddenly “mmm” with caramel syrup drizzle is heaven.
- Calories: 320 per bar (but who’s counting when it’s this good?)
- Fat: 23g (11g saturated) – that rich, creamy texture has to come from somewhere!
- Carbohydrates: 27g (1g fiber, 22g sugar) – thank the maple syrup and graham crackers for that
- Protein: 5g – eggs and cream cheese doing the heavy lifting here
- Sodium: 210mg – not bad for a dessert!
- Cholesterol: 75mg – mostly from those beautiful eggs
- Can I double the recipe? Absolutely! Just use a 9×13-inch pan instead and add 5-10 minutes to the baking time. This batch disappears twice as fast at my house!
- How do I prevent a soggy crust? Pre-bake that graham cracker base fully (10 minutes exactly) and let it cool slightly before adding the filling. This creates a moisture barrier.
- Can I omit the nuts? Sure! Swap in an equal amount of toasted oats or coconut flakes for crunch. My nut-allergic niece loves the oat version with extra cinnamon.
- Why did my filling crack? Probably overbaking or temperature shock. Next time, try a water bath or run a knife around the edges right after baking to release tension.
- Can I use light cream cheese? You can, but the texture won’t be as luxuriously creamy. If you do, add 1 tbsp flour to help stabilize the filling.
- How do I know when they’re done? The edges should be set but the center should still jiggle slightly – it’ll firm up as it chills. Overbaking makes them dry.
- Total Time: 1 hour
- Yield: 12 bars 1x
- Diet: Vegetarian
- 1 1/2 cups graham cracker crumbs
- 1/4 cup granulated sugar
- 6 tbsp melted butter
- 16 oz cream cheese, softened
- 1/2 cup maple syrup
- 2 large eggs
- 1 tsp vanilla extract
- 1 cup chopped pecans
- 1/4 cup brown sugar
- 1 tbsp butter, melted
- Preheat oven to 350°F. Line an 8×8-inch baking pan with parchment paper.
- Mix graham cracker crumbs, sugar, and melted butter. Press into the pan.
- Bake crust for 10 minutes. Let cool slightly.
- Beat cream cheese, maple syrup, eggs, and vanilla until smooth. Pour over crust.
- Combine pecans, brown sugar, and melted butter. Sprinkle over filling.
- Bake for 30-35 minutes until set. Cool completely before cutting.
- Store leftovers in the refrigerator.
- Use room-temperature cream cheese for smoother filling.
- Chill before serving for cleaner slices.
- Prep Time: 15 minutes
- Cook Time: 45 minutes
- Category: Dessert
- Method: Baking
- Cuisine: American
- Serving Size: 1 bar
- Calories: 320
- Sugar: 22g
- Sodium: 210mg
- Fat: 23g
- Saturated Fat: 11g
- Unsaturated Fat: 9g
- Trans Fat: 0g
- Carbohydrates: 27g
- Fiber: 1g
- Protein: 5g
- Cholesterol: 75mg
To Freeze
If you need to freeze, I’ve got you covered with these simple steps:
How Long Do They Last?
These maple pecan cheesecake bars stay good for months when stored properly – but let’s talk shelf life.
At Room Temp
At room temperature, they’ll stay fresh for about 4 hours – though I‘ve kept mine wrapped tightly at room temp for 3 days (they might get a tad less crisp but still delicious.
For the best texture, freeze for up to: 3 months in an airtight container.
Here’s the golden rule – store them in the fridge (bars in single layers with parchment between. I’ve found that plastic wrap (or aluminum foil wrapped in plastic works best to prevent freezer burn. And don’t skimp on the layers – no one likes soggy, thawed crust!
Thawing
When ready to thaw Let me tell you how I keep my Listen, I’ve baked my share of cheesecake bars, and here’s the golden rule – these maple pecan version need time to set their texture and flavors to develop fully. Proper storage makes all the difference between good and OMG-worthy. They’ll last about 2 hours in the fridge but taste better the next day! To maximize their slightly chewy texture and freshness, wrap tightly or pop in an airtight container in the fridge for up to 3 days. For longer storage, you can freeze the pan or individual bars in aluminum foil and plastic wrap. If you’re planning to serve, I love popping them at room temperature, let them sit out for 10 minutes on the counter first, then cut away! Now let’s talk numbers – because while we all know these maple pecan cheesecake bars are worth every delicious calorie, it’s good to know what you’re enjoying! Keep in mind these are estimates based on my exact recipe ingredients – your results might vary slightly depending on brands or substitutions. A little disclaimer from my kitchen to yours: these numbers are calculated per bar using the exact ingredients I listed. If you make substitutions (like low-fat cream cheese or sugar alternatives), your nutrition facts will change. But let’s be real – sometimes you just need to enjoy life’s sweeter moments without overanalyzing! Over the years, I’ve gotten so many questions about these bars – here are the ones that pop up most often with my tried-and-true answers: Still have questions? Just ask! I’ve made every mistake possible with these bars so you don’t have to. Delicious maple pecan cheesecake bars with a buttery crust, creamy filling, and crunchy topping. Keywords: maple pecan cheesecake bars, dessert recipe, easy cheesecake barsServing
Storing Tips from My Kitchen
At Room Temp
For extra crunch and flavor:
Nutrition Information
Common Questions About Maple Pecan Cheesecake Bars
Irresistible Maple Pecan Cheesecake Bars Recipe
Description
Ingredients
Instructions
Notes
Nutrition


