
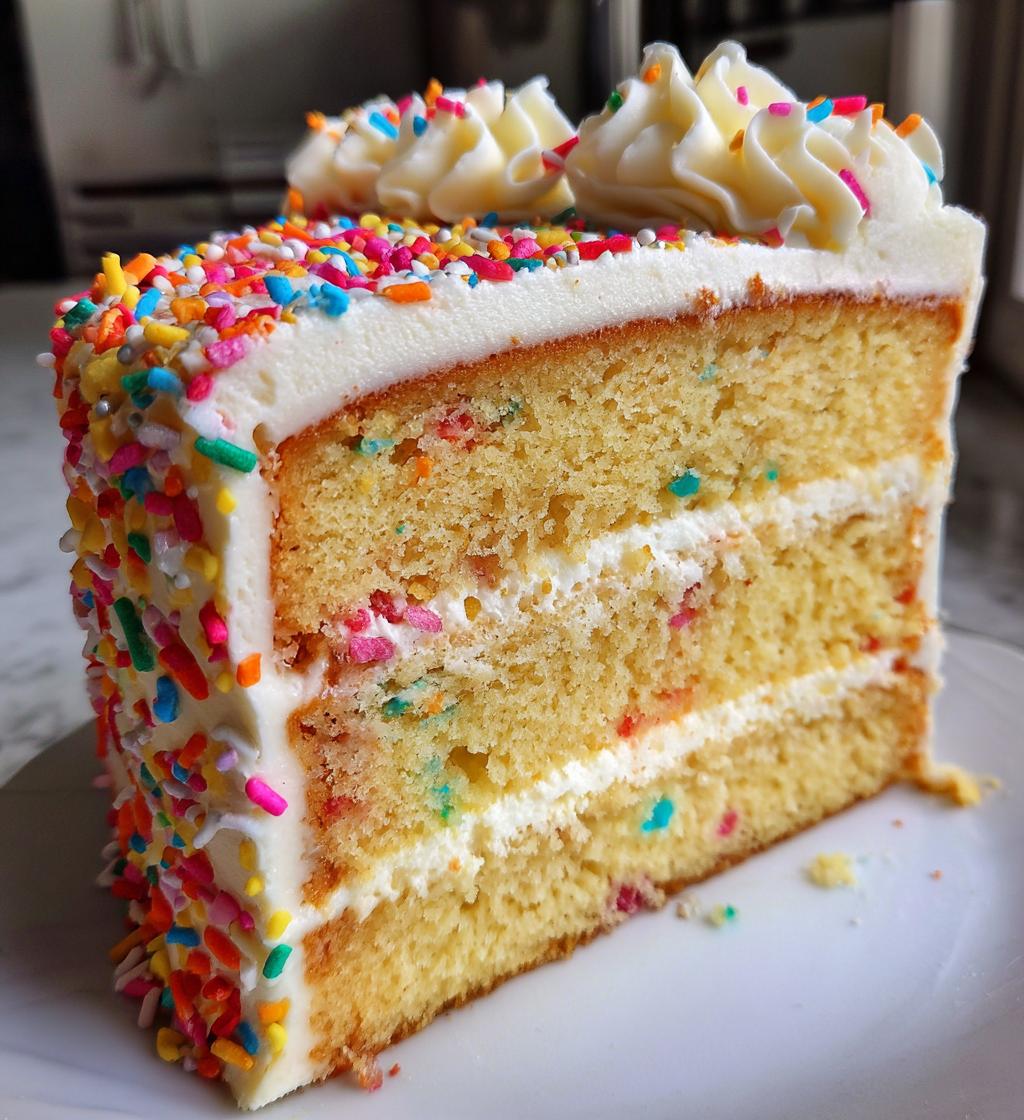
Graduation is such a monumental occasion, isn’t it? It’s a celebration of hard work, perseverance, and all those late-night study sessions. What better way to elevate the festivities than with a stunning two-tier graduation cake? Trust me, this cake doesn’t just taste amazing; it becomes the centerpiece of your celebration! Picture this: a beautifully decorated cake that not only looks fantastic but also tastes like a slice of happiness. You can customize it to reflect the graduate’s school colors or even their favorite flavors. The joy on their face when they see their personalized cake is priceless! Plus, you’ll impress all your guests with your baking skills. So, let’s dive into these delicious graduation cake ideas—specifically, how to create a fabulous two-tier cake that will make this milestone even more special!
Ingredients for Graduation Cake Ideas 2 Tier
Let’s gather everything we need to create this delightful two-tier graduation cake! Each ingredient plays a crucial role in making your cake not just look fabulous but taste amazing too. Here’s what you’ll need:
- 2 cups all-purpose flour: This forms the base of your cake, giving it structure and that lovely crumb.
- 1 1/2 cups sugar: For sweetness, of course! It balances out the flavors and helps create that soft texture we all love.
- 1 cup butter: Make sure it’s softened! Butter adds richness and moistness, making every bite melt in your mouth.
- 4 large eggs: These provide the binding and help the cake rise beautifully, so don’t skip out on the eggs!
- 1 cup milk: Whole milk is perfect for adding moisture and creating a tender crumb. You can even use buttermilk for a slight tang!
- 2 tsp baking powder: This is your leavening agent, ensuring your cake rises to the occasion—literally!
- 1 tsp vanilla extract: A splash of vanilla adds a warm, inviting flavor that makes everything better.
- 1/2 cup fondant: For decorating! Fondant gives a smooth finish and can be shaped into all sorts of fun designs.
- Food coloring: Use this to bring your cake to life! Customize the colors to match the graduation theme or the graduate’s favorite hues.
- Decorative sprinkles: These are the finishing touch that adds a bit of fun and excitement to your cake!
- Graduation cake topper: This is the cherry on top—literally! It’s what makes your cake undeniably a graduation cake.
Gather these ingredients and let’s get ready to create a masterpiece that’s sure to impress your guests and celebrate this momentous occasion!
How to Prepare Graduation Cake Ideas 2 Tier
Now that we have our ingredients ready, it’s time to bring this beautiful two-tier graduation cake to life! The preparation is straightforward, and I promise, you’ll feel like a baking superstar when you’re done. Here’s the step-by-step guide to making this celebratory cake.
Prepping the Batter
First things first, let’s get that butter and sugar creaming together. In a large mixing bowl, cream 1 cup of softened butter and 1 1/2 cups of sugar together until it’s light and fluffy—this takes about 3-5 minutes. You’ll want to really incorporate that air into the mixture, so don’t rush this step! I always find that using a hand mixer makes it easier, but a sturdy wooden spoon works too if you’re feeling traditional.
Next, add in your 4 large eggs, one at a time. Mix well after each addition to ensure everything is blended perfectly. It’s like giving your batter a little love with each egg! Then, stir in 1 cup of milk and 1 tsp of vanilla extract. This is where the cake starts to smell divine!
In a separate bowl, whisk together 2 cups of all-purpose flour and 2 tsp of baking powder. Gradually add this dry mixture to the wet mixture. I like to do this in thirds, alternating with the milk, to keep everything smooth and avoid lumps. Just mix until combined—don’t overdo it, or the cake might end up tough!
Baking the Cakes
Preheat your oven to 350°F (175°C) while you’re mixing. This is an important step, as a properly preheated oven ensures your cake rises evenly. Grease and flour two cake pans—this is a must to prevent sticking! I often use parchment paper on the bottom for extra security.
Once your batter is ready, pour it evenly into the prepared pans. Bake for 30-35 minutes, but keep an eye on them. You can test for doneness by inserting a toothpick into the center of the cakes. If it comes out clean, they’re ready! If not, give them a few more minutes and check again. Patience here pays off!
Frosting and Decorating
Once your cakes are baked and completely cooled, it’s time to layer and frost! Place one layer on your serving platter and generously spread frosting between the layers. I love using buttercream for its creamy texture and sweet flavor. Then, carefully stack the second layer on top.
Now, frost the top and sides of the cake with the remaining frosting. Smooth it out as best you can—it doesn’t have to be perfect, but a good base makes for beautiful decorations. Here comes the fun part! Roll out your 1/2 cup of fondant and use it to cover the cake for a sleek finish. Feel free to add some food coloring to match the graduate’s school colors.
Finally, sprinkle on those decorative sprinkles for a festive touch, and don’t forget to top it off with your graduation cake topper. Voilà! You’ve created a stunning two-tier cake that’s not just a treat but a piece of art celebrating this amazing milestone!
Why You’ll Love This Recipe
This two-tier graduation cake is more than just a dessert; it’s a celebration of achievement and joy! Here are some reasons why you’ll absolutely love making this cake:
- Quick Preparation: With a total time of just over an hour, you can whip up this stunning cake before the guests arrive!
- Celebratory Theme: This cake is perfect for graduation parties, bringing a festive vibe that everyone will appreciate.
- Versatile Flavors: Feel free to customize the cake flavor—chocolate, vanilla, or even red velvet—whatever the graduate loves!
- Personalized Touch: You can decorate it to match the graduate’s school colors, making it uniquely theirs.
- Impressive Presentation: The two-tier design makes for a show-stopping centerpiece that will wow your guests!
Trust me, this cake will be the highlight of the celebration, and you’ll feel so proud serving it!
Tips for Success with Graduation Cake Ideas 2 Tier
Alright, let’s make sure your two-tier graduation cake turns out just as fabulous as you envision it! Here are some handy tips that will help you tackle any challenges and ensure perfect results:
- Room Temperature Ingredients: Make sure your butter, eggs, and milk are at room temperature before you start. This helps everything blend together smoothly and creates a better texture.
- Measure Accurately: Baking is a science! Use a kitchen scale for precise measurements, especially for ingredients like flour and sugar. Too much flour can lead to a dry cake.
- Use the Right Pans: For a two-tier cake, use round pans that are the same size. If you want varying heights, consider using different sizes, but ensure the larger one is at least 2 inches wider than the smaller one.
- Cool Completely: After baking, let your cakes cool in the pans for about 10 minutes, then transfer them to a wire rack to cool completely. This prevents sogginess and makes frosting easier!
- Leveling the Cakes: Use a serrated knife to level the tops of your cakes before stacking. This ensures a stable base and prevents any tilting.
- Chill Between Layers: Once frosted, chill the cakes for about 20-30 minutes before adding the top layer. This helps set the frosting and makes stacking easier.
- Fondant Handling: If you’re using fondant, make sure to knead it well and keep it covered to prevent it from drying out. Dust your work surface with cornstarch to prevent sticking.
- Decorate with Love: Don’t stress about perfection! The beauty of a homemade cake lies in its charm. Add personal touches and let your creativity shine through!
With these tips in your back pocket, you’ll not only create a stunning two-tier graduation cake but also have a blast doing it! Happy baking!
Serving Suggestions for Graduation Cake Ideas 2 Tier
Now that you’ve created this beautiful two-tier graduation cake, let’s talk about how to make the celebration even more special with some delightful pairings! The right accompaniments can elevate your cake experience, making the event feel truly festive. Here are some fantastic serving suggestions:
- Refreshing Beverages: Pair your cake with sparkling lemonade or iced tea for a refreshing twist! You can even add a splash of fruit juice to give it a pop of color and flavor. For adults, a light champagne or prosecco can add a touch of elegance to the celebration.
- Fruit Platters: A colorful fruit platter with seasonal fruits like strawberries, blueberries, and melons can add a fresh contrast to the sweetness of the cake. Plus, it’s a light option that balances the richness of the frosting.
- Ice Cream: Who doesn’t love a scoop of ice cream with cake? Vanilla or chocolate ice cream pairs wonderfully with your graduation cake. You can even create an ice cream sundae bar where guests can add their favorite toppings!
- Chocolate-Covered Treats: Consider serving chocolate-covered strawberries or pretzels on the side. The combination of chocolate and cake is always a winner, and they add a fun touch to the dessert table.
- Coffee or Tea: A warm cup of coffee or herbal tea can be the perfect way to round off the meal. The warmth of the beverage complements the cake beautifully, creating a cozy atmosphere for everyone to enjoy.
These serving suggestions not only enhance your cake but also create a delightful dessert experience that everyone will remember. Enjoy every moment of your celebration!
Nutritional Information
Understanding the nutritional values of your delicious two-tier graduation cake is important, especially if you’re keeping track of what you and your guests are enjoying. Here’s an estimate of the typical nutritional values per slice (serving size: 1 slice):
- Calories: 300
- Fat: 15g
- Saturated Fat: 9g
- Trans Fat: 0g
- Unsaturated Fat: 5g
- Cholesterol: 50mg
- Sodium: 150mg
- Carbohydrates: 40g
- Fiber: 1g
- Sugar: 20g
- Protein: 3g
Keep in mind that these values can vary depending on the specific ingredients you use and any additional toppings or fillings you might add. Enjoy your cake in moderation, and celebrate with joy!
FAQ Section
Got questions about making this fabulous two-tier graduation cake? Don’t worry, I’ve got you covered! Here are some common queries that pop up, along with my answers to help you navigate your baking adventure:
Can I use different flavors for the cake layers?
Absolutely! One of the best parts of this two-tier graduation cake is the versatility it offers. You can easily mix it up by using chocolate, red velvet, or even lemon-flavored cake for one of the tiers. Just keep in mind that the baking times might slightly vary, so check for doneness accordingly!
How do I store leftover cake?
To keep your graduation cake fresh, wrap the leftovers in plastic wrap or place them in an airtight container. You can store it in the fridge for about 3-5 days. If you want to keep it longer, consider freezing individual slices. Just make sure they’re well-wrapped, and they can last for up to 3 months!
What kind of frosting works best for decorating?
For a smooth finish and easy decorating, buttercream frosting is my go-to! It’s creamy, delicious, and you can tint it with food coloring to match your graduation theme. If you’re feeling adventurous, cream cheese frosting adds a lovely tang and pairs wonderfully with flavors like red velvet or carrot cake.
Can I make this cake ahead of time?
You bet! This cake can be made a day or two in advance. Just bake and cool your layers, then wrap them tightly in plastic wrap and store them in the fridge. When you’re ready to decorate, let the layers come to room temperature before frosting. It’ll save you time on the big day!
What if my cake layers aren’t level?
No worries! If your cake layers come out a bit uneven, just use a serrated knife to level them off before stacking. This will ensure a stable base for your two-tier cake. Plus, it gives you a chance to taste those delicious scraps—yum!
Feel free to reach out with any other questions you might have. Happy baking, and enjoy celebrating those milestones with a scrumptious cake!
Storage & Reheating Instructions
Once you’ve enjoyed your fabulous two-tier graduation cake, you might find yourself with some delicious leftovers. No worries—I’ve got you covered on how to store and reheat your cake so you can savor every last bite!
First off, to store your cake, let it cool completely if you haven’t already. Then, wrap individual slices in plastic wrap or place them in an airtight container. This will help keep them fresh and prevent them from drying out. You can store your cake in the fridge for about 3-5 days without losing any of that delightful flavor.
If you want to keep your cake longer, consider freezing it! To freeze, make sure to wrap each slice tightly in plastic wrap, then place them in a freezer-safe bag or container. Label it with the date, and they should stay good for up to 3 months. When you’re ready to enjoy a slice, just take it out and let it thaw in the fridge overnight or at room temperature for a few hours.
Now, if you want to reheat your cake, I recommend doing so gently. For individual slices, pop them in the microwave for about 10-15 seconds until just warm—be careful not to overdo it, or you might end up with a dry piece! If you prefer, you can also reheat larger portions in the oven at 350°F (175°C) for about 10 minutes, but be sure to cover it with aluminum foil to keep it moist.
With these simple storage and reheating tips, you can enjoy your graduation cake long after the celebration is over. Happy indulging!
Print
Graduation Cake Ideas 2 Tier: 7 Deliciously Simple Recipes
- Total Time: 1 hour 5 minutes
- Yield: Serves 12-16 1x
- Diet: Vegetarian
Description
A two-tier graduation cake that celebrates the achievement of graduating.
Ingredients
- 2 cups all-purpose flour
- 1 1/2 cups sugar
- 1 cup butter
- 4 eggs
- 1 cup milk
- 2 tsp baking powder
- 1 tsp vanilla extract
- 1/2 cup fondant
- Food coloring
- Decorative sprinkles
- Graduation cake topper
Instructions
- Preheat the oven to 350°F (175°C).
- Grease and flour two cake pans.
- In a bowl, cream butter and sugar until fluffy.
- Add eggs one at a time, mixing well after each.
- Stir in milk and vanilla extract.
- In a separate bowl, combine flour and baking powder.
- Gradually add the dry ingredients to the wet mixture.
- Pour batter into prepared pans.
- Bake for 30-35 minutes or until a toothpick comes out clean.
- Let cakes cool completely.
- Layer the cakes, applying frosting in between.
- Cover the entire cake with frosting.
- Decorate with fondant, food coloring, and sprinkles.
- Add the graduation cake topper.
Notes
- Use different colors for a personalized touch.
- Consider using chocolate or red velvet cake for variety.
- Make sure the cakes are level before stacking.
- Prep Time: 30 minutes
- Cook Time: 35 minutes
- Category: Dessert
- Method: Baking
- Cuisine: American
Nutrition
- Serving Size: 1 slice
- Calories: 300
- Sugar: 20g
- Sodium: 150mg
- Fat: 15g
- Saturated Fat: 9g
- Unsaturated Fat: 5g
- Trans Fat: 0g
- Carbohydrates: 40g
- Fiber: 1g
- Protein: 3g
- Cholesterol: 50mg
Keywords: graduation cake ideas, two-tier cake, celebration cake


