
Oh my gosh, if there’s one cake that gets my family running to the kitchen, it’s this Oreo cake. The moment that chocolatey aroma hits the air, my kids appear like magic! This isn’t just any cake – it’s layers of moist chocolate goodness with that perfect Oreo crunch in every bite. My secret? A whole lotta love (and a whole package of Oreos). Trust me, once you try this, it’ll become your go-to dessert for every celebration – or just because it’s Tuesday!
Ingredients for Oreo Cake
Now, let’s talk about what makes this Oreo cake so ridiculously good – it all starts with gathering the right stuff! I’ve learned some hard lessons over the years (like that time I used cold eggs and ended up with lumpy batter), so pay attention to these details:
- 2 cups all-purpose flour – spooned and leveled, don’t pack it!
- 1 1/2 cups sugar – regular granulated works perfectly
- 3/4 cup unsweetened cocoa powder – the darker, the better for that rich chocolate flavor
- 2 tsp baking powder + 1 1/2 tsp baking soda – our rising dream team
- 1 tsp salt – trust me, it makes all the flavors pop
- 1 cup milk – whole milk gives the best texture
- 1/2 cup vegetable oil – keeps everything deliciously moist
- 2 large eggs – room temperature, please! (Take them out 30 minutes before)
- 2 tsp vanilla extract – pure vanilla makes all the difference
- 1 cup boiling water – yes, boiling! It’ll make sense later
- 2 cups crushed Oreos – I like some chunks left for texture
- 2 cups heavy cream – chilled is best for whipping
- 1/4 cup powdered sugar – for sweetening that dreamy cream
See? Nothing too fancy, just good quality ingredients prepared right. Now let’s make some magic happen!
How to Make Oreo Cake
Alright, let’s dive into the fun part – making this showstopper of a cake! Don’t let the layers intimidate you; I’ll walk you through each step like I’m right there in the kitchen with you. Just follow along, and you’ll have everyone begging for seconds (and the recipe!).
Preparing the Cake Batter
First things first – preheat that oven to 350°F and grease your pans really well. I like to use butter and a dusting of cocoa powder instead of flour – keeps the color nice and chocolatey!
Now, grab your biggest mixing bowl and whisk together all those dry ingredients – flour, sugar, cocoa powder, baking powder, baking soda, and salt. Get them nice and friendly with each other. In another bowl, mix the milk, oil, eggs, and vanilla until they’re completely combined. Pour the wet mixture into the dry and beat it for about 2 minutes – set a timer because it’s easy to lose track!
Here comes the magic trick: slowly stir in that boiling water. Yes, the batter will look scarily thin – that’s perfect! The hot water helps bloom the cocoa flavor and creates that ultra-moist texture we’re after. Just trust the process!
Baking and Cooling
Pour that liquid gold (okay, liquid chocolate) evenly between your prepared pans. Slide them into the oven and set your timer for 30 minutes. At the 30-minute mark, do the toothpick test – if it comes out clean, you’re golden! If not, give it another 5 minutes.
Here’s where patience is key – let those cakes cool in their pans for about 10 minutes before turning them out onto wire racks. Trying to remove them too soon is a recipe for cake disaster (learned that the hard way!). Let them cool completely before assembling – about an hour should do it.
Assembling the Oreo Cake
While the cakes cool, make your dreamy Oreo cream. Whip that chilled heavy cream and powdered sugar until stiff peaks form – pro tip: chill your bowl and beaters first for extra volume! Gently fold in 1 cup of those crushed Oreos.
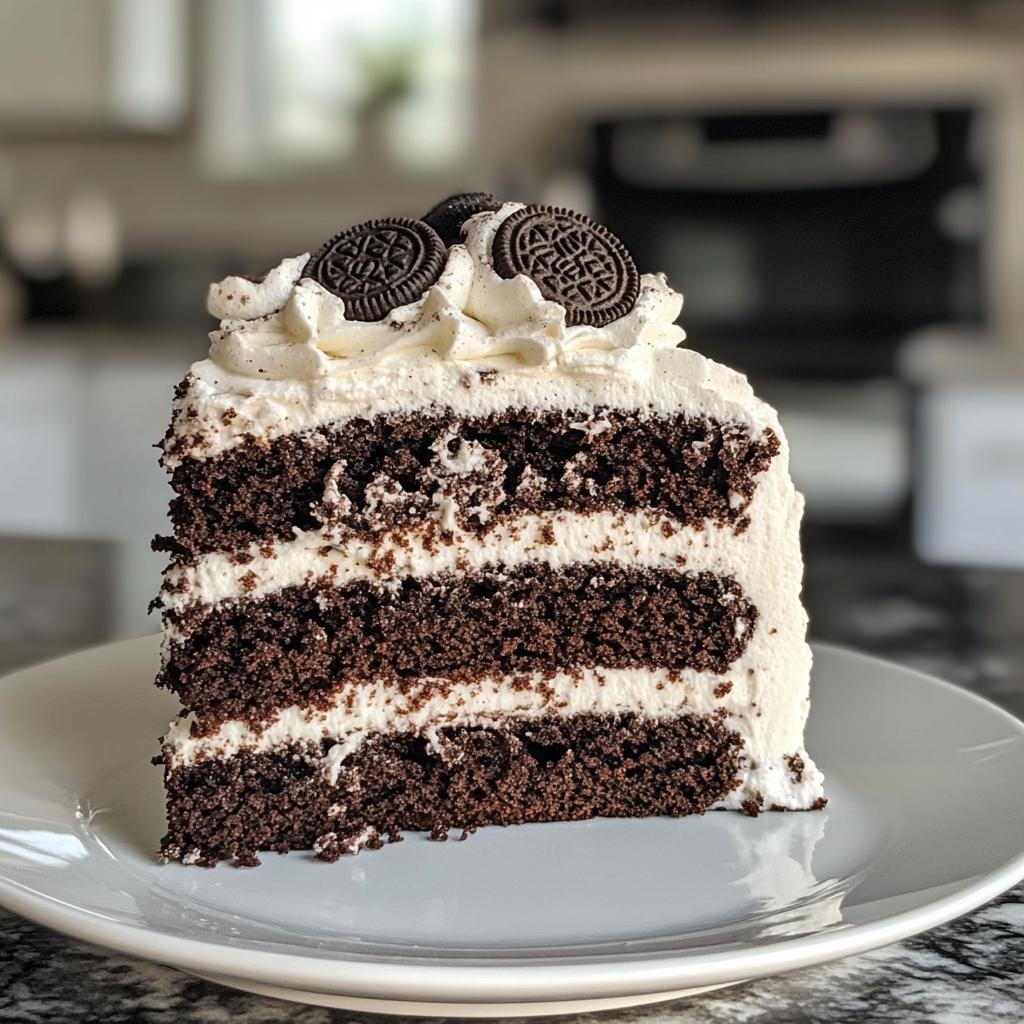
Time to build! Place your first cake layer on a plate or stand. Spread half the cream mixture over it, then sprinkle with some more crushed Oreos. Repeat with the second layer. Pop the whole beautiful thing in the fridge for at least an hour – I know it’s hard to wait, but this helps everything set up perfectly!
Tips for the Perfect Oreo Cake
After making this cake more times than I can count (my waistline can attest to that!), I’ve picked up some foolproof tricks to make it absolutely perfect every single time. First – always, always chill your mixing bowl and beaters before whipping the cream. I stick mine in the freezer for 15 minutes, and wow, what a difference it makes in getting those gorgeous stiff peaks!
Room temperature eggs are non-negotiable – cold eggs make the batter lumpy and don’t incorporate as well. If you forget to take them out early, just pop them in a bowl of warm water for 5 minutes. And here’s my favorite tip – double the Oreos if you’re feeling extra indulgent! More cookies between layers means more of that addictive crunch in every bite. Just don’t tell my dentist I said that!
Oreo Cake Variations
Oh, the fun you can have with this Oreo cake recipe! My family loves when I switch things up – sometimes I’ll add 1/2 tsp mint extract to the batter for a cool twist (hello, Thin Mint vibes!). The golden Oreos make a gorgeous vanilla version too. Feeling wild? Try the birthday cake or peanut butter Oreo flavors between layers. Last Christmas, I mixed in some crushed candy canes with the cream filling – total showstopper! The possibilities are endless.
Serving and Storing Oreo Cake
Here’s my favorite part – digging into this masterpiece! Serve your Oreo cake chilled straight from the fridge – that hour of waiting makes all the difference in letting the flavors meld together perfectly. I love sprinkling extra crushed Oreos on top right before serving for that wow factor. Got leftovers? (Unlikely!) Store them covered airtight in the fridge for up to 3 days – if it lasts that long!
Oreo Cake Nutritional Information
Okay, let’s be real – we’re not eating Oreo cake for its health benefits! But for those curious, here’s the scoop: each slice packs about 450 calories with that perfect balance of chocolatey goodness and creamy Oreo filling. Remember, these numbers are just estimates – your actual results might vary depending on how generous you are with those Oreo layers!
Frequently Asked Questions
Can I use store-bought whipped cream instead of making my own?
Oh honey, I get it – sometimes we’re in a hurry! While homemade whipped cream is dreamier, the store-bought stuff works in a pinch. Just fold in your crushed Oreos gently so it doesn’t deflate. But trust me, that 5 minutes of whipping fresh cream makes ALL the difference in texture and taste!
How do I prevent my Oreo cake from drying out?
The boiling water trick keeps it moist for days, but here’s my secret – wrap the cooled cake layers tightly in plastic wrap until you’re ready to assemble. And don’t skip that chilling time! The cream filling helps lock in moisture too. If it does dry out (rare with this recipe!), a quick microwave zap for 10 seconds brings it back to life.
Can I make this Oreo cake ahead of time?
Absolutely! The assembled cake actually tastes better after chilling overnight – the flavors meld beautifully. Just hold off on the final Oreo sprinkle until serving so they stay crunchy. The unfilled cake layers can be frozen for up to a month too – wrap them well in plastic and foil.

Incredible 2-Layer Oreo Cake You Must Try
- Total Time: 1 hour 55 minutes
- Yield: 1 cake (8-10 servings) 1x
- Diet: Vegetarian
Description
A delicious and easy-to-make Oreo cake with layers of chocolate and crushed Oreos.
Ingredients
- 2 cups all-purpose flour
- 1 1/2 cups sugar
- 3/4 cup unsweetened cocoa powder
- 2 tsp baking powder
- 1 1/2 tsp baking soda
- 1 tsp salt
- 1 cup milk
- 1/2 cup vegetable oil
- 2 large eggs
- 2 tsp vanilla extract
- 1 cup boiling water
- 2 cups crushed Oreos
- 2 cups heavy cream
- 1/4 cup powdered sugar
Instructions
- Preheat your oven to 350°F. Grease and flour two 9-inch cake pans.
- In a large bowl, mix flour, sugar, cocoa powder, baking powder, baking soda, and salt.
- Add milk, vegetable oil, eggs, and vanilla extract. Beat for 2 minutes.
- Stir in boiling water. The batter will be thin.
- Pour the batter into the prepared pans. Bake for 30-35 minutes. Let cool.
- Whip heavy cream and powdered sugar until stiff peaks form. Fold in 1 cup of crushed Oreos.
- Assemble the cake by layering cake, cream mixture, and remaining Oreos.
- Chill for at least 1 hour before serving.
Notes
- Use room temperature eggs for better mixing.
- Chill the mixing bowl before whipping the cream for best results.
- For extra Oreo flavor, add more crushed cookies between layers.
- Prep Time: 20 minutes
- Cook Time: 35 minutes
- Category: Dessert
- Method: Baking
- Cuisine: American
Nutrition
- Serving Size: 1 slice
- Calories: 450
- Sugar: 35g
- Sodium: 400mg
- Fat: 22g
- Saturated Fat: 10g
- Unsaturated Fat: 10g
- Trans Fat: 0g
- Carbohydrates: 60g
- Fiber: 3g
- Protein: 6g
- Cholesterol: 70mg
Keywords: Oreo cake, chocolate cake, dessert, homemade cake


