
You know those nights when you’re craving something sweet but don’t want to turn on the oven? That was me last week, staring into my fridge at 9 PM, when inspiration struck. I whipped up these no-bake cheesecake cups in about 15 minutes flat – and let me tell you, they disappeared even faster! What I love most is how these little cups solve all my last-minute dessert emergencies. You get that classic creamy cheesecake texture without any baking, and the best part? You can top them with whatever you’ve got on hand – fresh berries, chocolate shavings, even that last scoop of Nutella hiding in your pantry. Trust me, once you try this method, you’ll never stress about dessert again!
Why You’ll Love These No-Bake Cheesecake Cups
Let me count the ways these little cups will become your new dessert obsession:
- 15-minute miracle: From fridge to table faster than you can say “cheesecake”
- Creamy dreamy texture: That perfect rich-but-light consistency without any baking fuss
- Endless possibilities: Change up toppings with whatever’s in season (or whatever’s left in your fridge)
- No oven required: Perfect for hot summer days when baking sounds like torture
- Portion perfection: Individual servings mean no fighting over who gets the biggest slice
Seriously – these are the little lifesavers I wish I’d discovered years ago!
Ingredients for No-Bake Cheesecake Cups
Here’s everything you’ll need to make these dreamy little cups – and trust me, you probably have most of it in your kitchen already:
- 1 1/2 cups graham cracker crumbs – packed firmly (about 12 whole sheets crushed)
- 1/4 cup melted butter – unsalted is my preference, but salted works too if you like that sweet-salty vibe
- 16 oz cream cheese – must be softened to room temp (I leave mine out for 2 hours)
- 1/2 cup granulated sugar – measure this precisely for the perfect sweetness
- 1 tsp pure vanilla extract – the good stuff makes all the difference
- 1 cup whipped topping – thawed if frozen, and yes, homemade whipped cream works too
- Topping ideas: Fresh berries, chocolate chips, caramel sauce, crushed Oreos – go wild!
That’s it! Simple ingredients that transform into something magical when they come together.
How to Make No-Bake Cheesecake Cups
Okay, let’s get to the fun part – making these dreamy little cups! Don’t worry, it’s so easy you’ll be amazed at how professional they look. Just follow these simple steps:
Step 1: Prepare the Crust
First, grab your graham cracker crumbs and melted butter. I like to mix them right in the measuring cup – one less bowl to wash! Stir until it looks like wet sand and all the crumbs are coated. Now here’s my trick: use a small spoon or the bottom of a shot glass to press about 1-2 tablespoons firmly into each cup. You want it packed enough to hold together, but not so tight it turns into cement!
Step 2: Make the Cheesecake Filling
This is where room temperature cream cheese is KEY – cold cream cheese will leave lumps no matter how long you beat it! Whip that softened cream cheese until it’s completely smooth (about 2 minutes). Then add the sugar and vanilla, beating another minute until it’s silky. Now gently fold in the whipped topping – I mean really gently, like you’re folding in a cloud! Overmixing here will make your filling dense instead of light and fluffy.
Step 3: Assemble and Chill
Spoon the creamy filling over your crusts, smoothing the tops with the back of a spoon. Now the hardest part – waiting! Chill them for at least 2 hours (I know, torture!). The magic happens as they set up into perfect cheesecake texture. Top them right before serving so your toppings stay fresh and crunchy. Pro tip: if you’re adding fruit, pat it dry first so it doesn’t make your cups watery!
Tips for Perfect No-Bake Cheesecake Cups
Want pro-level results every time? Here are my hard-won secrets:
- Full-fat cream cheese only – low-fat versions make the filling weep and lose that luscious texture
- Patience is key – let them chill the full 2 hours (I’ve tried shortcutting and regretted it!)
- Room temp matters – cold cream cheese = lumpy filling no matter how long you beat it
- Toast your crumbs – for extra flavor, toast graham crackers before crushing (350°F for 5 minutes)
- Layer toppings smart – add sauce drizzles after chilling to keep crusts crisp
Follow these, and you’ll get perfect little cheesecake clouds every single time!
Variations for No-Bake Cheesecake Cups
Oh, the fun begins when you start playing with flavors! Here are my favorite ways to mix things up:
- Chocolate lovers: Swirl melted chocolate into the filling and top with chocolate shavings
- Berry bliss: Layer fresh berry compote between the crust and filling
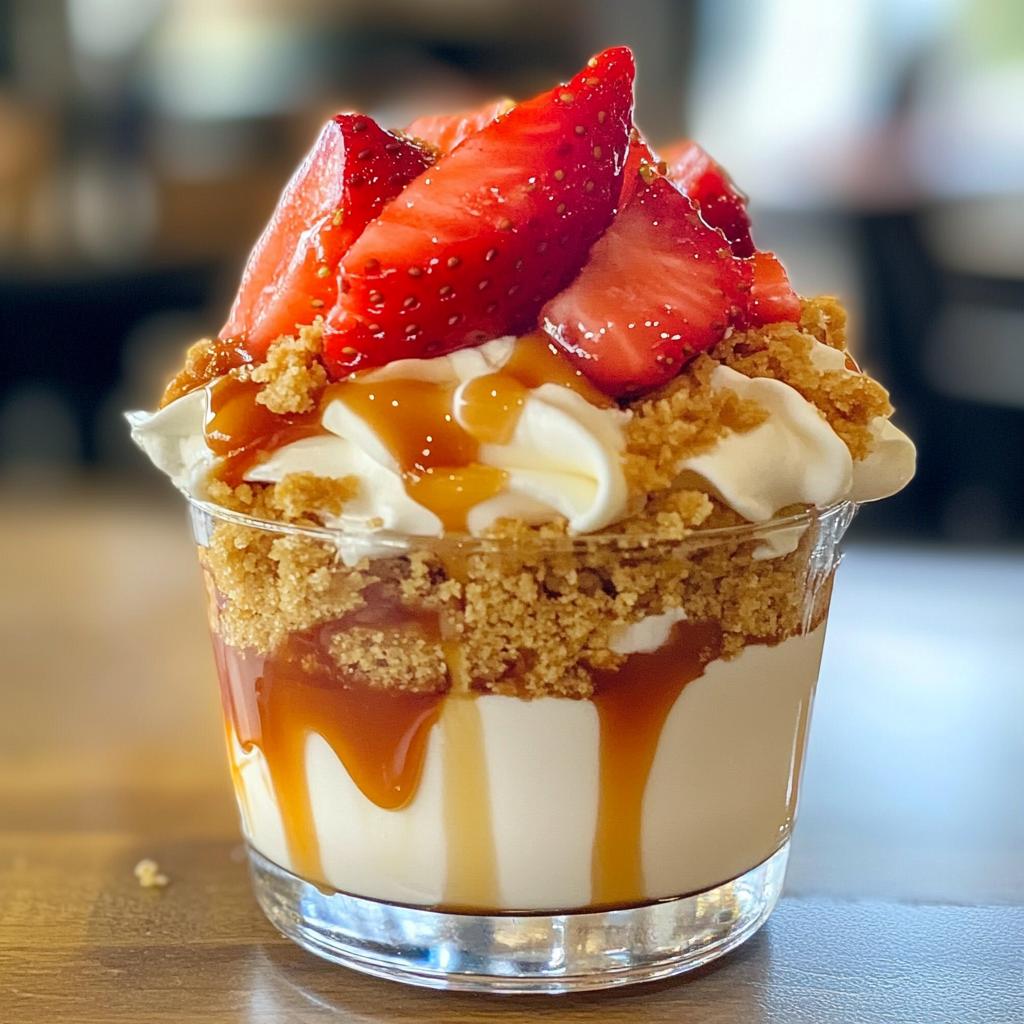
- Salted caramel dream: Drizzle caramel sauce on top with a pinch of flaky sea salt
- Cookie monster: Swap graham crumbs for crushed Oreos or Biscoff cookies
- Lemon zest: Add 1 tbsp lemon juice and zest to the filling for a bright twist
The best part? You can make a few different flavors in one batch – no need to choose just one!
Serving and Storing No-Bake Cheesecake Cups
Here’s the beautiful thing about these little cups – they actually get better after chilling! I like to let mine sit overnight for the creamiest texture. Keep them covered in the fridge for up to 3 days (if they last that long!). The key is adding toppings right before serving – trust me, you don’t want soggy graham crackers or weeping berries. Serve them straight from the fridge for that perfect chilled cheesecake experience. And yes, I’ve been known to eat one for breakfast – no judgment here!
Nutritional Information
Okay, let’s be real – we’re not eating cheesecake for the health benefits! But if you’re curious, here’s the scoop per cup (based on my exact recipe):
- 280 calories – totally worth every bite
- 18g fat (10g saturated) – that’s where the creamy magic happens
- 18g sugar – just sweet enough without being cloying
- 3g protein – hey, that cream cheese counts for something!
Remember, these numbers are estimates – your actual counts will change if you go wild with toppings (as you should!). Nutritional info should never stop you from enjoying life’s sweet moments!
Frequently Asked Questions
I get asked about these cheesecake cups all the time – here are the answers to the questions that pop up most often:
Can I Use Greek Yogurt Instead of Whipped Topping?
You can, but the texture won’t be as light and fluffy. If you’re going this route, use thick Greek yogurt and whip it with the cream cheese to incorporate air. You’ll need to add a bit more sugar since yogurt is tangier. Honestly? I’d stick with whipped topping for that classic cheesecake cloud-like texture we all love!
How Long Do These Cheesecake Cups Last?
They’ll stay perfect in the fridge for 3 days – if you can resist eating them that long! Just keep them covered tightly. You’ll know they’ve gone bad if the filling separates or gets watery. Pro tip: Store them without toppings and add those fresh when you’re ready to serve.
Can I Freeze No-Bake Cheesecake Cups?
Absolutely! Freeze them without toppings for up to a month. Thaw overnight in the fridge – they’ll taste just as good! The texture might be slightly denser after freezing, but still delicious. I like to freeze a batch for those “I need cheesecake NOW” emergencies (we all have them!).
Share Your No-Bake Cheesecake Cups
I’d love to see your beautiful creations! Tag me on Instagram or leave a comment below with your favorite topping combinations. Nothing makes me happier than seeing how you make this recipe your own. Now go forth and cheesecake!
Print
15-Minute Magical No-Bake Cheesecake Cups
- Total Time: 2 hrs 15 mins
- Yield: 12 cups 1x
- Diet: Vegetarian
Description
Easy no-bake cheesecake cups with creamy texture and customizable toppings. Perfect for quick desserts.
Ingredients
- 1 1/2 cups graham cracker crumbs
- 1/4 cup melted butter
- 16 oz cream cheese, softened
- 1/2 cup sugar
- 1 tsp vanilla extract
- 1 cup whipped topping
- Assorted toppings (fruit, chocolate, caramel, etc.)
Instructions
- Mix graham cracker crumbs and melted butter in a bowl.
- Press 1-2 tbsp of the mixture into the bottom of each cup.
- Beat cream cheese, sugar, and vanilla until smooth.
- Fold in whipped topping gently.
- Spoon the mixture over the crust in each cup.
- Chill for at least 2 hours.
- Add toppings before serving.
Notes
- Use gluten-free graham crackers for a gluten-free version.
- Chill the cups for at least 2 hours for best texture.
- Store in the refrigerator for up to 3 days.
- Prep Time: 15 mins
- Cook Time: 0 mins
- Category: Dessert
- Method: No-Bake
- Cuisine: American
Nutrition
- Serving Size: 1 cup
- Calories: 280
- Sugar: 18g
- Sodium: 220mg
- Fat: 18g
- Saturated Fat: 10g
- Unsaturated Fat: 6g
- Trans Fat: 0g
- Carbohydrates: 24g
- Fiber: 0.5g
- Protein: 3g
- Cholesterol: 45mg
Keywords: no-bake cheesecake, cheesecake cups, easy dessert


