
Oh, there’s just something magical about decorating cookies during the Christmas season, isn’t there? The air fills with the sweet scent of freshly baked sugar cookies, and suddenly, it feels like the whole world slows down for a moment. Trust me, easy Christmas cookies decorating isn’t just about the cookies; it’s about the laughter and creativity that comes alive when families gather around the kitchen table. I still remember those cozy afternoons spent with my siblings, each of us armed with icing bags and a rainbow of sprinkles, competing to see who could create the most festive cookie masterpiece. We’d laugh at our silly designs and gobble up our creations before they even had a chance to dry! It’s those little moments that make the holiday season so special, and I can’t wait for you to experience it too. So, gather your loved ones, unleash your inner artist, and let’s turn those plain cookies into edible art that brings joy and sweet memories for everyone!
Ingredients List
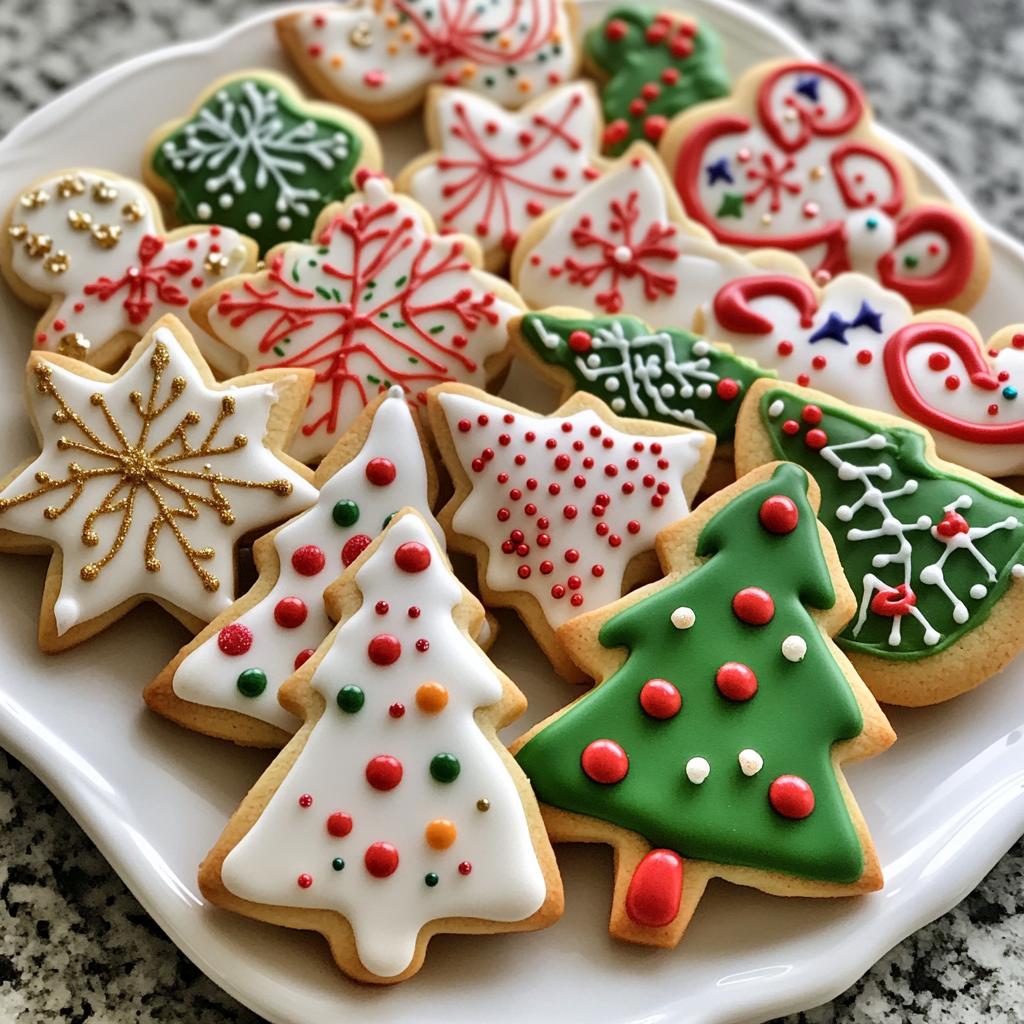
Here’s what you’ll need to get started on your easy Christmas cookies decorating adventure! Each ingredient plays a vital role in making your cookies not just tasty but also eye-catching!
- 1 batch of sugar cookies: This is the foundation for your decorating fun! You can use store-bought or homemade sugar cookies—whatever fits your holiday vibe!
- Royal icing: This magical icing dries hard, making it perfect for decorating. It creates a smooth canvas for your designs and holds up beautifully when you add sprinkles or edible glitter.
- Food coloring: Bring your cookies to life with vibrant colors! You can use gel or liquid food coloring—just a little goes a long way!
- Sprinkles: The more, the merrier! Use a variety of shapes and sizes to add festive flair to your cookies. Trust me, sprinkles make everything better!
- Edible glitter: For that extra sparkle! A sprinkle of edible glitter is like the icing on the cake—literally! It adds a magical touch to your holiday treats.
Gather these ingredients, and you’re all set to create some delightful cookie decorations that will wow your family and friends!
How to Prepare Instructions
Ready to dive into your cookie decorating adventure? Let’s break it down step by step so you can create some beautiful holiday treats without feeling overwhelmed! Just follow along, and you’ll have a blast!
- Bake your sugar cookies: Start by baking your batch of sugar cookies according to your favorite recipe. Remember, the cookies need to be completely cooled before you start decorating—this usually takes about 15-20 minutes. Patience is key here!
- Cool cookies completely: Once baked, transfer the cookies to a wire rack. Make sure they’re fully cooled; this prevents the icing from melting and ruining your designs. You want them to be firm and ready for the royal icing!
- Prepare your royal icing: While your cookies are cooling, whip up your royal icing. If you’re new to this, it’s a simple mix of powdered sugar, meringue powder, and water. Beat it until it’s nice and smooth.
- Divide and color the icing: Once your icing is ready, divide it into bowls—one for each color you want to use. Add a few drops of food coloring to each bowl and mix until you achieve your desired shades. Don’t be shy; vibrant colors make for festive cookies!
- Pipe the outlines: Grab a piping bag fitted with a fine tip (or just a zip-top bag with the corner snipped off) and start piping outlines on your cookies. This is your chance to be creative! Think about fun shapes or holiday themes like snowflakes or Christmas trees.
- Fill in your designs: Next, take some of your thinned royal icing (you can add a little water to achieve a pouring consistency) and fill in the outlined areas. Use a toothpick or a skewer to spread the icing if needed. This is where the magic happens!
- Add sprinkles and edible glitter: While the icing is still wet, sprinkle on your decorations! This is my favorite part—go wild with sprinkles and glitter to make your cookies sparkle and shine!
- Let the cookies dry completely: Now, here comes the hardest part—waiting! Let your decorated cookies dry completely, which usually takes about 4-6 hours. If you can, leave them overnight to make sure everything is set and ready for the big reveal!
And there you have it! Follow these steps, and you’ll have a stunning batch of decorated cookies that are as beautiful as they are delicious. Have fun, and don’t forget to enjoy the process! Happy decorating!
Why You’ll Love This Recipe
There are so many reasons to adore this easy Christmas cookies decorating recipe! Here are just a few that make it a must-try this holiday season:
- Quick preparation: You can whip up these festive cookies in no time! With just a simple batch of sugar cookies and royal icing, you’re ready to decorate in about an hour.
- Fun for kids: This activity is perfect for involving the little ones! Watching their eyes light up as they create their own cookie masterpieces is a joy you won’t want to miss.
- Customizable designs: Every cookie can be as unique as your imagination allows! Whether you want classic shapes or whimsical holiday themes, you can mix and match colors, patterns, and decorations.
- Delicious taste: Not only do they look amazing, but these cookies taste just as good! The combination of sweet sugar cookies and smooth royal icing is irresistible!
- Memorable moments: Decorating cookies is a wonderful way to create lasting memories with family and friends. It’s more than just baking; it’s about laughter, creativity, and holiday spirit!
Trust me, once you dive into this cookie decorating adventure, you’ll be hooked! It’s the perfect way to bring everyone together and spread some holiday cheer.
Tips for Success
Want to take your easy Christmas cookies decorating to the next level? Here are my top tips to ensure your cookies turn out beautifully every time. Trust me, a little guidance goes a long way in making your decorating experience fun and successful!
Achieving the right icing consistency
First things first: the consistency of your royal icing is crucial! You want it to be thick enough to hold its shape but thin enough to spread easily when you fill in designs. A good rule of thumb is to aim for a consistency similar to that of toothpaste for outlining and a bit thinner (think like warm honey) for filling. You can test this by lifting a spoonful of icing—if it flows back into the bowl within about 10 seconds, you’re good to go!
Using a piping bag vs. a zip-top bag
Don’t have a fancy piping bag? No problem! A zip-top bag works just as well when you snip off one corner. Just remember to keep your bag upright while filling it to avoid spills, and twist the top to keep the icing from oozing out the other end. It’s all about making it easy and fun!
Practice makes perfect
If you’re feeling a bit unsure about your decorating skills, don’t hesitate to practice on a few extra cookies. I often make a couple of “test” cookies when I’m trying out new designs. This way, you can adjust your technique and find what works best before tackling the main batch!
Be creative with your designs
Let your imagination run wild! You can create all sorts of fun shapes and patterns. Try using cookie cutters to make festive shapes like stars, trees, or even gingerbread men. And don’t be afraid to mix colors and patterns—layering different elements can lead to a stunning finished product!
Don’t rush the drying process
Patience is key when it comes to letting your cookies dry! I know it’s tempting to rush the process, but allowing the icing to dry completely is essential for keeping your designs intact. I usually leave mine overnight, just to be safe. You’ll thank yourself later when you see how beautiful they look!
With these tips in your back pocket, you’re ready to create some jaw-dropping decorated cookies! Enjoy the journey, and have a blast spreading holiday cheer with your creations!
Variations
Ready to get creative? There are so many fun ways to switch up your easy Christmas cookies decorating that’ll keep the festive spirit alive! Let’s dive into some delightful variations to make your cookies even more special!
Explore different cookie shapes
While classic round sugar cookies are a holiday staple, why not shake things up with different shapes? Use festive cookie cutters to create stars, angels, snowmen, or even holiday ornaments! Each shape can inspire unique designs, and it’s a great way to add variety to your cookie platter. Imagine a whole tray filled with whimsical shapes that tell a holiday story!
Try alternative icing flavors
Why stick to plain royal icing when you can jazz it up? Experiment with different flavor extracts to give your icing a unique twist! Almond extract, peppermint extract, or even a hint of vanilla can elevate your royal icing game. Just a few drops will add a lovely taste while you decorate—trust me, your taste buds will thank you!
Incorporate seasonal decorations
Take advantage of the holiday season by using seasonal decorations! Think about adding themed sprinkles like Christmas trees, snowflakes, or candy canes. You can also use edible glitter in festive colors like red and green to make your cookies sparkle even more. And don’t forget about edible markers! They’re perfect for adding personalized messages or drawings on your cookies.
Mix up the colors
Let your creativity shine by playing around with color schemes! Instead of traditional red and green, try a winter wonderland theme with icy blues and whites, or go for a warm and cozy palette with golds and browns. You can even create a rainbow of colors for a fun twist! The options are endless, and each batch can reflect your unique personality.
Make it a themed cookie decorating party
Why not host a themed cookie decorating party? Invite friends or family over and have everyone bring their favorite cookie shapes and decorations. You can challenge each other to create the best holiday-themed cookie, or even have a contest for the most creative design! Sharing ideas and laughter while decorating will make the experience even more memorable.
With these variations, you’ll find endless inspiration to keep your easy Christmas cookies decorating fresh and exciting each year. So grab your supplies, and let’s make some sweet holiday magic together!
Serving Suggestions
Now that you’ve created a stunning batch of decorated Christmas cookies, it’s time to think about how to present them! Trust me, these treats shine even brighter when paired with the perfect accompaniments. Here are some delightful ideas to enhance your cookie experience:
- Hot cocoa: There’s nothing quite like a warm mug of rich hot cocoa to complement your cookies! Top it off with a generous swirl of whipped cream and maybe even a sprinkle of cocoa powder for that extra touch. It’s a cozy pairing that warms the heart!
- Milk: The classic choice! A cold glass of milk is always a hit with cookies. Whether you prefer whole, almond, or chocolate milk, your cookies will taste even better when you take a dip!
- Eggnog: For a festive twist, serve your cookies with a glass of eggnog! This creamy, spiced drink is perfect for the holiday season, and it pairs beautifully with the sweetness of your cookies.
- Tea: If you’re looking for a lighter option, a warm cup of tea can be a lovely complement. Try a cozy chai or a soothing peppermint tea to enhance the holiday flavors of your cookies.
- Decorative platters: Don’t forget to display your cookies on beautiful platters! Arrange them in fun shapes or tiers to create an eye-catching centerpiece for your holiday gatherings. Adding some festive decorations like pinecones or sprigs of holly around the cookies can elevate the presentation even more!
These serving suggestions will not only highlight your delicious cookies but also create a warm and inviting atmosphere for your family and friends to enjoy! Happy serving!
Storage & Reheating Instructions
Once you’ve decorated your beautiful Christmas cookies, it’s important to store them properly so they stay fresh and delicious. Trust me, you want to savor every last bite of your hard work!
First things first, let the cookies dry completely before storing them. I usually wait at least 6 hours or even overnight to ensure the royal icing has set. Once they’re nice and firm, grab an airtight container—this is essential for keeping them fresh!
I recommend layering your cookies with parchment paper between them to prevent any of those gorgeous decorations from sticking together. If you’ve gone a little sprinkle-crazy, this will protect all that festive flair! Your decorated cookies can last for about 1 to 2 weeks when stored this way at room temperature.
If you want to keep them longer, you can freeze the undecorated sugar cookies! Just wrap them tightly in plastic wrap and then place them in a freezer-safe container. They’ll last for up to 3 months in the freezer. When you’re ready to decorate, simply thaw them in the fridge overnight and then let them come to room temperature before icing.
When it comes time to serve those lovely cookies, you can enjoy them at room temperature, but if you want to warm them up a bit, pop them in the microwave for about 10-15 seconds. Just be careful not to overdo it—nobody wants a cookie that’s too soft! With these simple storage tips, you’ll keep the holiday spirit alive with every delicious bite!
Nutritional Information
When it comes to enjoying your easy Christmas cookies, it’s always nice to know what you’re indulging in! Keep in mind that nutritional values can vary based on the specific ingredients and brands you use, but here’s a general estimate based on typical ingredients:
- Serving Size: 1 cookie
- Calories: 150
- Sugar: 10g
- Sodium: 50mg
- Fat: 5g
- Saturated Fat: 2g
- Unsaturated Fat: 2g
- Trans Fat: 0g
- Carbohydrates: 22g
- Fiber: 0g
- Protein: 1g
- Cholesterol: 15mg
These tasty treats are not just festive; they also pack a delightful sweet punch! Enjoy them in moderation as part of your holiday celebrations, and remember, it’s all about balance and joy this season!
FAQ Section
Got questions about easy Christmas cookies decorating? No worries—I’ve got you covered! Here are some of the most common questions I get, along with the answers to help you on your festive baking journey!
What’s the best consistency for royal icing?
The right consistency for royal icing is super important! For outlining, aim for a thicker consistency—think about toothpaste. When filling in designs, you’ll want it a bit thinner, similar to warm honey. A good test is to lift a spoonful of icing; if it flows back into the bowl within about 10 seconds, it’s just right!
How do I store decorated cookies?
To keep your decorated cookies fresh, let them dry completely first—usually about 6 hours or overnight. Then, store them in an airtight container with parchment paper between layers to prevent decorations from sticking together. They should last about 1 to 2 weeks at room temperature. If you’ve made extra cookies, freeze the undecorated ones for later!
What if I mess up while decorating?
Oops! Mistakes happen, and that’s part of the fun! If you accidentally mess up a design, don’t panic. You can gently scrape off the icing with a knife and start over. If the cookie is dry, you can also add more icing to cover up any mishaps—just think of it as adding another layer of creativity!
Can I make the cookies ahead of time?
Absolutely! You can bake and decorate your cookies ahead of time. Just make sure to store them properly. Decorated cookies can be stored for about 1 to 2 weeks, while undecorated cookies can go in the freezer for up to 3 months. Just thaw them in the fridge overnight when you’re ready to decorate!
How can I make my cookies look more professional?
If you want those cookies to look like they came from a bakery, practice makes perfect! Use a piping tip for clean outlines, and take your time while filling in designs. Experiment with different techniques, such as flooding and layering colors. Don’t forget to be creative and have fun; that’s what makes each cookie uniquely yours!
With these answers in your pocket, you’re all set to tackle any decorating challenge that comes your way! Happy baking and decorating!
Print
easy christmas cookies decorating joyfully crafted
- Total Time: 1 hour
- Yield: 24 cookies 1x
- Diet: Vegetarian
Description
Easy Christmas cookies decorating guide
Ingredients
- 1 batch of sugar cookies
- Royal icing
- Food coloring
- Sprinkles
- Edible glitter
Instructions
- Bake sugar cookies according to recipe.
- Cool cookies completely.
- Prepare royal icing and divide into bowls.
- Add food coloring to each bowl.
- Pipe outlines on cookies with icing.
- Fill in designs with thinned icing.
- Add sprinkles and edible glitter.
- Let the cookies dry completely.
Notes
- Use different colors for variety.
- Experiment with shapes and designs.
- Store decorated cookies in an airtight container.
- Prep Time: 30 minutes
- Cook Time: 10 minutes
- Category: Dessert
- Method: Baking and decorating
- Cuisine: American
Nutrition
- Serving Size: 1 cookie
- Calories: 150
- Sugar: 10g
- Sodium: 50mg
- Fat: 5g
- Saturated Fat: 2g
- Unsaturated Fat: 2g
- Trans Fat: 0g
- Carbohydrates: 22g
- Fiber: 0g
- Protein: 1g
- Cholesterol: 15mg
Keywords: easy christmas cookies decorating


