
There’s something magical about gathering around a steaming mug of hot chocolate during the holidays, isn’t there? I still remember the first time I set up a Christmas cocoa bar for our family gathering – the way my niece’s eyes lit up when she saw all the toppings, the laughter as everyone created their perfect cup. That’s when I knew this would become our new holiday tradition.
A Christmas cocoa bar isn’t just about the drink – it’s about creating moments. The rich aroma of cocoa filling the air, the sound of candy canes clinking against mugs, the cozy feeling of wrapping your hands around a warm cup while snow falls outside. It transforms simple hot chocolate into an experience your guests will remember.
What I love most is how it brings people together. Kids giggle as they pile on marshmallows, adults sneak extra whipped cream when they think no one’s looking, and suddenly everyone’s sharing stories by the fireplace. That’s the real magic of a Christmas cocoa bar – it’s not just a drink station, it’s where holiday memories are made.
Why You’ll Love These Christmas Cocoa Bar Ideas
Trust me, once you try setting up a Christmas cocoa bar, you’ll wonder why you didn’t do it sooner! Here’s what makes it so special:
- Effortless entertaining: Just simmer one big batch of cocoa—no fussing with individual orders while guests arrive. The toppings do all the work!
- Something for everyone: Picky eater? Sugar-conscious? Dairy-free? With all the mix-ins, everyone creates their perfect mug.
- Instant holiday vibes: The aroma alone—rich chocolate, peppermint, cinnamon—will make your home smell like Santa’s workshop.
- Kid (and adult!) magnet: Watching guests light up while building their cocoa masterpieces is half the fun. Pro tip: have extra marshmallows—they disappear fast!
It’s not just hot chocolate—it’s a holiday experience in a mug.
Essential Ingredients for Your Christmas Cocoa Bar
Now, let’s talk ingredients—because the magic starts with what goes in your pot! For the base cocoa, you’ll need:
- 4 cups whole milk (or your favorite dairy-free alternative—I’ve used oat milk with fantastic results)
- 1/2 cup high-quality cocoa powder (I always sift mine to prevent lumps—such a game changer!)
- 1/2 cup granulated sugar (adjust to your taste—we like ours on the less sweet side)
- 1 tsp pure vanilla extract (the real stuff makes all the difference)
- Pinch of salt (this little secret enhances all the chocolatey goodness)
But the real fun begins with the toppings! Here’s what I always set out:
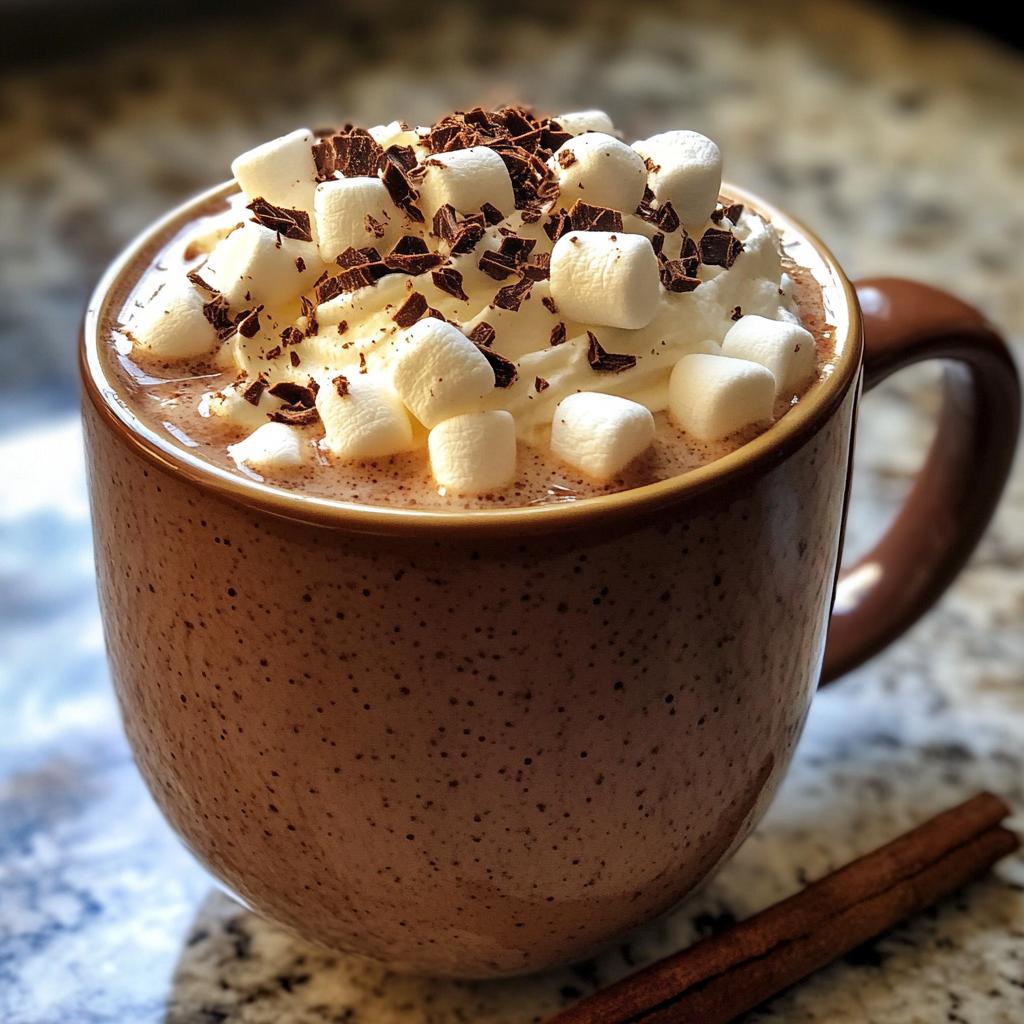
- Whipped cream (the cloud-like crown every cocoa deserves)
- Mini marshmallows (a must—they melt into gooey perfection)
- Chocolate shavings (use a vegetable peeler on a chocolate bar—so easy!)
- Peppermint sticks (for stirring AND crunch—double duty!)
- Cinnamon sticks (warming spices = instant holiday vibes)
- Caramel sauce (drizzle it over the whipped cream—divine!)
Pro tip: Prepare toppings in small bowls with festive spoons—it makes everything feel extra special!
How to Set Up Your Christmas Cocoa Bar
Okay, let’s get this cocoa party started! Setting up your Christmas cocoa bar is easier than wrapping presents (and way more fun). Follow these simple steps, and you’ll have the coziest drink station in town.
Preparing the Hot Chocolate Base
First things first – that rich, velvety cocoa base. Here’s how I make mine foolproof every time:
- Heat it slow and steady: Pour your milk into a heavy-bottomed saucepan over medium-low heat. You want it warm, not boiling – patience is key here!
- Whisk like you mean it: When the milk is steaming (about 5 minutes), add your sifted cocoa powder, sugar, vanilla, and that pinch of salt. Now whisk vigorously for a full minute – no lazy stirring! This prevents lumps and makes it silky smooth.
- Simmer to perfection: Let it bubble gently for exactly 5 minutes, whisking occasionally. The cocoa will thicken slightly and develop deeper flavor. (Sniff test: your kitchen should smell like Christmas morning at this point.)
Pro tip: Transfer the cocoa to a slow cooker set on “warm” – it’ll stay perfect for hours without scorching. Add a splash of milk if it thickens too much.
Arranging the Toppings Station
Now for the fun part – the toppings! Presentation is everything here. My favorite setup:
- Tiered trays for height and visual appeal (dollar store cake stands work great!)
- Mini mason jars filled with toppings – so cute and keeps things tidy
- Labels for everything (I use chalkboard tags or festive stickers)
- Small spoons and scoops – no double-dipping!
Arrange everything within easy reach, with the cocoa pot or slow cooker as the centerpiece. Add some holiday greenery or fairy lights around the station for that extra festive touch. Trust me, your guests will be snapping photos before they even take their first sip!
Creative Christmas Cocoa Bar Toppings
Oh, the toppings – this is where your Christmas cocoa bar becomes a true masterpiece! While marshmallows and whipped cream are classics, I love mixing in unexpected treats that make guests go “Wow!” Here are my all-time favorite additions:
- Crushed candy canes – The quintessential holiday crunch! I smash them in a ziplock bag with a rolling pin (very therapeutic after holiday shopping).
- Toasted coconut flakes – Just 3 minutes in a dry skillet transforms them into golden, aromatic magic.
- Peppermint schnapps or Irish cream – For the adults’ corner (wink wink). Just a splash turns cocoa into a cocktail!
- Orange zest – A pinch adds bright citrus notes that pair surprisingly well with chocolate.
- Cookie crumbles – Leftover gingerbread or sugar cookies? Crush ’em up for instant cookie cocoa.
- Flavored syrups – My homemade vanilla bean or salted caramel syrup stays warm in little pitchers.
Last year, I even set out a bowl of mini chocolate chips and butterscotch chips – the kids went wild making their own “chocolate chip cookie” cocoa. The possibilities are endless when you think outside the mug!
Tips for the Perfect Christmas Cocoa Bar
After years of hosting cocoa bars, I’ve learned a few secrets for making it absolutely foolproof:
- Slow cooker magic: Keep your cocoa at the perfect drinking temperature for hours without burning. Set it to “warm” and stir occasionally.
- Taste as you go: Start with less sugar – guests can always add more. I keep simple syrup on hand for those with a sweet tooth.
- Dietary swaps: Use dairy-free milk and vegan whipped cream to accommodate everyone. Label clearly!
- Prep ahead: Make the cocoa base up to 2 days in advance – just reheat gently before serving.
- Extra mugs: Have plenty warm and ready – people always come back for seconds!
Remember – it’s about joy, not perfection. Even lopsided whipped cream tastes delicious!
Christmas Cocoa Bar Variations
Why stop at classic hot chocolate when you can mix things up? Here are my favorite ways to put a festive twist on the traditional cocoa bar:
- White Christmas version: Swap dark cocoa for white chocolate chips melted into warm milk – so creamy and dreamy with crushed peppermint on top.
- Spiked cocoa corner: Set out small bottles of Baileys, peppermint schnapps, or bourbon for grown-ups to spike their mugs (just don’t let the kids grab these by mistake!).
- Mexican hot chocolate: Add a pinch of cayenne and cinnamon to your base for a warm, spicy kick that’ll wake up your taste buds.
- Mocha magic: Stir in a shot of espresso or strong coffee to the cocoa base for chocolate-coffee lovers.
The best part? You can set up multiple cocoa stations with different themes – the possibilities are as endless as Santa’s list!
Serving and Storing Your Christmas Cocoa Bar
Here’s the good news – your Christmas cocoa bar keeps giving long after the party ends! For serving, keep the cocoa warm in your slow cooker (it’ll stay perfect for 3-4 hours on “warm”). Toppings stay fresh in airtight containers – marshmallows in ziplock bags, sauces in squeeze bottles. Any leftover cocoa? It reheats beautifully the next day – just add a splash of milk while warming to bring back that creamy texture. Stored properly in the fridge, your cocoa base lasts up to 3 days (though in my house, it never lasts that long!).
Nutritional Information
Now, let’s chat numbers – but remember, these are just estimates that’ll change based on your exact ingredients and how generous you are with those toppings! For a basic cup of our cocoa (before the whipped cream mountain):
- Calories: About 200 per serving
- Sugar: 25g (mostly from natural lactose in milk and that bit of added sugar)
- Protein: 6g – hey, milk’s good for you!
- Fat: 5g (use low-fat milk if you prefer)
But let’s be real – the true measure is in holiday happiness, not calories. Everything in moderation, including moderation during Christmas!
Frequently Asked Questions
Over the years, I’ve gotten so many great questions about our Christmas cocoa bar – here are the ones that come up most often!
Can I make this whole setup dairy-free?
Absolutely! I’ve used oat milk and coconut milk with fantastic results – just pick an unflavored, unsweetened variety. For toppings, look for vegan whipped cream and dairy-free chocolate chips. Pro tip: coconut whipped cream is my secret weapon!
How do I scale this for a big crowd?
Easy math – just double or triple the cocoa base recipe and keep it warm in multiple slow cookers. For toppings, I estimate about 1/4 cup of each per person (except marshmallows – kids inhale those!). Set up stations in different areas to prevent traffic jams.
What’s the best way to keep toppings fresh all night?
Small bowls with lids are my go-to – just uncover a few at a time. Anything that can melt (like chocolate chips) stays in the fridge until needed. And here’s a trick: put damp paper towels under your marshmallow bowl to prevent them from drying out.
Can I prep the cocoa base ahead?
You bet! Make it up to 2 days in advance – just store it in the fridge and gently reheat it before serving. The flavor actually improves as the ingredients mingle. Just give it a good whisk as it warms up.
Got more questions? I’m all ears! And don’t forget – we’d love to see your creations. Tag us in your cocoa bar photos!
Print
23 Magical Christmas Cocoa Bar Ideas to Try
- Total Time: 20 mins
- Yield: 4 servings 1x
- Diet: Vegetarian
Description
Create a festive Christmas cocoa bar with these easy ideas. Perfect for holiday gatherings, this setup lets guests customize their hot chocolate with various toppings and flavors.
Ingredients
- 4 cups milk
- 1/2 cup cocoa powder
- 1/2 cup sugar
- 1 tsp vanilla extract
- 1/4 tsp salt
- Whipped cream
- Mini marshmallows
- Chocolate shavings
- Peppermint sticks
- Cinnamon sticks
- Caramel sauce
Instructions
- Heat milk in a saucepan over medium heat.
- Whisk in cocoa powder, sugar, vanilla, and salt until smooth.
- Simmer for 5 minutes, stirring occasionally.
- Pour into mugs and set up a toppings station.
- Let guests customize with whipped cream, marshmallows, and other toppings.
Notes
- Use dairy-free milk for a vegan option.
- Adjust sugar to taste.
- Keep warm in a slow cooker for easy serving.
- Prep Time: 10 mins
- Cook Time: 10 mins
- Category: Beverage
- Method: Stovetop
- Cuisine: American
Nutrition
- Serving Size: 1 cup
- Calories: 200
- Sugar: 25g
- Sodium: 150mg
- Fat: 5g
- Saturated Fat: 3g
- Unsaturated Fat: 2g
- Trans Fat: 0g
- Carbohydrates: 35g
- Fiber: 3g
- Protein: 6g
- Cholesterol: 10mg
Keywords: Christmas cocoa bar, hot chocolate, holiday drinks, festive drinks


