

Nothing says Christmas like the rich, velvety smell of melted chocolate filling your kitchen. I still remember standing on a stool as a kid, watching my mom stir chocolate for our annual holiday treats – my tiny fingers always sneaking a taste before it even hit the molds. Now it’s my favorite December ritual, wrapping up batches of these homemade Christmas chocolates for neighbors, teachers, and of course, my very eager taste-testers (aka my kids).
What makes these so special? You control every delicious detail – from the quality of chocolate to festive mix-ins that make each piece unique. Forget store-bought tins! In about 30 minutes, you’ll have gorgeous homemade Christmas chocolates that taste like holiday magic. Trust me, once you try this easy method, you’ll never go back to the supermarket stuff again.
Why You’ll Love These Christmas Chocolates
Oh, where do I start? These homemade Christmas chocolates are my absolute favorite holiday project because:
- They’re so easy – no fancy skills needed, just melt, pour, and wait (okay, the waiting is the hardest part!)
- You can make them your own – swap in different chocolates, toss in cranberries for tartness, or go wild with holiday sprinkles
- They look festively fancy but secretly require minimal effort (your secret’s safe with me)
- Everyone goes nuts for homemade gifts – package them in cute boxes with ribbon and you’ll instantly become the most popular person at the cookie exchange
Seriously, the first time I made these, my neighbor asked if I’d bought them from some gourmet chocolatier – best compliment ever!
Ingredients for Christmas Chocolates
Here’s what you’ll need to make the most heavenly homemade Christmas chocolates – and yes, quality really matters here! I learned this the hard way when I tried bargain chocolate one year (never again).
- 200g dark chocolate – Look for at least 60% cocoa for that rich depth
- 100g milk chocolate – The creamy balance to dark’s intensity
- 50g white chocolate – For pretty drizzles or marbled effects
- 1 tsp vanilla extract – The secret whisper of warmth
- 50g chopped nuts – I’m partial to toasted hazelnuts or pecans, but walnuts work too (chop them roughly for good texture)
- 50g dried fruit – Tart cherries or cranberries add festive pop, chopped to raisin-size
- 1 tbsp coconut oil – Just enough to make the chocolate extra smooth without tasting coconutty
Pro tip: Splurge on the best chocolate you can find – it makes all the difference between “nice” and “Oh my gosh, give me the whole batch!”
Equipment You’ll Need
Don’t worry—you probably have most of this stuff already! Here’s what you’ll grab:
- A double boiler (or make one with a heatproof bowl over a saucepan of simmering water)
- Silicone molds—I use festive shapes like stars or trees, but even mini muffin tins work
- Measuring spoons for those precise vanilla and coconut oil amounts
- A spatula for scraping every last bit of chocolate (waste not, want not!)
That’s it—no fancy gadgets required. Now let’s melt some chocolate!
How to Make Christmas Chocolates
Okay, let’s get to the fun part—turning these simple ingredients into little bites of holiday joy! I’ll walk you through each step, just like my mom did for me (minus the stool-climbing). Follow along, and you’ll be a chocolate-making pro in no time.
Melting the Chocolate
First things first—let’s melt that chocolate just right. Here’s my foolproof method:
- Fill a saucepan with about 2 inches of water and bring it to a gentle simmer—you want steam, not a rolling boil.
- Place your heatproof bowl on top (make sure it doesn’t touch the water!) and add your chopped dark chocolate first.
- Stir constantly with a spatula as it melts—this isn’t the time for multitasking! Keep the heat medium-low to avoid scorching.
- When it’s about 75% melted, remove from heat and keep stirring—the residual heat will finish the job. This prevents overheating (which makes chocolate grainy—trust me, I’ve cried over seized chocolate before).
Repeat with the milk and white chocolates in separate bowls. Pro tip: White chocolate burns easiest, so melt it last and watch it like a hawk!
Adding Mix-Ins
Now for the creative part! Once your dark chocolate is smooth and glossy:
- Stir in the vanilla and coconut oil until fully blended—this gives that perfect silky texture.
- If you’re adding nuts or fruit, fold them in now while the chocolate’s still warm (about 1-2 tbsp per 100g chocolate). Don’t overmix—you want even distribution without deflating the chocolate.
- For layered effects, pour your dark chocolate into molds first, let it set slightly (10 minutes), then add milk chocolate. Swirl with a toothpick for marbled magic!
Setting and Unmolding
Almost there! Here’s how to get picture-perfect chocolates:
- Gently tap the filled molds on the counter to remove air bubbles (this prevents craters).
- Chill in the fridge for at least 2 hours—no peeking! They need this time to set properly.
- When firm, flip the molds onto parchment paper and press lightly—they should pop right out. If they resist, warm the mold’s bottom briefly with your hands.
And voilà! You’ve just made professional-looking Christmas chocolates. Now try not to eat them all before gifting (I never succeed at this part).
Tips for Perfect Christmas Chocolates
After years of making these (and plenty of chocolate mishaps), here are my hard-earned secrets for holiday-chocolate perfection:
- Temper if you’re fancy – For that professional snap and shine, temper your chocolate properly (but honestly? The coconut oil trick works great for casual gifting).
- Store them right – Keep in an airtight container between parchment layers – they’ll stay fresh for 2 weeks (if they last that long!). Never refrigerate after setting – condensation makes them weep.
- Go wild with decor – While still wet, press in crushed candy canes, edible glitter, or gold leaf for instant holiday glam. I keep a “sprinkle graveyard” of all my failed experiments – trust me, it’s half the fun!
- Label your layers – When doing multi-chocolate batches, mark your molds with tape so you remember what’s what (my “surprise” peppermint-dark chocolate was… interesting).
Remember: Even the imperfect ones taste amazing – just call them “rustic” and watch them disappear!
Variations for Christmas Chocolates
Oh, the possibilities! Once you’ve mastered the basics, try these festive twists to make your Christmas chocolates extra special:
- Peppermint Crunch – Stir crushed candy canes into white chocolate – the refreshing zing is pure holiday magic
- Orange Dreams – Add orange zest to dark chocolate with a pinch of cinnamon for a grown-up citrusy kick
- Salty-Sweet – Sprinkle flaky sea salt on milk chocolate before it sets – my brother-in-law devours these every year
Feeling adventurous? Try folding in crushed gingerbread cookies or adding a drop of rum extract to the dark chocolate – just like grandma’s holiday fruitcake, but way more delicious!
Serving and Storing Christmas Chocolates
Now for my favorite part – showing off these beauties! Stack them in mini cupcake liners inside festive tins (I hoard cute holiday tins all year for this). Tie with ribbon and a sprig of pine for instant gift appeal. For parties, arrange on a tiered stand – they disappear faster than you can say “Santa!”
Store leftovers (ha!) in an airtight container with parchment between layers at cool room temp – they’ll keep their shine for 2 weeks. Never refrigerate – chocolate hates moisture! Pro tip: Hide your personal stash behind the Brussels sprouts – no one looks there.
Nutritional Information
Now, let’s be real – we’re not eating Christmas chocolates for their health benefits! But for those curious, here’s the scoop per piece (about 1-inch size): roughly 80 calories, 5g fat, and 6g sugar. Of course, these numbers dance around depending on your mix-ins – more nuts mean more protein, extra fruit adds natural sweetness. My philosophy? Enjoy every bite – it’s the holidays!
Common Questions About Christmas Chocolates
Over the years, I’ve gotten the same excited questions about these holiday treats—so let me share what I’ve learned through trial and (mostly delicious) error!
Can I skip the coconut oil?
Absolutely! If you’re not a coconut fan, use 1 tsp vegetable shortening instead—it gives the same smooth texture without any flavor. Butter works too, but it might make your chocolates softer. Just avoid water-based liquids (like milk), which can make chocolate seize up into a grainy mess—ask me how I know!
How can I make these vegan?
Easy peasy! Use dairy-free chocolate (check labels—some dark chocolates are accidentally vegan) and swap honey-roasted nuts for plain toasted ones. I love using chopped dried figs or candied ginger for extra sweetness without dairy. The coconut oil is already plant-based—bonus!
How long do homemade chocolates last?
Stored properly (that’s key!), they’ll stay fresh for 2 weeks at room temp or 1 month in the fridge (just let them come to room temp before eating to avoid condensation). The white chocolate versions tend to discolor first—another reason to eat those immediately!
Why did my chocolate get cloudy?
Ah, the dreaded “bloom”! This happens when chocolate gets too warm or encounters moisture. Still safe to eat—just not as pretty. To prevent it, make sure your molds are completely dry before pouring, and avoid sudden temperature changes. If it happens anyway, call them “snow-dusted” chocolates and carry on!
Can I freeze them for later?
You bet! Layer them between parchment in an airtight container and freeze for up to 3 months. Thaw overnight in the fridge—no one will guess they weren’t made fresh! This trick saved me last year when surprise guests showed up with gift expectations.
Print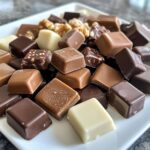
25 Irresistible Christmas Chocolates to Devour
- Total Time: 25 mins
- Yield: 20 pieces 1x
- Diet: Vegetarian
Description
Delicious homemade chocolates perfect for the holiday season.
Ingredients
- 200g dark chocolate
- 100g milk chocolate
- 50g white chocolate
- 1 tsp vanilla extract
- 50g chopped nuts (optional)
- 50g dried fruit (optional)
- 1 tbsp coconut oil
Instructions
- Melt dark chocolate in a double boiler.
- Stir in vanilla extract and coconut oil.
- Pour into molds and add nuts or fruit if desired.
- Repeat steps for milk and white chocolate.
- Let set in the fridge for 2 hours.
- Remove from molds and serve.
Notes
- Use high-quality chocolate for best results.
- Store in an airtight container.
- Add festive toppings like sprinkles for decoration.
- Prep Time: 15 mins
- Cook Time: 10 mins
- Category: Dessert
- Method: No-Bake
- Cuisine: International
Nutrition
- Serving Size: 1 piece
- Calories: 80
- Sugar: 6g
- Sodium: 5mg
- Fat: 5g
- Saturated Fat: 3g
- Unsaturated Fat: 2g
- Trans Fat: 0g
- Carbohydrates: 8g
- Fiber: 1g
- Protein: 1g
- Cholesterol: 2mg
Keywords: christmas chocolates, holiday treats, homemade chocolates


