
There’s something magical about the scent of freshly baked bread filling the house during the holidays—especially when it’s a beautifully scored Christmas loaf, golden and crackling as it cools. I still remember my first attempt at bread scoring years ago; I was so nervous my shaky hands turned simple slashes into wobbly zigzags. But oh, the pride when that loaf came out of the oven, its festive patterns whispering, “Welcome, Christmas!” Whether you’re a seasoned baker or a first-timer, scoring transforms humble dough into edible art. It’s easier than you think, and I’ll show you how to make your holiday table shine with this simple, joyful touch.
Why You’ll Love Christmas Bread Scoring
Trust me, once you try scoring your own Christmas bread, you’ll be hooked. Here’s why:
- It’s easier than it looks – With just a few simple cuts, you can turn a plain loaf into something spectacular
- Instant holiday magic – Those crisp, golden patterns make any table feel festive
- Totally customizable – From simple stars to intricate snowflakes, you can make each loaf unique
- Major wow factor – Guests will think you spent hours when it really takes seconds
My favorite part? Watching the cuts bloom open in the oven – it’s like edible Christmas morning every time!
Ingredients for Christmas Bread Scoring
Gather these simple ingredients – I promise you probably have most in your pantry right now:
- 500g bread flour – That special protein content gives our loaf that perfect chew
- 10g salt – Just enough to make all the flavors pop
- 7g instant yeast – The magic that makes our dough rise beautifully
- 300ml water – Lukewarm is perfect, about like baby bathwater
- 1 tbsp honey – My secret for a golden crust (you can use sugar if needed)
- 2 tbsp olive oil – Makes the crumb wonderfully tender
See? Nothing fancy! Just good, honest ingredients that transform into something truly special.
Equipment Needed for Christmas Bread Scoring
You won’t need fancy gadgets for this – just a few basic tools you likely already have:
- Sharp knife or razor blade – My trusty paring knife works great, but a lame (that fancy bread scorer) makes cleaner cuts
- Large mixing bowl – Any big bowl will do, though I’m partial to my grandma’s chipped ceramic one
- Baking tray – No need for special pans, your regular sheet pan is perfect
Nice-to-haves if you’re feeling fancy:
- Dough scraper – Helps shape the loaf neatly
- Pastry brush – For that golden egg wash shine
- Parchment paper – Makes cleanup a breeze
See? Nothing complicated – just simple tools for spectacular results!
How to Score Christmas Bread
Okay, now for the fun part! Let me walk you through every step – I’ve made all the mistakes so you don’t have to. The key is taking your time and enjoying the process. Before you know it, you’ll have a masterpiece!
Preparing the Dough
First, mix your flour, salt, and yeast in that big bowl. Add the water, honey, and olive oil all at once – no need to fuss! Now, roll up your sleeves and knead for about 10 minutes. You’ll know it’s ready when the dough transforms from shaggy to smooth and springs back when you poke it. Cover with a damp towel and let it rise in a warm spot until doubled – usually about an hour. I like to use my oven with just the light on for this.
Shaping and Scoring the Loaf
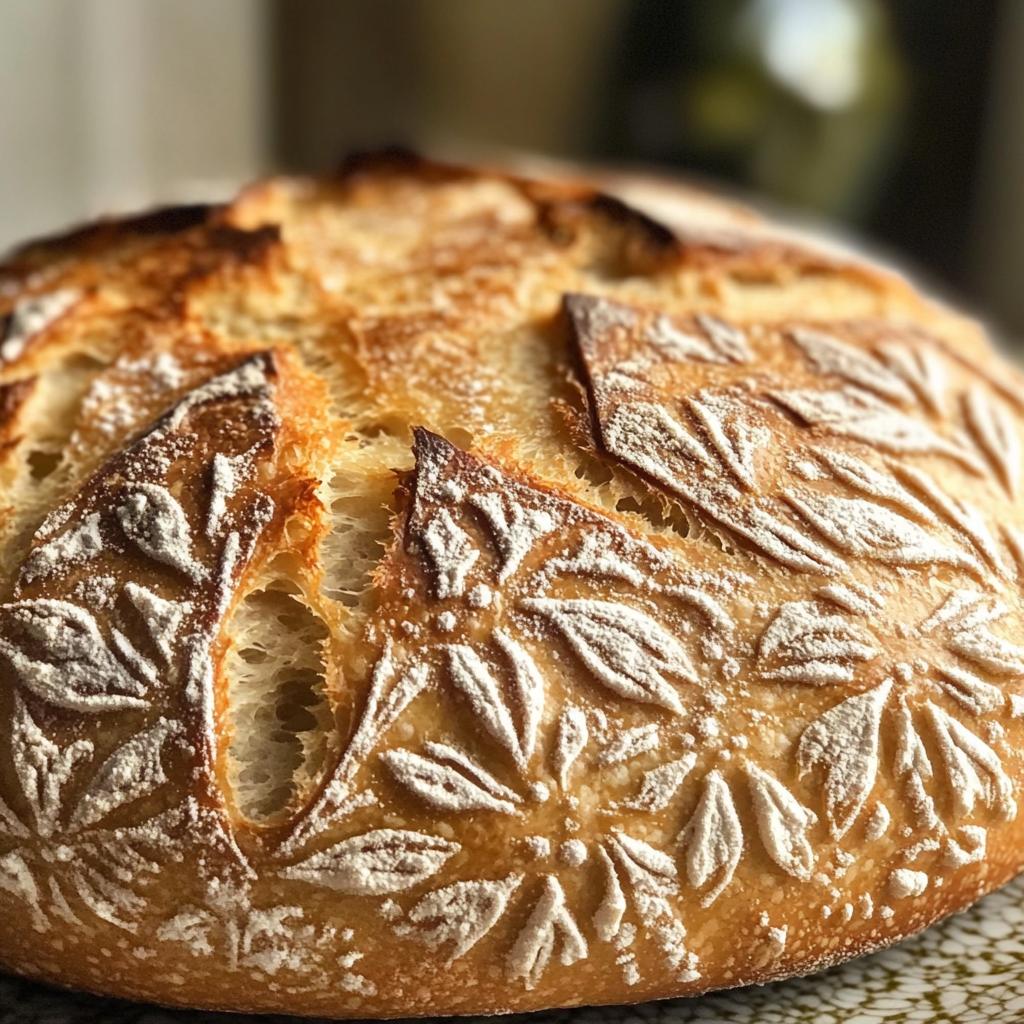
When your dough is puffy and happy, gently turn it out onto a floured surface. Shape it into a tight round by pulling the edges underneath – think of tucking a blanket! Now for the magic: dust the top lightly with flour so your design shows up clearly. Use that sharp knife to make quick, confident cuts about 1/4 inch deep. Start simple – crosses or stars are perfect beginners’ designs. Want something fancier? Try snowflakes or holly leaves! Just remember: the dough will expand, so make your cuts slightly deeper and wider than you think. My first time, I made tiny cuts that disappeared in the oven – lesson learned!
Baking the Christmas Bread
Slide your masterpiece onto a baking tray and into a preheated 200°C oven. Set your timer for 25 minutes, but peek at 20 – ovens vary! You’ll know it’s done when the loaf sounds hollow when tapped underneath and the cuts have bloomed into golden canyons. That heavenly smell means Christmas is officially here! Let it cool just enough so you don’t burn your fingers, then slice into your edible artwork.
Tips for Perfect Christmas Bread Scoring
After dozens of loaves (and plenty of learning moments!), here are my can’t-live-without tips for showstopping scores every time:
- Sharper is better – A dull knife drags the dough instead of slicing cleanly. I keep a razor blade just for bread!
- Flour is your friend – That light dusting makes designs pop and prevents sticking. Too much? Just brush off excess with your fingers.
- Practice makes pretty – Sketch designs on paper first. My first snowflake looked more like a spiderweb!
- Confidence counts – Hesitant cuts turn wobbly. Commit to your lines – they’ll bloom beautifully in the oven.
Two big oops moments to avoid: cutting too shallow (designs disappear) or waiting too long to score (the dough deflates). Time it just after shaping when the surface is taut but still soft!
Variations for Christmas Bread Scoring
Once you’ve mastered basic scoring, try these festive twists! My family goes wild for cinnamon-raisin – just knead in 2 tsp cinnamon and a handful of plump raisins before shaping. For extra holiday cheer, toss in dried cranberries and orange zest – the citrus makes the flavors sing! Feeling fancy? Brush the baked loaf with honey butter for a glistening finish that screams celebration.
Serving and Storing Christmas Bread
Oh, that first warm slice straight from the oven – pure holiday bliss! I always serve mine fresh with softened butter that melts into the cracks. Leftovers (if you have any!) keep beautifully wrapped in a clean kitchen towel for 2 days. For longer storage, freeze slices in parchment paper – they toast up perfectly for Christmas morning breakfast!
Nutritional Information
Here’s the breakdown per slice (but let’s be honest – who stops at one?): about 150 calories, 3g fat, and 5g protein. Remember, nutritional values are estimates and will vary based on your specific ingredients. The real magic is in that homemade holiday joy!
Frequently Asked Questions
Q1. What’s the best flour for Christmas bread scoring?
Bread flour is my go-to because its higher protein content gives that perfect chew and helps the scoring designs hold their shape. All-purpose works in a pinch, but you might get slightly less dramatic cuts. Whatever you use, make sure it’s fresh – old flour can make your dough sluggish!
Q2. I don’t have a razor blade. What can I use for scoring?
No fancy tools needed! A very sharp paring knife works great – I used kitchen scissors once in a pinch (just make quick snips). Some bakers swear by clean, sharp sewing scissors for intricate designs. The key is whatever you use needs to be sharp – dull tools will drag the dough instead of slicing cleanly.
Q3. Can I make the dough ahead?
Absolutely! After the first rise, you can refrigerate the dough overnight. Just let it sit at room temp for 30 minutes before shaping and scoring. This actually develops more flavor! Frozen dough works too – thaw in the fridge overnight then proceed with the recipe.
Share Your Christmas Bread Scoring Creations
I’d love to see your holiday masterpieces! Snap a photo of your scored bread and share it below – those festive patterns deserve to be celebrated. Who knows, your design might inspire someone else’s Christmas table!
Print
Perfect Christmas Bread Scoring in 3 Easy Steps
- Total Time: 1 hour 55 minutes
- Yield: 1 loaf 1x
- Diet: Vegetarian
Description
Learn how to score Christmas bread for a festive touch.
Ingredients
- 500g bread flour
- 10g salt
- 7g instant yeast
- 300ml water
- 1 tbsp honey
- 2 tbsp olive oil
Instructions
- Mix flour, salt, and yeast in a bowl.
- Add water, honey, and olive oil. Knead until smooth.
- Let the dough rise for 1 hour.
- Shape the dough into a round loaf.
- Score the top with festive patterns.
- Bake at 200°C for 25 minutes.
Notes
- Use a sharp knife or razor for clean cuts.
- Dust with flour before scoring for better visibility.
- Practice designs on paper first.
- Prep Time: 1 hour 30 minutes
- Cook Time: 25 minutes
- Category: Baking
- Method: Oven-baked
- Cuisine: International
Nutrition
- Serving Size: 1 slice
- Calories: 150
- Sugar: 2g
- Sodium: 200mg
- Fat: 3g
- Saturated Fat: 0.5g
- Unsaturated Fat: 2g
- Trans Fat: 0g
- Carbohydrates: 28g
- Fiber: 2g
- Protein: 5g
- Cholesterol: 0mg
Keywords: Christmas bread, bread scoring, festive baking


