
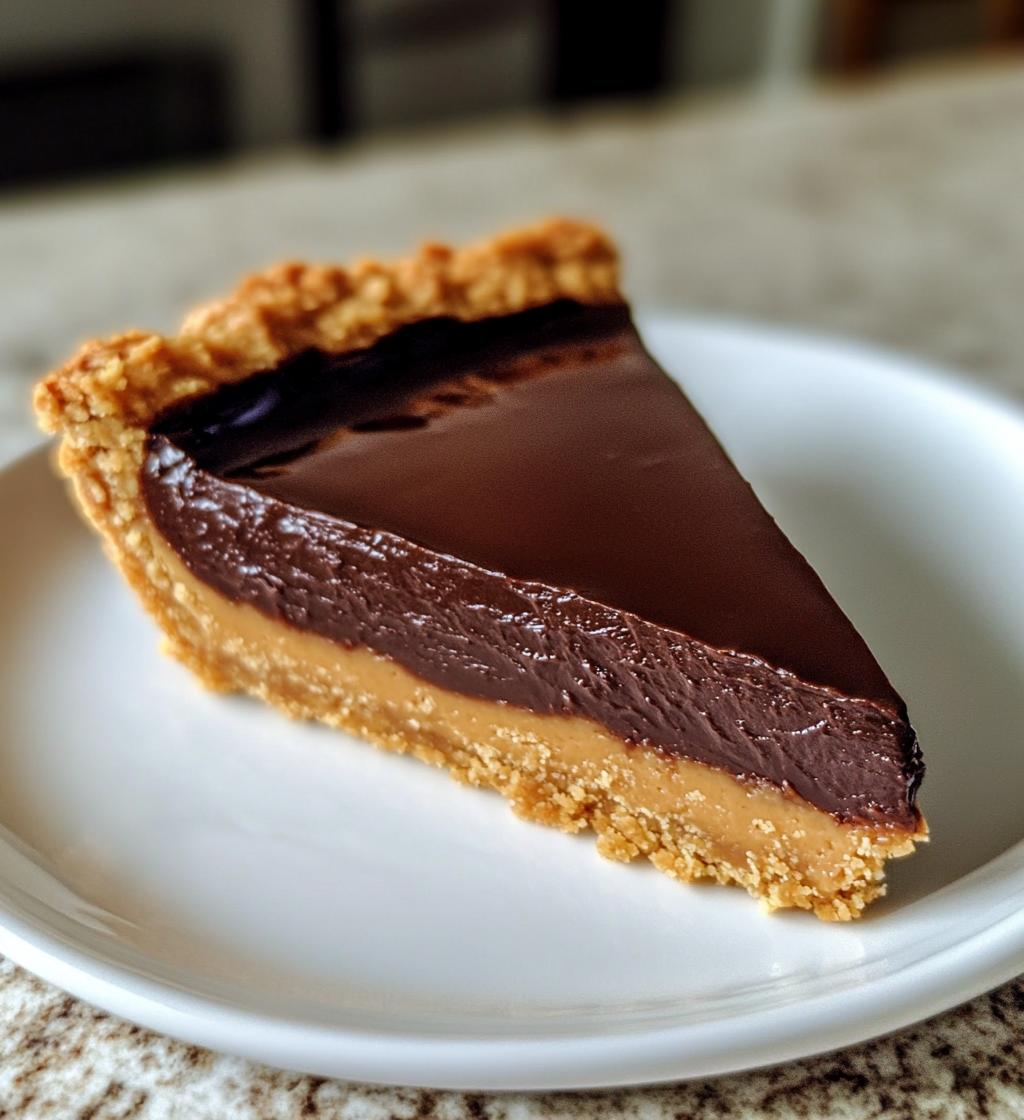
Let me tell you about my absolute favorite dessert to make when I’m craving something rich and indulgent—this chocolate peanut butter tart. It’s the kind of treat that makes you close your eyes after the first bite. The silky smooth ganache is pure chocolate heaven, and the nutty crust? Oh, it’s a game-changer. I’ve been perfecting this recipe for years, and trust me, it’s foolproof. Whether you’re hosting a dinner party or just treating yourself, this tart is guaranteed to impress. Plus, it’s surprisingly easy to whip up. Just wait until you see how the flavors melt together—pure magic!
Why You’ll Love This Chocolate Peanut Butter Tart
Oh my goodness, where do I even start? This tart has stolen hearts at every gathering I’ve brought it to – and yours will too! Here’s why:
- That ganache! Silky doesn’t even begin to cover it – it’s like cutting through chocolate clouds
- Nutty magic: The peanut butter crust adds this irresistible salty-sweet crunch
- Shockingly easy: Looks fancy but comes together faster than you’d think (your secret’s safe with me)
- Crowd-pleaser: Even my “I don’t like sweets” uncle asks for seconds
- Make-ahead dream: Gets even better after chilling overnight
Seriously, one bite and you’ll understand why this never lasts long in my fridge!
Ingredients for Chocolate Peanut Butter Tart
Okay, let’s gather our goodies! Here’s everything you’ll need to create this dreamy tart – and trust me, every single ingredient plays a starring role. I’ve learned through many (many!) batches that quality matters here, so don’t skimp!
- 1 1/2 cups crushed graham crackers – I like to pulse mine in the food processor until they’re fine but still have a tiny bit of texture
- 1/4 cup melted butter – Use the real deal, please! It makes the crust perfectly crisp
- 1/2 cup peanut butter – Creamy works best here; the natural kind can make the crust too oily
- 1 cup heavy cream – This is your ganache game-changer; don’t substitute!
- 1 cup dark chocolate chips – I prefer 60-70% cacao for that perfect bittersweet balance
- 2 tbsp powdered sugar – Just a touch to balance the chocolate’s intensity
- 1/4 tsp salt – My secret weapon to make all the flavors pop!
See? Nothing too fancy, just simple ingredients that create magic together. Now let’s get mixing!
How to Make Chocolate Peanut Butter Tart
Alright, let’s dive into the fun part! Making this tart is easier than you think, but I’ll walk you through each step so it turns out perfect. Just follow along and soon you’ll be slicing into chocolate-peanut butter heaven!
Preparing the Crust
First things first – preheat that oven to 350°F (175°C)! While it’s heating up, mix your crushed graham crackers, melted butter, and peanut butter in a bowl until it looks like wet sand. Here’s my trick: press the mixture firmly into your tart pan using the bottom of a measuring cup – this keeps it nice and compact. Pop it in the oven for just 10 minutes until it’s lightly golden, then let it cool completely. Resist the urge to rush this step – a cool crust means your ganache won’t melt!
Making the Silky Ganache
Now for the star of the show! Heat your heavy cream in a small saucepan until it’s steaming but not boiling – you’ll see little bubbles forming around the edges. Pour this hot cream over your chocolate chips and let it sit for 1 minute (this is crucial!). Then gently stir until it transforms into this glossy, dreamy chocolate river. Add the powdered sugar and salt, stirring until everything’s perfectly smooth. Oh, that smell is incredible!
Assembling the Tart
Here comes the magic moment! Pour your luscious ganache into the cooled crust, using a spatula to spread it evenly. Now the hardest part – pop it in the fridge and wait at least 2 hours (I know, torture!). But trust me, this patience pays off when you get those picture-perfect slices. Pro tip: If you can resist, letting it chill overnight makes the flavors even more amazing!
Tips for the Perfect Chocolate Peanut Butter Tart
After making this tart more times than I can count (okay, maybe I have a problem), here are my foolproof tips to guarantee success every time:
- Peanut butter matters: Stick with smooth, conventional peanut butter – the natural kinds separate and make the crust greasy.
- Chill for clean cuts: Wait the full 2 hours (or overnight!) before slicing – warm tart = messy tart.
- Hot knife trick: Dip your knife in hot water and wipe dry between cuts for those Instagram-worthy slices.
- Storage smarts: Cover tightly with plastic wrap – it keeps beautifully for 3 days in the fridge.
- Crunch control: If your crust seems dry, add just 1 extra tbsp melted butter – don’t overdo it!
Follow these and you’ll have everyone begging for your secret recipe. (You’re welcome!)
Variations for Your Chocolate Peanut Butter Tart
Oh, the fun you can have with this recipe! Here are my favorite twists when I’m feeling adventurous:
- Milk chocolate lovers: Swap the dark chocolate for milk chocolate chips – extra sweet and creamy!
- Crunch time: Press crushed peanuts into the ganache before chilling for an amazing texture contrast.
- Salty surprise: Sprinkle flaky sea salt on top right before serving – it makes the flavors sing!
- Cookie swap: Try Oreo crumbs instead of graham crackers for an ultra-chocolatey crust.
- Caramel drizzle: Warm some store-bought caramel and zigzag it over the chilled tart – heavenly!
Feel free to play around – that’s half the fun of baking!
Serving Suggestions for Chocolate Peanut Butter Tart
Oh, the ways you can serve this beauty! My absolute favorite is slightly chilled with a dollop of barely-sweetened whipped cream – the cool fluffiness cuts through the rich chocolate perfectly. For special occasions, I’ll top slices with fresh raspberries or strawberries. The tart berries play so nicely with the sweet peanut butter and chocolate! Sometimes, I’ll even dust the top with cocoa powder right before serving for that fancy café look. And don’t forget – a hot cup of coffee makes the perfect sidekick to this decadent dessert!
Storing and Reheating Chocolate Peanut Butter Tart
Here’s the good news – this tart keeps like a dream! Just cover it tightly with plastic wrap and store it in the fridge for up to 3 days. The flavors actually deepen as it sits, making it even better. One thing to avoid? Freezing. The ganache can get grainy, and the crust loses its perfect crunch. If you need to serve it slightly cooler than fridge temp, just let it sit on the counter for 10 minutes before slicing. Trust me, it’s worth the wait!
Nutritional Information for Chocolate Peanut Butter Tart
Here’s the scoop on what’s in each slice (because we all want to know, right?): Each serving has about 320 calories, 22g of fat, 28g of carbs, and 6g of protein. Keep in mind, these are estimates – if you tweak the recipe (like using milk chocolate or adding toppings), the numbers might change a bit. But hey, it’s dessert – sometimes you just gotta indulge!
Frequently Asked Questions About Chocolate Peanut Butter Tart
I get so many questions about this tart – here are the ones that pop up most often!
Can I use almond butter instead of peanut butter?
Absolutely! Any nut butter works, but keep in mind almond butter makes a slightly less sweet crust. You might want to add an extra teaspoon of sugar.
Why is my ganache lumpy?
Usually means your cream wasn’t hot enough. Next time, heat until steaming with small bubbles at the pan’s edge. If it happens, strain through a fine mesh sieve.
How do I know when it’s chilled enough?
The ganache should feel completely firm when you gently press the center – no jiggle! Two hours minimum, but overnight is golden.
Can I freeze leftovers?
I don’t recommend it – the texture changes dramatically. Better to share with neighbors (they’ll love you!).
What size tart pan works best?
A standard 9-inch removable bottom tart pan is perfect. Springform pans work too – just watch baking time.
Share Your Chocolate Peanut Butter Tart Experience
I’d absolutely love to hear how your tart turns out! Did you add any fun twists? Did it disappear as fast as mine always does? Drop me a comment below with your results – and don’t forget to rate the recipe so others can see how amazing it is. Happy baking, friends!
Print
Irresistible Chocolate Peanut Butter Tart with Silky Ganache
- Total Time: 2 hours 25 minutes
- Yield: 8 servings 1x
- Diet: Vegetarian
Description
A rich chocolate peanut butter tart with a silky ganache filling and nutty crust.
Ingredients
- 1 1/2 cups crushed graham crackers
- 1/4 cup melted butter
- 1/2 cup peanut butter
- 1 cup heavy cream
- 1 cup dark chocolate chips
- 2 tbsp powdered sugar
- 1/4 tsp salt
Instructions
- Preheat oven to 350°F (175°C).
- Mix crushed graham crackers, melted butter, and peanut butter. Press into a tart pan.
- Bake crust for 10 minutes, then cool.
- Heat heavy cream until steaming, pour over chocolate chips, and stir until smooth.
- Pour ganache into the crust and refrigerate for 2 hours.
- Slice and serve chilled.
Notes
- Use smooth peanut butter for best texture.
- Chill tart before slicing for clean cuts.
- Prep Time: 15 minutes
- Cook Time: 10 minutes
- Category: Dessert
- Method: Baking
- Cuisine: American
Nutrition
- Serving Size: 1 slice
- Calories: 320
- Sugar: 18g
- Sodium: 180mg
- Fat: 22g
- Saturated Fat: 10g
- Unsaturated Fat: 9g
- Trans Fat: 0g
- Carbohydrates: 28g
- Fiber: 2g
- Protein: 6g
- Cholesterol: 25mg
Keywords: chocolate peanut butter tart, ganache, nutty dessert


