
There’s something about the combo of chocolate and peanut butter that feels like a warm hug in dessert form. My Chocolate Peanut Butter Swirl Bars are the treat I always turn to when I need something quick, indulgent, and guaranteed to disappear fast at potlucks. The first time I made these for my niece’s birthday, she declared them “even better than store-bought candy bars” – high praise from a tough-to-please 10-year-old! What makes them special? That perfect swirl of rich chocolate and creamy peanut butter over a buttery shortbread-like crust. They’re dangerously easy to make but taste like you spent hours in the kitchen. Just try stopping at one square – I dare you!
Why You’ll Love These Chocolate Peanut Butter Swirl Bars
Listen, I know we all have those days when we need something sweet now without a fuss. That’s exactly why these bars are my go-to:
- Crazy quick – From bowl to fridge in under 30 minutes (okay, plus chilling time, but that doesn’t count as work!)
- No-bake magic – The crust bakes just 15 minutes while you melt the toppings
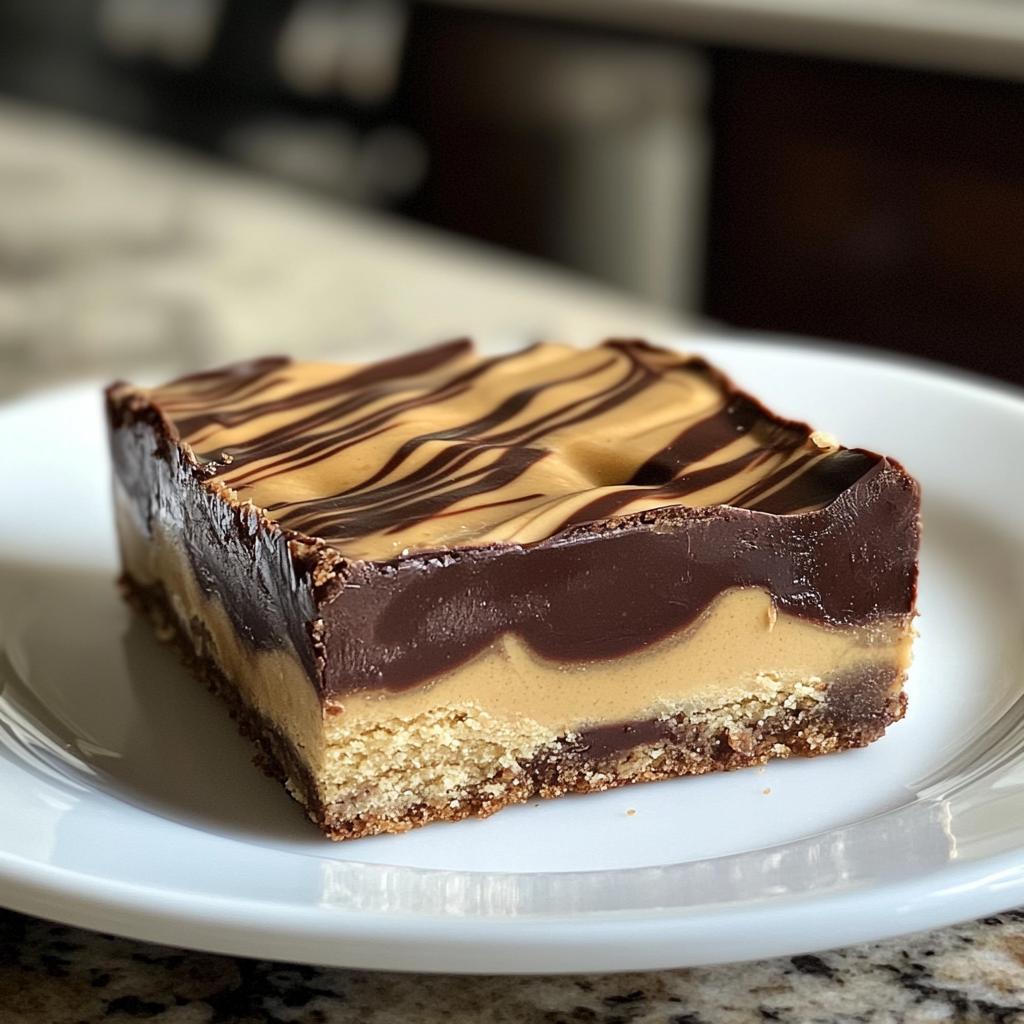
- That swirl hypnotizes people – Everyone thinks you’re a pastry pro when they see those chocolate ribbons
- Potluck gold – I’ve brought these to six events this year and always get begged for the recipe
The best part? That salty-sweet crunch giving way to fudgy chocolate. Pure bliss.
Ingredients for Chocolate Peanut Butter Swirl Bars
Here’s the beautiful thing about these bars – you probably have most of this stuff in your pantry already! But let me tell you exactly what you’ll need (and why each ingredient matters):
- 1 cup all-purpose flour – The backbone of our crust, giving it that perfect crumbly texture
- 1/2 cup unsalted butter, melted – Yes, melted! This makes the crust extra tender (and saves you from creaming)
- 1/2 cup granulated sugar + 1/4 cup packed brown sugar – The brown sugar adds moisture while the white sugar gives crispness
- 1 tsp vanilla extract – My secret for making the crust taste like shortbread cookies
- 1/4 tsp salt – Crucial for balancing all that sweetness
- 1/2 cup creamy peanut butter – Not the natural kind – we need that stabilizer for smooth spreading
- 1/2 cup semi-sweet chocolate chips + 1 tbsp coconut oil – The oil makes the chocolate drizzle like a dream
See? Simple stuff that creates magic together. Now let’s get mixing!
Equipment You’ll Need
Before we dive in, let’s grab our trusty kitchen tools – nothing fancy here! You’ll need:
- 8×8-inch baking pan – My go-to for perfect thick bars (a 9×9 works too, they’ll just be slightly thinner)
- Parchment paper – Lifesaver for clean removal (trust me, you don’t want to skip this!)
- 2 mixing bowls – One for the crust, one for swirling magic
- Microwave-safe bowl – For melting chocolate without a double boiler fuss
That’s it! No stand mixer or special gadgets needed – just good old-fashioned mixing by hand.
How to Make Chocolate Peanut Butter Swirl Bars
Okay, let’s get to the fun part – making these beauties! I’ll walk you through each step like we’re baking together in my kitchen. Just follow along, and you’ll have perfect swirl bars in no time.
Preparing the Crust
First things first – preheat that oven to 350°F (175°C). Now grab your biggest mixing bowl and toss in the flour, melted butter, both sugars, vanilla, and salt. Stir until it looks like wet sand – no dry spots! Line your pan with parchment (leave some hanging over the edges – you’ll thank me later) and press the mixture in FIRMLY with your fingers. We want an even layer that’ll hold up to those toppings. Pop it in the oven for exactly 15 minutes – you’ll know it’s ready when the edges turn golden.
Adding the Peanut Butter Layer
While the crust cools slightly, let’s prep the peanut butter. Microwave it for about 30 seconds until it’s pourable but not hot. Pour it over the warm crust and spread gently with a spatula – the warmth helps it spread like a dream. Don’t worry about perfection here; we’re going to swirl it anyway!
Swirling the Chocolate
Now the magic! Melt chocolate chips with coconut oil in 20-second bursts, stirring between each. When it’s smooth, drizzle it over the peanut butter in zigzags. Take a knife and make figure-eight motions – just 3-4 passes max! Overmixing turns it muddy. The goal is those gorgeous marble streaks where both flavors shine.
Chilling and Cutting
Here’s the hardest part – patience! Refrigerate for at least 1 hour (2 is better). When it’s firm, lift it out using the parchment handles and slice with a warm knife (run it under hot water and dry between cuts). Clean slices every time! Now try not to eat the whole batch in one sitting.
Tips for Perfect Chocolate Peanut Butter Swirl Bars
After making these bars more times than I can count (okay, maybe I have a problem), here are my foolproof tricks:
- Peanut butter temperature matters! Room temp spreads easier, but if yours is cold, microwave in 10-second bursts until just softened
- Chill like you mean it – That hour minimum is non-negotiable unless you want peanut butter fingerprints everywhere
- Parchment paper wings – Leave those extra-long sides hanging out so you can lift the whole slab out cleanly
- Warm knife = clean cuts – I run mine under hot water between each slice for picture-perfect bars
Oh, and hide a few in the back of the fridge – they mysteriously vanish otherwise!
Ingredient Substitutions and Variations
Want to mix things up? I’ve tried every variation under the sun (all in the name of research, of course). Here are my favorite twists on the classic:
- Nut butter swap – Almond butter works beautifully, though it’ll be slightly less sweet. Sunflower seed butter makes it school-safe for allergies
- Chocolate choices – Dark chocolate chips give a sophisticated edge, while milk chocolate makes it extra kid-friendly (watch the coconut oil – you might need less)
- Crunch factor – Stir 1/4 cup chopped peanuts into the peanut butter layer for texture
- Salty surprise – A sprinkle of flaky sea salt after swirling takes it over the top
Just remember – natural peanut butter can make the bars softer, and omitting coconut oil might thicken your chocolate. Taste won’t suffer, but texture might change slightly. Happy experimenting!
Storing and Freezing Chocolate Peanut Butter Swirl Bars
These bars disappear fast at my house, but if you miraculously have leftovers (or hid some like I do), here’s how to keep them fresh. Store them in an airtight container at room temperature for up to 3 days, or in the fridge for a full week – the chill actually makes the chocolate extra fudgy. For longer storage, freeze individual bars wrapped tightly in plastic, then foil. They’ll keep beautifully for 2 months! Just thaw at room temp for 15 minutes before serving. Pro tip: Layer wax paper between bars to prevent sticking. The texture stays perfect every time!
Nutritional Information
Each Chocolate Peanut Butter Swirl Bar packs about 220 calories – totally worth every bite! Here’s the quick breakdown per serving:
- 12g fat (6g saturated from all that delicious butter and chocolate)
- 24g carbs (15g sugars to satisfy that sweet tooth)
- 4g protein (thank you, peanut butter!)
Remember – these numbers can vary slightly based on your exact ingredients. I use standard measuring cups, but if you’re watching specific macros, definitely weigh your flour and sugars for precision!
Frequently Asked Questions
Can I use crunchy peanut butter instead of creamy?
Absolutely! The texture will be different, but I actually love the extra crunch. Just know the swirls won’t be as smooth – those peanut bits like to interrupt the chocolate’s flow. If you go this route, press the peanut butter layer extra firmly so the chunks don’t make cutting messy.
How long do these bars stay fresh?
At room temp, they’re dreamy for 3 days in an airtight container. In the fridge? A full week! The chocolate actually gets fudgier as they chill. If they last that long – mine never do. Pro tip: The crust stays crispest when stored between parchment layers.
Can I skip the chilling step?
Oh honey, I wish! That hour in the fridge is what lets the layers set properly. Without it, you’ll have a delicious but sloppy mess. If you’re in a pinch, pop them in the freezer for 30 minutes – but no less!
Can I double this recipe?
You bet! Use a 9×13 pan and add 5 minutes to the crust baking time. The swirls look extra impressive on a bigger canvas. Just be sure your microwave bowl is big enough for all that melty chocolate goodness!

Irresistible Chocolate Peanut Butter Swirl Bars
- Total Time: 1 hour 30 minutes (includes chilling)
- Yield: 12 bars 1x
- Diet: Vegetarian
Description
Delicious chocolate peanut butter swirl bars with a rich and creamy texture. Perfect for dessert or a sweet snack.
Ingredients
- 1 cup all-purpose flour
- 1/2 cup unsalted butter, melted
- 1/2 cup granulated sugar
- 1/4 cup brown sugar
- 1 tsp vanilla extract
- 1/4 tsp salt
- 1/2 cup creamy peanut butter
- 1/2 cup semi-sweet chocolate chips
- 1 tbsp coconut oil
Instructions
- Preheat oven to 350°F (175°C). Line a baking pan with parchment paper.
- Mix flour, melted butter, granulated sugar, brown sugar, vanilla, and salt in a bowl until combined.
- Press the mixture into the prepared pan to form the crust.
- Bake for 15 minutes until lightly golden.
- In a separate bowl, melt peanut butter and spread it over the baked crust.
- Melt chocolate chips with coconut oil and drizzle over the peanut butter layer.
- Use a knife to swirl the chocolate and peanut butter together.
- Chill in the fridge for at least 1 hour before cutting into bars.
Notes
- Store in an airtight container for up to one week.
- For a firmer texture, freeze for 30 minutes before cutting.
- Substitute almond butter if peanut butter is unavailable.
- Prep Time: 15 minutes
- Cook Time: 15 minutes
- Category: Dessert
- Method: Baking
- Cuisine: American
Nutrition
- Serving Size: 1 bar
- Calories: 220
- Sugar: 15g
- Sodium: 80mg
- Fat: 12g
- Saturated Fat: 6g
- Unsaturated Fat: 4g
- Trans Fat: 0g
- Carbohydrates: 24g
- Fiber: 1g
- Protein: 4g
- Cholesterol: 20mg
Keywords: chocolate peanut butter bars, dessert, easy recipe


