
Oh my goodness, let me tell you about cheese balls! They are the ultimate party appetizer, and I just can’t get enough. Seriously, there’s something magical about that creamy, cheesy goodness all rolled into one delightful ball. It’s like a flavor explosion in every bite! I remember the first time I made one for a family gathering; I was so nervous, but it turned out to be a huge hit. Everyone kept coming back for more, and I felt like a culinary genius!
This cheese ball recipe is not just easy to whip up, but it’s also perfect for any gathering, whether it’s a holiday party, casual get-together, or game night with friends. You can have it ready in just 15 minutes, and then all you need to do is let it chill in the fridge for a couple of hours while you kick back and enjoy a glass of wine. Trust me, your guests will be raving about it!
What I love the most is how versatile cheese balls can be. You can customize them with various ingredients to suit your taste or the theme of the gathering. I’ve even made some with a spicy twist by adding jalapeños for that extra kick. They always disappear so quickly! So, grab your ingredients and let’s dive into making this delicious cheese ball that will surely become a staple at all your future gatherings!
Ingredients List
Alright, let’s get into the good stuff—here’s what you’ll need to make this delicious cheese ball! Gather these ingredients, and I promise you’ll have a fantastic appetizer ready in no time.
- 8 oz cream cheese, softened: This is the base of our cheese ball. Make sure it’s nice and soft so it blends smoothly with the other ingredients.
- 1 cup shredded cheddar cheese: I love using sharp cheddar for its rich flavor, but you can go for mild if that’s your thing!
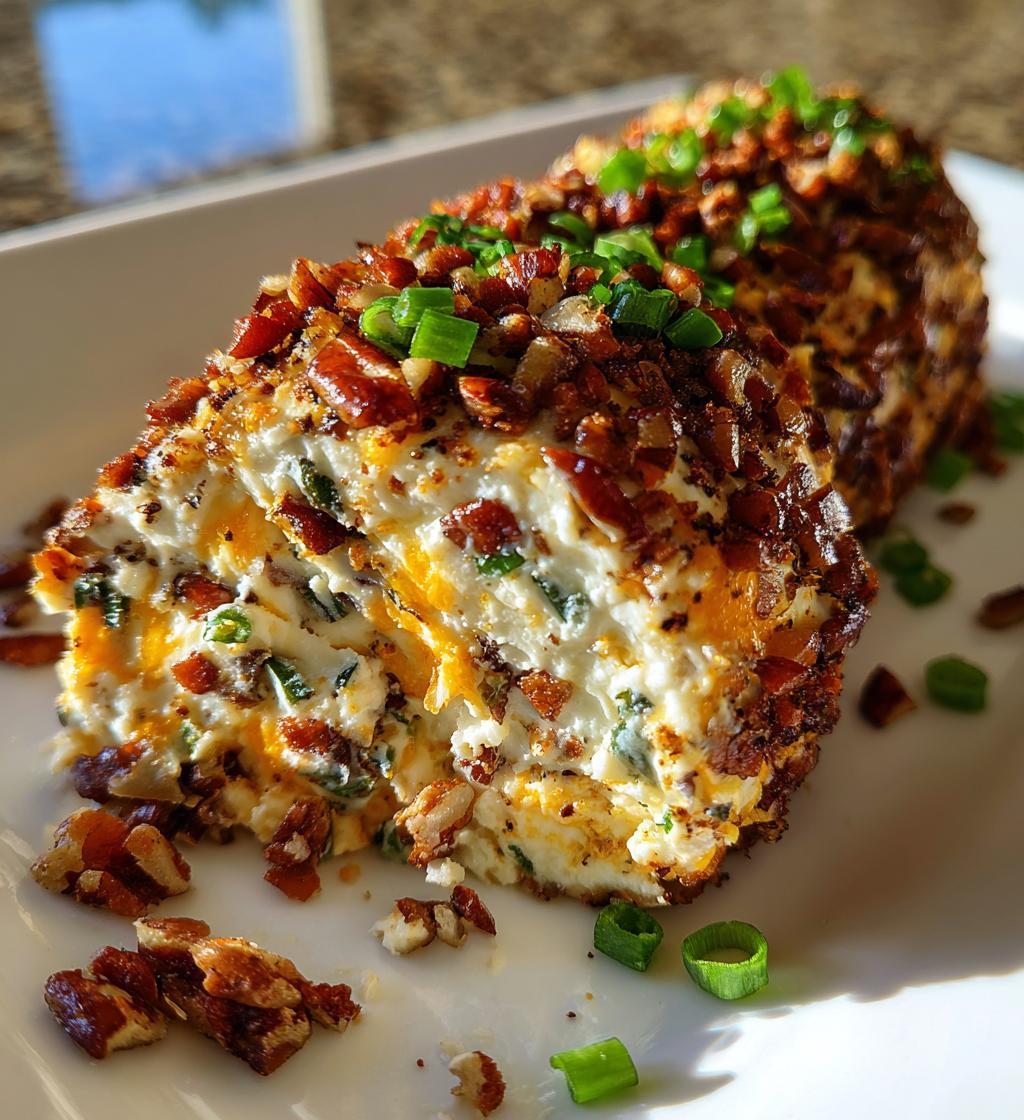
- 1/2 cup chopped green onions: These add a fresh, zesty crunch that really elevates the flavor. Don’t skip them!
- 1/2 cup chopped pecans: These bring a lovely crunch and nutty flavor. Feel free to toast them lightly for an extra depth of flavor.
- 1 tbsp Worcestershire sauce: This little kick of umami is essential for rounding out all the flavors.
- 1 tsp garlic powder: Because let’s be honest, everything’s better with a bit of garlic!
- 1/2 tsp salt: Just a pinch to enhance all those yummy flavors.
That’s it! Simple and straightforward, right? Now that you have everything ready, let’s move on to the fun part—making your cheese ball!
How to Prepare Cheese Ball
Now that we’ve gathered all the ingredients, it’s time to put on our culinary hats and create this scrumptious cheese ball! I promise you, it’s as easy as pie—well, maybe easier! Just follow these simple steps, and you’ll be on your way to cheese ball perfection.
Step-by-Step Instructions
- Combine the cheeses and flavorings: In a mixing bowl, you’ll want to combine the softened cream cheese and shredded cheddar cheese. It’s best to use a spatula or wooden spoon to mix until everything is well blended. Trust me, this is where the magic begins!
- Add the extras: Next, toss in the chopped green onions, Worcestershire sauce, garlic powder, and salt. Mix everything together until it’s combined beautifully. You want to see those vibrant green bits of onion peeking through the creamy mixture!
- Shape the cheese ball: Once your mixture is nice and smooth, it’s time to form it into a ball. Don’t be shy—get your hands in there! I find it helpful to use a bit of plastic wrap to help shape it. Just scoop the mixture onto the wrap, then twist and roll it into a ball. It should feel nice and compact.
- Coat with pecans: Now comes the fun part! Roll your cheese ball in the chopped pecans until it’s fully coated. This gives it a lovely crunch and a beautiful presentation. Plus, who can resist the nutty flavor that complements the cheese?
- Chill out: Wrap the cheese ball in plastic wrap and pop it in the fridge for at least 2 hours. This chilling time is essential—it allows the flavors to meld and helps the cheese ball firm up. If you can wait longer, even better!
- Serve and enjoy: When you’re ready to dive in, remove the cheese ball from the fridge, unwrap it, and place it on a serving platter. It pairs perfectly with crackers, fresh veggies, or even some sliced baguette. Wow your guests with this delightful appetizer!
And there you have it! A delightful cheese ball that’s sure to steal the show at your next gathering. Just remember to save some for yourself; it’s hard to resist going back for seconds!
Why You’ll Love This Cheese Ball Recipe
This cheese ball recipe is a total game changer for any gathering. Here’s why you’re going to adore it:
- Incredible Flavor: The creamy goodness of the cream cheese combined with the sharp cheddar and the crunch of pecans creates a heavenly taste explosion in every bite!
- Quick and Easy: With just 15 minutes of prep time, you can whip this up without breaking a sweat. Then, just let it chill while you enjoy your day!
- Versatile for Any Occasion: Whether it’s a holiday party, a casual game night, or a summer barbecue, this cheese ball fits right in. You can even switch up ingredients to match the theme or your guests’ tastes!
- Make-Ahead Friendly: You can prepare this cheese ball a day in advance, which means less stress for you on the day of the event. Just pop it in the fridge and it’s ready when you are!
- Crowd-Pleaser: Trust me, everyone will be talking about this cheese ball. It’s a guaranteed hit that will disappear from the table in no time!
So, are you ready to impress your guests with this delightful appetizer? I know they’ll be coming back for seconds, and you’ll be the star of the show!
Tips for Success
Ready to take your cheese ball game to the next level? Here are some tried-and-true tips that will help you create the most amazing cheese ball every time!
- Use Room Temperature Cream Cheese: This is crucial! Make sure your cream cheese is softened to room temperature before mixing. It blends much easier that way, resulting in a smoother texture. I usually set it out for about an hour before I start.
- Mix Thoroughly: Don’t rush this step! You want to ensure all the ingredients are well combined, so take your time mixing. A good mix means every bite will be bursting with flavor.
- Get Creative with Coatings: While I love pecans for their crunch, feel free to experiment! You can roll the cheese ball in crushed crackers, bacon bits, or even fresh herbs for a twist. The possibilities are endless!
- Chill for Optimal Flavor: Give your cheese ball plenty of time in the fridge. The longer it chills, the more the flavors meld together. If you can, let it sit overnight—your taste buds will thank you!
- Presentation Matters: When serving, don’t just plop the cheese ball on a plate! Dress it up with some colorful veggies or a selection of crackers around it. A beautiful presentation makes it even more appealing!
With these tips in your back pocket, you’re all set to create a stunning cheese ball that’s as delicious as it is impressive. Happy cheeseball making!
Variations of Cheese Ball Recipes
Now that you’ve mastered the classic cheese ball, let’s have some fun with variations! The beauty of cheese balls is their versatility, and you can easily mix things up to create unique flavors that will keep your guests guessing. Here are some fabulous ideas to inspire your next cheeseball masterpiece!
- Herbed Cheese Ball: Swap out the cheddar for a creamy goat cheese or a tangy feta. Add fresh herbs like dill, chives, or parsley for a refreshing twist. The bright flavors will make this cheese ball perfect for spring gatherings!
- Spicy Jalapeño Cheese Ball: For those who love a kick, mix in finely chopped jalapeños or even some diced green chilies. You can also add a sprinkle of cayenne pepper or chili powder to the cheese mixture. Just remember to taste as you go for the right level of heat!
- Sweet and Savory Cheese Ball: Combine cream cheese with brown sugar and crushed pineapple for a sweet version. Roll the cheese ball in chopped pecans and serve with apple slices or graham crackers for a delightful balance of flavors.
- Smoky BBQ Cheese Ball: Mix in a tablespoon of your favorite BBQ sauce and some smoked paprika for a BBQ-inspired cheese ball. You can even add crumbled bacon for that smoky flavor punch. This one pairs perfectly with crispy tortilla chips!
- Italian Cheese Ball: How about a twist on the Italian classic? Use mozzarella and add sun-dried tomatoes, fresh basil, and a drizzle of balsamic glaze. Roll it in pine nuts for a crunchy finish. It’s like a caprese salad in cheese ball form!
Feel free to get adventurous and combine different flavors! The key is to have fun with it and create a cheese ball that reflects your personal taste or the theme of your gathering. With these variations, you’ll never run out of delicious options to impress your guests!
Serving Suggestions
Now that your cheese ball is ready to shine, let’s talk about how to serve it up for maximum impact! Presentation is key, and I’ve got some delightful ideas to make your cheese ball the star of the show.
First up, you can’t go wrong with a classic selection of crackers. I love using a variety of textures and flavors to complement the creamy cheese ball. Think buttery Ritz, crunchy water crackers, or even some whole grain options for a wholesome touch. Arrange them around the cheese ball on a beautiful platter, and watch your guests dive in!
Fresh veggies are another fantastic accompaniment. Sliced cucumbers, baby carrots, and bell pepper strips not only add a pop of color but they also provide a refreshing crunch that pairs perfectly with the rich flavors of the cheese ball. You can even create a little veggie bouquet by placing them in a jar or cup beside the cheese ball for a fun presentation!
If you want to go a step further, consider serving your cheese ball with some warm, toasted baguette slices. Just slice up a baguette, brush the pieces with a bit of olive oil, and toast them in the oven until golden brown. This adds a lovely crunch and a hint of warmth that makes each bite even more irresistible.
For a special touch, you might also want to add a small bowl of your favorite jam or chutney nearby. The sweetness contrasts beautifully with the savory flavors of the cheese ball, and it creates an exciting flavor combination that guests will love!
Finally, don’t forget to provide some small utensils or toothpicks for easy serving. You want to make it as effortless as possible for your guests to dig in and enjoy every last bite of your amazing cheese ball!
With these serving suggestions, your cheese ball will not only taste fantastic but will also look stunning on the table. Get ready for compliments and empty platters!
Nutritional Information Section
Now, let’s talk about the nutritional side of our delicious cheese ball! Keep in mind that these values can vary based on the specific ingredients and brands you use, so they’re not set in stone. However, here’s a typical breakdown to give you an idea of what you’re getting:
- Calories: 100 per serving (1 ounce)
- Fat: 8g
- Saturated Fat: 4g
- Unsaturated Fat: 3g
- Trans Fat: 0g
- Cholesterol: 25mg
- Sodium: 150mg
- Carbohydrates: 2g
- Fiber: 0g
- Sugar: 1g
- Protein: 5g
So there you have it! This cheese ball is a delightful treat that fits perfectly into many diets. Just remember to savor every bite, and enjoy sharing it with friends and family! Happy snacking!
FAQ Section
Got questions about cheese balls? Don’t worry, I’ve got you covered! Here are some common queries and answers that will help you navigate the world of cheeseball recipes with ease.
Q1. Can I make cheese balls ahead of time?
Absolutely! In fact, making your cheese ball in advance is a fantastic idea. You can prepare it up to a day ahead and simply store it in the fridge. This allows the flavors to meld beautifully, making it even tastier when you serve it!
Q2. How do I store leftover cheese ball?
If you happen to have any leftovers (which is rare!), just wrap the cheese ball tightly in plastic wrap or place it in an airtight container. It’ll keep well in the fridge for about 5 days. Just remember to bring it to room temperature before serving again for the best flavor and texture!
Q3. Can I use different cheeses in the recipe?
Definitely! One of the best things about cheese ball recipes is their versatility. Feel free to experiment with different cheeses like cream cheese, goat cheese, or even blue cheese for a bold flavor. Just keep in mind that different cheeses will change the taste and texture, so have fun with it!
Q4. What can I serve with my cheese ball?
You can serve a cheese ball with a variety of accompaniments! Crackers are a classic choice, but fresh veggies like cucumbers, carrots, and bell peppers also make great pairings. For something a little different, try warm baguette slices or even pretzels. The options are endless!
Q5. How can I make my cheese ball spicier?
If you’re looking to spice things up, consider adding finely chopped jalapeños, a dash of cayenne pepper, or even some hot sauce to the mix. Just remember to taste as you go to find the perfect level of heat for your guests. They’ll love the kick!

Cheese Ball Delight: 5 Irresistible Recipes to Savor
- Total Time: 2 hours 15 minutes
- Yield: 8 servings 1x
- Diet: Vegetarian
Description
A delicious cheese ball perfect for parties and gatherings.
Ingredients
- 8 oz cream cheese, softened
- 1 cup shredded cheddar cheese
- 1/2 cup chopped green onions
- 1/2 cup chopped pecans
- 1 tbsp Worcestershire sauce
- 1 tsp garlic powder
- 1/2 tsp salt
Instructions
- In a mixing bowl, combine cream cheese, cheddar cheese, green onions, Worcestershire sauce, garlic powder, and salt.
- Mix until well blended.
- Form the mixture into a ball shape.
- Roll the cheese ball in chopped pecans until fully coated.
- Wrap in plastic wrap and refrigerate for at least 2 hours.
- Serve with crackers or vegetables.
Notes
- For a spicy kick, add jalapeños.
- Can be made a day ahead.
- Serve with assorted dips for variety.
- Prep Time: 15 minutes
- Cook Time: 0 minutes
- Category: Appetizer
- Method: No-cook
- Cuisine: American
Nutrition
- Serving Size: 1 ounce
- Calories: 100
- Sugar: 1g
- Sodium: 150mg
- Fat: 8g
- Saturated Fat: 4g
- Unsaturated Fat: 3g
- Trans Fat: 0g
- Carbohydrates: 2g
- Fiber: 0g
- Protein: 5g
- Cholesterol: 25mg
Keywords: cheese ball, cheeseball recipes


