
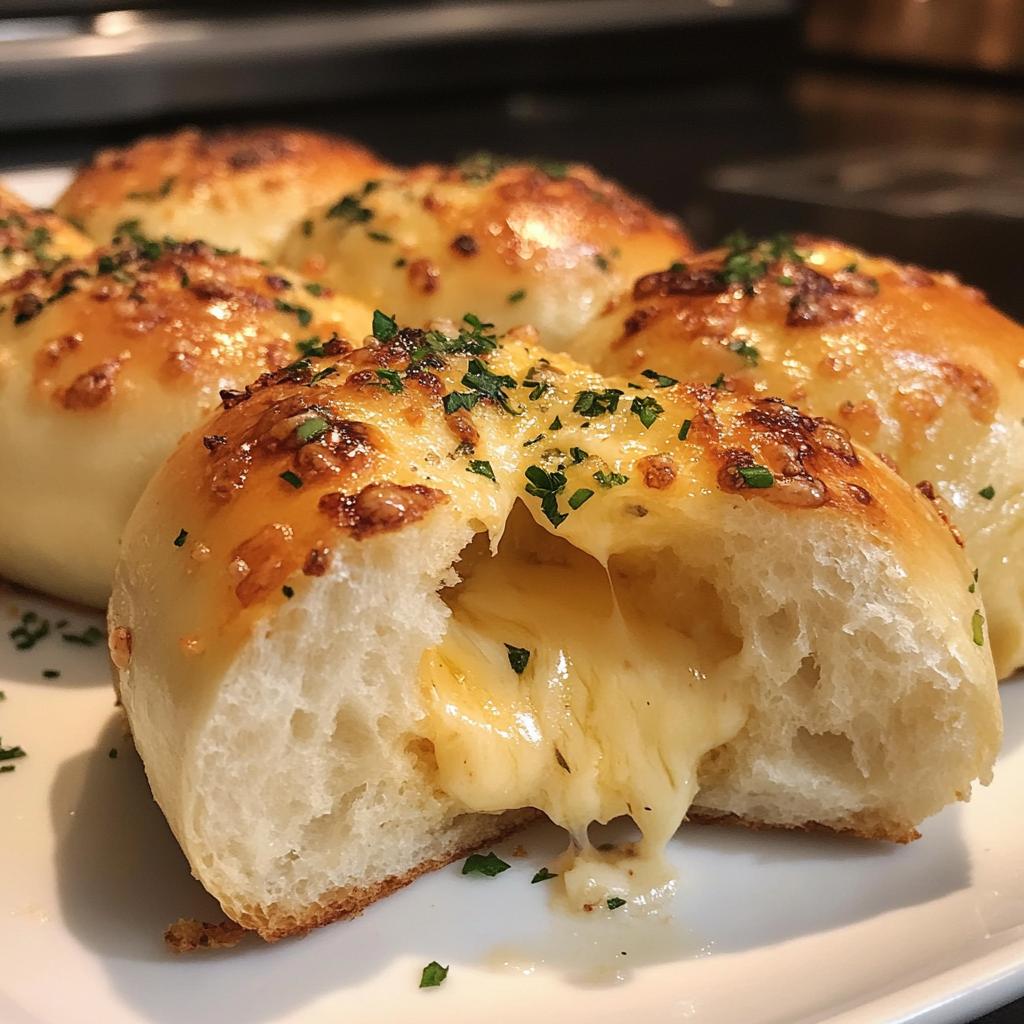
You know that moment when you pull a tray of warm, golden rolls from the oven, and the whole kitchen smells like garlic butter and melted cheddar? That’s the magic of these cheddar stuffed garlic rolls—my go-to recipe whenever I need something quick, comforting, and guaranteed to disappear fast. I stumbled on this recipe years ago when I had extra cheddar and a serious bread craving, and now it’s my secret weapon for potlucks, weeknight dinners, or just bribing my kids to do their homework. Soft, cheesy, and packed with garlicky goodness, these rolls are what carb dreams are made of.
Ingredients for Cheddar Stuffed Garlic Rolls
Here’s what you’ll need to make those irresistible cheesy rolls. Trust me, using the right ingredients makes all the difference between “good” and “oh-my-goodness-I-need-another-one!”
- 2 cups all-purpose flour (spoon and leveled)
- 1 tbsp sugar (just enough to wake up the yeast)
- 1 tsp salt (I use kosher)
- 1 tbsp active dry yeast (check the expiration date!)
- 3/4 cup warm water (110°F/45°C – think baby bathwater warm)
- 2 tbsp melted butter (unsalted, please)
- 1 egg (room temp works best)
- 1 cup shredded cheddar cheese (block cheese, freshly grated – pre-shredded won’t melt as nicely)
- 2 cloves garlic, minced (fresh is non-negotiable here)
- 1 tbsp chopped parsley (fresh makes it pop)
See that note about the cheese? I learned the hard way that pre-shredded cheese just doesn’t give you that dreamy, stretchy cheese pull we all crave. And fresh garlic? Powder just can’t compete with that aromatic punch.
How to Make Cheddar Stuffed Garlic Rolls
Okay, let’s get our hands doughy! These rolls come together in a few simple steps, but I’ve got all the little tricks to make sure yours turn out perfect every time. Just follow along and resist the urge to peek in the oven too early – that melty cheese is worth the wait!
Prepare the Dough
First, grab your biggest mixing bowl and whisk together the flour, sugar, salt, and that all-important yeast. Now here’s my secret – make a little well in the center and pour in the warm water (test it on your wrist first – if it’s comfy there, it’s perfect for yeast). Add the melted butter and egg, then mix it all together with a wooden spoon until it forms a shaggy mess.
Flour your clean counter and turn out the dough. Now comes the fun part – kneading! You’ll want to work it for about 5-7 minutes until it transforms into this smooth, slightly tacky ball. If it sticks to your hands, add just a dusting more flour. Pro tip: The dough should spring back when you poke it gently – that’s how you know it’s ready.
First Rise and Shaping
Pop that beautiful dough ball back in the bowl, cover it with a damp towel, and tuck it in someplace cozy to rise. I use my oven with just the light on – that gentle warmth is perfect. Set a timer for 1 hour (yes, the full hour! This patience pays off in fluffy rolls).
When your dough has doubled (it’s so satisfying to see!), punch it down (my favorite stress relief) and divide it into 8 equal pieces. Flatten each into a little disc with your fingers – about ¼ inch thick. Now the magic happens: pile about 2 tablespoons of that glorious cheddar in the center, then gather the edges and pinch them together tightly (like you’re making a little cheese purse). Roll gently between your palms to seal completely – this is crucial to prevent cheese explosions in the oven!
Baking the Rolls
Arrange your stuffed dough balls on a parchment-lined baking sheet, cover again, and let them puff up for another 30 minutes. Meanwhile, preheat your oven to 375°F – no cheating on the temperature!
Bake for 15-20 minutes until they’re gorgeously golden on top. The smell will drive you crazy! As soon as they come out, mix that minced garlic with a bit more melted butter and parsley, then brush it generously over the hot rolls. That garlic butter soaks right in, making them impossibly fragrant and delicious. Try to let them cool for 5 minutes before diving in… though I never last that long!
Why You’ll Love These Cheddar Stuffed Garlic Rolls
Let me tell you why these rolls have become a permanent fixture in my recipe rotation – and why you’ll be making them on repeat too!
- That cheese pull! Nothing beats breaking open a warm roll to reveal molten cheddar stretching like golden sunshine.
- Pantry-friendly magic: Basic ingredients transform into something extraordinary – no fancy grocery runs needed.
- Works for any occasion: Game day snack? Check. Fancy dinner side? Absolutely. Midnight carb craving? No judgement here.
- Beginner-friendly: If you can knead dough and stuff a pocket, you’re already a cheddar roll master in the making.
Seriously, these disappear faster than I can bake them – and that’s saying something!
Tips for Perfect Cheddar Stuffed Garlic Rolls
After making these rolls more times than I can count (and eating even more!), I’ve picked up some foolproof tricks to guarantee cheddar-stuffed success every time:
- Cheese matters: Always shred your own from a block – those anti-caking agents in pre-shredded bags ruin the ooey-gooey factor.
- Patience pays off: Don’t rush the second rise! Those extra 30 minutes create airy, cloud-like interiors that make the cheese filling shine.
- Garlic wisdom: Mince it finely – big chunks can burn and turn bitter during baking (learned that the smoky way!).
- Seal tight: Really pinch those edges closed – cheese lava leaks make tasty but messy rolls.
- Baking sheet savvy: Use parchment paper unless you enjoy scrubbing baked-on cheese (spoiler: you don’t).
Follow these, and you’ll be the hero of every bread basket!
Ingredient Substitutions
Out of something? No panic! These cheddar stuffed garlic rolls are pretty forgiving – with a few smart swaps:
- Cheese: Mozzarella works for a milder pull, or try pepper jack for a kick (though nothing beats sharp cheddar’s tang).
- Parsley: Use 1 tsp dried if fresh isn’t handy – it’ll still give that pop of color.
- Flour: Swap half the AP flour for whole wheat, but expect a denser texture (I do this for breakfast rolls).
Non-negotiables: Fresh yeast (check that expiration date!) and real garlic – powdered just doesn’t deliver the same punch. Trust me on this one.
Storing and Reheating
If by some miracle you have leftovers (rare in my house!), here’s how to keep them tasting fresh. Store cooled rolls in an airtight container for up to 2 days – any longer and they lose that magical texture. When ready to enjoy again, reheat in a 300°F oven for 5-7 minutes until warmed through and slightly crisp. Whatever you do, resist the microwave! It turns these beauties into sad, soggy pucks (learned that lesson the hard way).
Cheddar Stuffed Garlic Rolls FAQs
I get asked about these rolls all the time, so here are the answers to the questions that pop up most often in my kitchen (and probably yours too!):
- “Can I freeze them?” Absolutely! Freeze the stuffed, unbaked rolls on a tray first, then transfer to a bag. Bake straight from frozen – just add 5 extra minutes. Perfect for surprise guests!
- “Garlic powder instead of fresh?” In a pinch, sure – but fresh minced garlic gives that irresistible aroma and flavor. Powder can taste flat in comparison.
- “Make-ahead tips?” My favorite trick! After shaping, refrigerate overnight. Next day, let them sit at room temp for 30 minutes before baking. Fresh rolls with zero morning effort!
There you have it – all my cheesy bread secrets in one place!
Nutritional Information
Just so you know what you’re biting into (not that it’ll stop you from eating three at once!): Each golden roll packs about 210 calories, 8g fat, 27g carbs, and 8g protein. Remember – these are estimates that’ll vary slightly depending on your exact ingredients. Now go forth and bake with zero guilt – cheese is basically a food group, right?
Tag us on social if you make these – nothing makes me happier than seeing your melty cheese pull photos!
Print
Irresistible Cheddar Stuffed Garlic Rolls Recipe
- Total Time: 1 hour 50 minutes
- Yield: 8 rolls 1x
- Diet: Vegetarian
Description
Soft rolls stuffed with cheddar cheese and flavored with garlic, perfect as a side or snack.
Ingredients
- 2 cups all-purpose flour
- 1 tbsp sugar
- 1 tsp salt
- 1 tbsp active dry yeast
- 3/4 cup warm water
- 2 tbsp melted butter
- 1 egg
- 1 cup shredded cheddar cheese
- 2 cloves garlic, minced
- 1 tbsp chopped parsley
Instructions
- Mix flour, sugar, salt, and yeast in a bowl.
- Add warm water, melted butter, and egg. Knead until smooth.
- Cover and let the dough rise for 1 hour.
- Divide dough into 8 pieces and flatten each.
- Stuff with cheddar cheese, fold, and shape into rolls.
- Place on a baking sheet and let rise for 30 minutes.
- Bake at 375°F for 15-20 minutes until golden.
- Brush with garlic-parsley butter before serving.
Notes
- Use freshly grated cheese for better melting.
- Adjust garlic to taste.
- Let dough rise in a warm place.
- Prep Time: 1 hour 30 minutes
- Cook Time: 20 minutes
- Category: Bread
- Method: Baking
- Cuisine: American
Nutrition
- Serving Size: 1 roll
- Calories: 210
- Sugar: 2g
- Sodium: 320mg
- Fat: 8g
- Saturated Fat: 4g
- Unsaturated Fat: 3g
- Trans Fat: 0g
- Carbohydrates: 27g
- Fiber: 1g
- Protein: 8g
- Cholesterol: 35mg
Keywords: cheddar stuffed garlic rolls, cheesy bread, garlic rolls


