
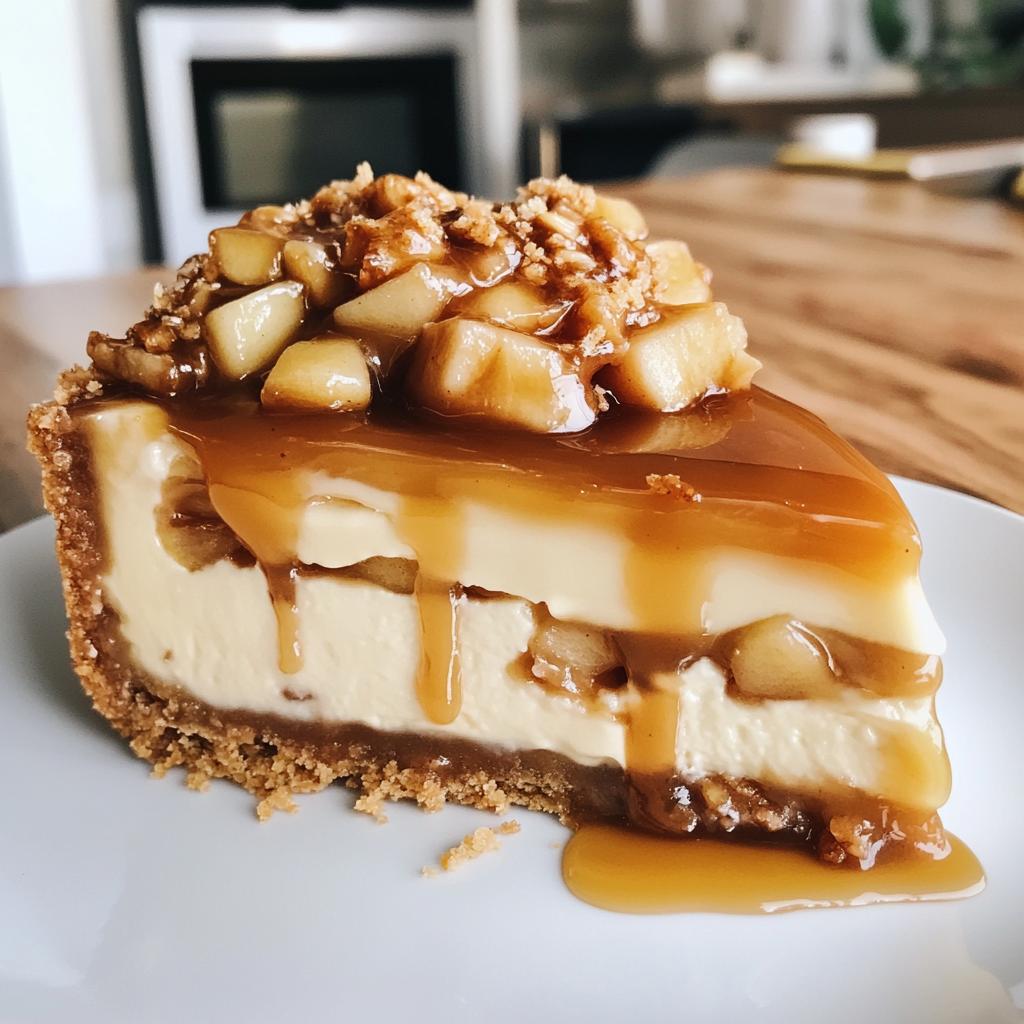
There’s something magical about fall baking, isn’t there? The moment crisp air hits, I start craving warm spices and cozy desserts. My caramel apple cheesecake has become the star of our autumn gatherings – it’s like autumn in dessert form! I’ve perfected this recipe through years of trial and error (and many happy taste-testers). The creamy cheesecake layered with tart apples and sweet caramel sauce hits all the right notes. Trust me, this isn’t your average cheesecake. It’s the kind of dessert that makes people ask for seconds before they’ve even finished their first slice. Perfect for Thanksgiving, Halloween parties, or just when you need a little seasonal comfort.
Why You’ll Love This Caramel Apple Cheesecake
This isn’t just any cheesecake – it’s a celebration of everything wonderful about fall! Here’s why it’s become my go-to dessert when the leaves start changing:
Perfect for Fall Baking
When apples are at their peak and you’re craving those warm cinnamon flavors, this caramel apple cheesecake delivers. It brings together all the cozy autumn vibes in one perfect slice. I love how the aroma fills my kitchen with that irresistible apple-cinnamon scent while it bakes.
Creamy and Decadent
The magic happens when the smooth, velvety cheesecake meets those tender apple pieces – and then that luscious caramel sauce takes it over the top! It’s got that perfect balance where the tart apples cut through the richness just enough. Every bite is pure comfort.
Ingredients for Caramel Apple Cheesecake
Gathering the right ingredients is half the battle when making this showstopper dessert. Here’s exactly what you’ll need – and yes, every single one matters! I’ve learned the hard way that shortcuts just don’t work with cheesecake.
For the crust:
- 2 cups graham cracker crumbs (measure after crushing, packed firmly)
- 1/2 cup melted butter (I use unsalted – trust me, it makes a difference)
For the cheesecake filling:
- 24 oz cream cheese (that’s 3 standard packages – must be softened at room temp for 2 hours)
- 3/4 cup granulated sugar (don’t pack it – just level it off)
- 3 large eggs (room temperature eggs blend smoother)
- 1 tsp pure vanilla extract (imitation just won’t give you that depth of flavor)
For the apple layer:
- 2 medium apples (peeled and diced small – I swear by Granny Smith for that perfect tartness)
- 1/2 tsp ground cinnamon (freshly opened for maximum flavor)
For topping:
- 1/2 cup caramel sauce (homemade or good-quality store-bought – warm it slightly for easy drizzling)
Pro tip: Measure everything before you start! There’s nothing worse than realizing mid-recipe that your cream cheese isn’t soft enough. I set mine out first thing in the morning when I know I’ll be baking later.
Equipment You’ll Need
Now let’s talk tools – because having the right equipment makes all the difference when you’re creating this caramel apple cheesecake masterpiece. Here’s what I always pull out of my kitchen cabinets before starting:
- 9-inch springform pan – This is non-negotiable! The removable sides make serving so much easier. Mine’s a bit battered but I wouldn’t trade it for anything.
- Stand mixer or electric hand mixer – You could mix by hand, but your arms will thank you for using a mixer to get that perfectly smooth cream cheese texture.
- Mixing bowls – One large one for the filling, another medium for the crust mixture.
- Measuring cups and spoons – Precision matters with cheesecake, so I always double-check my measurements.
- Rubber spatula – For scraping every last bit of that delicious batter into the pan.
- Paring knife and cutting board – For prepping those apples (I like them in small, even pieces so they distribute nicely).
- Oven thermometer – Cheesecakes are fussy about temperature, so I always verify my oven is accurate.
That’s it! No fancy gadgets required – just solid basics that most home bakers already have. Though if you’re like me, you might want to add “an extra spoon for quality control taste-testing” to the list!
How to Make Caramel Apple Cheesecake
Alright, let’s get to the fun part – bringing this caramel apple cheesecake to life! I’ve made this so many times I could probably do it in my sleep, but I’ll walk you through each step carefully. Just follow along, and you’ll have a showstopping dessert that’ll make everyone think you’re a professional pastry chef!
Preparing the Crust
First things first – that buttery graham cracker base. I like to use a food processor to crush my graham crackers into fine crumbs (about 15 full sheets to make 2 cups). Mix them with the melted butter until it resembles wet sand – you’ll know it’s right when you can squeeze a handful and it holds its shape.
Now, here’s my secret for the perfect crust: press the mixture firmly into the bottom and slightly up the sides of your springform pan. I use the bottom of a measuring cup to really pack it down tight. Pop this in the freezer for 10 minutes while you prep the filling – it helps the crust hold together when you add the batter.
Making the Cheesecake Filling
This is where the magic happens! Beat your softened cream cheese on medium speed until it’s completely smooth – no lumps allowed! Scrape down the bowl often (I can’t stress this enough). Gradually add the sugar and beat until it’s fully incorporated and looks creamy.
Now for the eggs – add them one at a time, mixing just until combined after each. Overbeating at this stage can make your cheesecake puff up then collapse, so be gentle! Finally, mix in that glorious vanilla extract. Your batter should be silky smooth and slightly shiny when it’s ready.
Layering Apples and Batter
Time to build those delicious layers! Pour half the cheesecake batter over your chilled crust and spread it evenly. Now sprinkle your diced apples evenly over the batter – I like to leave about a 1/2-inch border around the edge. Dust the apples with cinnamon (this little extra step makes all the difference!).
Carefully spoon the remaining batter over the apples. I use a rubber spatula to gently spread it without disturbing the apples too much. Don’t worry if some apple pieces peek through – they’ll look gorgeous after baking!
Baking and Cooling
Bake at 325°F for 50-55 minutes. The edges should be set but the center will still have a slight jiggle – like Jell-O when you gently tap the pan. Turn off the oven and crack the door open with a wooden spoon for about an hour. This slow cooling prevents cracks (my biggest cheesecake fear!).
After its oven nap, move the cheesecake to a wire rack to cool completely. Then comes the hardest part – refrigerate for at least 4 hours, preferably overnight. I know it’s tempting to dig in, but trust me, the wait is worth it! The flavors develop and the texture becomes perfectly set.
When you’re ready to serve, run a thin knife around the edge before releasing the springform. Drizzle with warm caramel sauce – I like to do this right before serving for that perfect gooey texture. Oh, and don’t skimp on the caramel! This is where all those flavors come together in perfect harmony.
Tips for the Perfect Caramel Apple Cheesecake
After burning through more cream cheese than I’d care to admit, I’ve learned all the tricks to make this caramel apple cheesecake foolproof. These are my absolute must-know tips – consider them your baking safety net!
Choose your apples wisely: Granny Smith apples are my ride-or-die for this recipe. Their tartness cuts through the sweetness beautifully. If you must use sweeter apples, reduce the sugar in the filling by a tablespoon or two.
Room temperature ingredients matter: I can’t stress this enough – cold cream cheese equals lumpy batter. Take it out 2 hours before baking, or if you’re impatient like me sometimes, microwave it on 50% power in 15-second bursts (just don’t let it melt!).
The magic of scraping: Stop your mixer and scrape down the bowl every minute or so – those sneaky cream cheese lumps hide along the sides. A perfectly smooth batter means no surprise chunks in your finished cheesecake.
Don’t overmix after adding eggs: Once those eggs go in, mix just until combined. Overdoing it incorporates too much air, which leads to cracks and an uneven texture. I count to 30 seconds max after the last egg goes in.
The slow cool-down is key: That hour with the oven door cracked? Non-negotiable. It prevents sudden temperature changes that make cheesecakes crack. I use a wooden spoon to prop mine open about 4 inches.
Chill time isn’t optional: I know it’s tempting, but slicing into a warm cheesecake is a recipe for disaster. Four hours minimum in the fridge, though overnight is truly ideal. The flavors develop and the texture sets up perfectly.
Cutting clean slices: Here’s my trick – run your knife under hot water between each cut. Wipe it dry, then slice. You’ll get picture-perfect pieces every time.
Remember – even if your cheesecake cracks (and we’ve all been there!), that luscious caramel sauce covers a multitude of sins. The most important thing? Enjoy the process and that first heavenly bite!
Serving Suggestions
Now for the best part – showing off your gorgeous caramel apple cheesecake! I always make a little extra caramel sauce because everyone goes wild for that golden drizzle. Warm it slightly so it cascades beautifully over each slice – you want those perfect ribbons dripping down the sides.
For an extra special touch, try these serving ideas that always impress my guests:
- Whipped cream clouds: A dollop of fresh whipped cream with a pinch of cinnamon makes each slice feel extra indulgent.
- Coffee pairing: A hot cup of dark roast coffee or spiced chai tea balances the sweetness perfectly – my Sunday brunch go-to!
- Crunchy contrast: Sprinkle some toasted pecans or walnuts on top for texture – just a small handful makes all the difference.
- Vanilla ice cream: Okay, I know it’s rich, but a scoop of good vanilla ice cream alongside warm cheesecake? Absolute heaven.
Presentation tip: Use a warm knife to slice (wiping it clean between cuts) and serve on simple white plates – that way the gorgeous caramel and apple layers really pop. And don’t forget to snap a photo before everyone digs in – this dessert deserves its moment in the spotlight!
Storing and Reheating
Here’s the beautiful thing about this caramel apple cheesecake – it actually gets better after a day in the fridge! The flavors mingle and deepen, making leftovers (if you’re lucky enough to have any) something to look forward to.
In the fridge: Cover your cheesecake tightly with plastic wrap or store it in an airtight container. It’ll stay fresh for up to 5 days – though mine never lasts that long! The caramel topping keeps beautifully, but if you want that fresh-drizzled look, you can add more just before serving.
Freezing tips: This cheesecake freezes like a dream! Wrap individual slices or the whole thing (without topping) tightly in plastic wrap, then foil. It’ll keep beautifully for up to 2 months. Thaw overnight in the fridge – resist the urge to microwave it! Top with fresh caramel sauce when you’re ready to serve.
One important note: Never leave your cheesecake out at room temperature for more than 2 hours. Cream cheese desserts are delicate creatures when it comes to food safety. I always pop mine back in the fridge right after serving – unless, of course, it’s already been devoured!
Nutritional Information
Okay, let’s talk numbers – because even though this caramel apple cheesecake tastes like pure indulgence, I like knowing what I’m enjoying! Here’s the nutritional breakdown per slice (based on 10 servings):
- Calories: About 420 – but trust me, every single one is worth it!
- Fat: 28g (16g saturated) – that rich, creamy texture has to come from somewhere
- Carbs: 38g – mostly from that glorious graham cracker crust and caramel drizzle
- Protein: 6g – thank you, cream cheese and eggs!
- Sugar: 32g – but hey, it’s dessert – we’re here for a good time!
Important note: These numbers can vary based on the exact ingredients you use (like different brands of cream cheese or caramel sauce). If you’re watching specific dietary needs, I recommend plugging your exact ingredients into a nutrition calculator. And let’s be real – when that first bite of spiced apples and creamy cheesecake hits your tongue, the numbers suddenly seem much less important!
Frequently Asked Questions
Over the years, I’ve gotten so many questions about this caramel apple cheesecake – and believe me, I’ve asked most of them myself while perfecting the recipe! Here are the answers to everything you might be wondering:
Can I use store-bought caramel sauce?
Absolutely! While homemade caramel is divine, a good-quality store-bought sauce works beautifully in a pinch. My grocery store favorites are the ones in the glass jars near the ice cream toppings – they tend to have better flavor than the plastic squeeze bottles. Just warm it slightly before drizzling so it flows nicely.
How do I prevent cracks in my cheesecake?
Oh honey, cracks happen to the best of us! My three golden rules: don’t overmix after adding eggs, cool it slowly in the turned-off oven, and never skip the fridge time. If you do get cracks? More caramel sauce! It’s like dessert makeup – covers everything beautifully.
Can I make this gluten-free?
You bet! Just swap the graham crackers for gluten-free ones (I like the Pamela’s brand). The texture might be slightly different, but all that creamy apple-caramel goodness will still shine through. Double-check your caramel sauce too – some brands contain gluten.
What’s the best way to peel and dice the apples?
I use my trusty vegetable peeler first – quick swipes from stem to bottom. For dicing, aim for pieces about the size of chocolate chips. Too big and they’ll sink; too small and they disappear. Pro tip: toss them with a teaspoon of lemon juice to prevent browning while you prep everything else.
Can I freeze leftovers?
Freeze away! Just wrap individual slices tightly in plastic wrap, then foil. They’ll keep beautifully for up to 2 months. Thaw overnight in the fridge – no microwave needed! The texture might be slightly denser after freezing, but that caramel sauce brings it right back to life.
Share Your Creation
I can’t wait to see your caramel apple cheesecake masterpieces! There’s nothing I love more than hearing how this recipe turns out in other kitchens. Did your family go wild for it? Did you add your own special twist? Snap a photo of that gorgeous caramel drizzle and tag me – I want to see every glorious crumb!
If you loved this recipe as much as we do, leave a star rating or quick comment below. Your notes help other bakers know what to expect (and they make my day!). And hey – if you ran into any hiccups, tell me about those too. I’ve got plenty more tips up my sleeve to help troubleshoot for next time.
Most importantly – enjoy every bite of that creamy, apple-studded, caramel-kissed goodness. Then come back and tell me all about it! Happy baking, friends!
Print
Irresistible Caramel Apple Cheesecake Bliss
- Total Time: 1 hour 15 minutes
- Yield: 10 servings 1x
- Diet: Vegetarian
Description
A delicious caramel apple cheesecake perfect for fall baking.
Ingredients
- 2 cups graham cracker crumbs
- 1/2 cup melted butter
- 24 oz cream cheese, softened
- 3/4 cup granulated sugar
- 3 eggs
- 1 tsp vanilla extract
- 2 apples, peeled and diced
- 1/2 cup caramel sauce
- 1/2 tsp cinnamon
Instructions
- Preheat oven to 325°F.
- Mix graham cracker crumbs and melted butter, press into a springform pan.
- Beat cream cheese and sugar until smooth.
- Add eggs one at a time, then vanilla.
- Pour half the batter over the crust.
- Sprinkle diced apples and cinnamon, then remaining batter.
- Bake 50-55 minutes until set.
- Cool, then top with caramel sauce.
Notes
- Chill cheesecake for at least 4 hours before serving.
- Use tart apples like Granny Smith for balance.
- Drizzle extra caramel when serving.
- Prep Time: 20 minutes
- Cook Time: 55 minutes
- Category: Dessert
- Method: Baked
- Cuisine: American
Nutrition
- Serving Size: 1 slice
- Calories: 420
- Sugar: 32g
- Sodium: 380mg
- Fat: 28g
- Saturated Fat: 16g
- Unsaturated Fat: 9g
- Trans Fat: 0g
- Carbohydrates: 38g
- Fiber: 1g
- Protein: 6g
- Cholesterol: 125mg
Keywords: caramel apple cheesecake, fall dessert, baking ideas


