

You know those nights when you want something cheesy, spicy, and ridiculously easy to eat? That’s how these Buffalo Chicken Mac & Cheese Wraps were born in my kitchen—half desperation, half genius. I was scrambling to feed a crowd during game day, staring at leftover mac and cheese and some shredded chicken. A little buffalo sauce later, and bam—the perfect handheld bite was born. Now, it’s my go when the kids are hangry or when I need a quick dinner that actually tastes like I tried. Crispy tortilla, creamy mac, and that tangy buffalo kick? Trust me, you’ll want to make extras.
Why You’ll Love These Buffalo Chicken Mac & Cheese Wraps
Listen, these wraps are not just food—they’re little miracles wrapped in a tortilla. Here’s why they’re about to become your new obsession:
- Weeknight superhero: From fridge to plate in under 25 minutes (yes, I timed it). When the kids are climbing the walls or you just can’t with dinner tonight, this is your save.
- Flavor bomb: Creamy mac and cheese meets that spicy buffalo kick—it’s like your favorite bar food decided to get cozy in a wrap. The garlic and onion powder? Chef’s kiss.
- Take it anywhere: Soccer games, picnics, your couch while binge-watching—no fork required. I’ve even packed them cold in lunchboxes (shh, don’t tell the food safety people).
- Your rules: Love heat? Drown ’em in extra buffalo sauce. Mild more your style? Cut the sauce and add ranch. The beauty is in the customization.
Seriously, these wraps check all the boxes—easy, delicious, and fun to eat. What more could you want?
Ingredients for Buffalo Chicken Mac & Cheese Wraps
Here’s what you’ll need to create these magical wraps—most are probably already in your kitchen! Pro tip: That “shredded cooked chicken”? I swear by rotisserie chicken from the deli when I’m in a hurry (no shame!), but leftover baked chicken works beautifully too.
- 2 cups cooked macaroni – elbows or shells are perfect
- 1 cup shredded cooked chicken – see my lazy-girl rotisserie hack above
- 1/4 cup buffalo sauce – Frank’s RedHot is my ride-or-die
- 1 cup shredded cheddar cheese – fresh-grated melts like a dream
- 1/4 cup cream cheese – the secret to ultra-creamy sauce
- 1/4 cup milk – any kind works, even almond milk in a pinch
- 4 large flour tortillas – burrito-size for maximum filling
- 2 tbsp butter – none of that margarine nonsense
- 1/2 tsp garlic powder – trust me, it matters
- 1/2 tsp onion powder – the flavor booster
- Salt and pepper – to taste (I’m generous with both)
Equipment You’ll Need
- Medium saucepan
- Mixing bowl
- Tongs
- Skillet
How to Make Buffalo Chicken Mac & Cheese Wraps
Okay, let’s get rolling—literally! These wraps come together so fast you’ll barely have time to sneak a taste (though I definitely won’t judge if you do). Here’s how to make magic happen in three simple steps:
Step 1: Prepare the Cheese Sauce
First, grab your medium saucepan and melt that butter over medium-low heat—we’re not trying to start a kitchen fire here. Once it’s bubbly, plop in the cream cheese and start stirring like your dinner depends on it (because it kinda does). When it starts looking smooth and friendly, pour in the milk and add your cheddar, garlic powder, and onion powder. Keep stirring until it’s all melty and glorious—about 2-3 minutes. Pro tip: If it looks too thick, add a splash more milk. Too thin? Sprinkle in a little extra cheese. Trust your gut (and your sweet tooth).
Step 2: Mix in Macaroni and Chicken
Now, dump in your cooked macaroni and gently fold it into that luscious cheese sauce. I use a rubber spatula and pretend I’m tucking the noodles into a cheesy blanket—no aggressive stirring or you’ll end up with mush! In a separate bowl, toss your shredded chicken with the buffalo sauce until it’s fully coated (this is where the flavor magic happens). Then, mix the saucy chicken into the mac and cheese just until combined. Taste it—this is your chance to add more salt, pepper, or even an extra drizzle of buffalo sauce if you’re feeling bold.
Step 3: Assemble and Toast the Wraps
Lay out your tortillas and divide the filling evenly—about 3/4 cup per wrap. Fold the sides in about an inch, then roll from the bottom up as tightly as you can (think burrito-rolling skills). Heat a dry skillet over medium heat—not too hot or your tortilla will burn before the filling gets warm. Place each wrap seam-side down first and let it toast for 1-2 minutes per side until golden and crisp. Listen for that satisfying sizzle! Let them rest a minute before cutting (if you can wait) so the filling doesn’t volcano out.
Tips for Perfect Buffalo Chicken Mac & Cheese Wraps
After making these wraps more times than I can count (hey, when something works, it works!), I’ve picked up a few tricks that take them from good to “oh-my-gosh-give-me-the-recipe” status. Here are my hard-earned secrets:
- Spice it your way: That 1/4 cup buffalo sauce is just a starting point. For mild palates, cut it in half and mix in some ranch dressing. Want your lips tingling? Double it—I won’t judge! The beauty is in the customization.
- Warm those tortillas: Cold tortillas = cracking disasters. Microwave them for 10 seconds wrapped in a damp paper towel or quickly toast them in a dry pan. The steam makes them flexible enough to roll without splitting.
- Grate your own cheese: I know, I know—pre-shredded is convenient. But that anti-caking powder? It turns sauces grainy. Freshly grated cheddar melts into silky perfection every time. Worth the extra two minutes, promise.
- Don’t overstuff: As tempting as it is to pile that filling sky-high, 3/4 cup max per wrap keeps everything inside where it belongs. Any more and you’ll have a delicious but messy situation on your hands.
Oh, and one bonus tip—if you’re serving these to kids, let the filling cool slightly before wrapping. Nothing worse than molten cheese burns when you’re just trying to feed tiny humans!
Variations & Substitutions
Listen, I live for kitchen experiments—that’s how this whole wrap situation started! Here are my favorite ways to mix things up when the mood strikes or when the pantry’s looking bare:
- Gluten-free gang: Swap regular tortillas for gluten-free ones (the almond flour kind crisps up beautifully) and use your favorite GF pasta. Just as delicious, zero guilt.
- Dairy-free delight: Vegan butter, almond milk, and dairy-free cheeses work shockingly well here. For that creamy tang, blend soaked cashews with nutritional yeast instead of cream cheese—it’s magic!
- Crunch factor: Toss in diced celery or carrots with the chicken for that classic buffalo wing experience. My kids call it “hidden veggie mode” when I do this sneaky trick.
- Ranch rebels: Drizzle ranch dressing inside before rolling, or mix half ranch/half buffalo sauce. Cool creaminess + spicy kick = happy taste buds.
- Protein power: No chicken? Canned tuna (drained well!) or even chickpeas make great stand-ins. For vegetarian friends, I’ve used roasted cauliflower with rave reviews.
- Cheese shuffle: Out of cheddar? Pepper jack brings heat, mozzarella adds stretch, and gouda gives a smoky twist. Cheese is cheese—it’s all good in my book.
The best part? These wraps are like culinary playdough—mold them to whatever you’re craving or whatever’s about to expire in your fridge. No rules, just deliciousness!
Serving Suggestions
Okay, let’s talk about turning these wraps into MVP-worthy meals! Here’s how I love to serve them—sometimes fancy, sometimes straight-off-the-pan casual:
- The Classic Combo: Pile up crisp carrot and celery sticks (hello, buffalo wing vibes!) with extra buffalo sauce and ranch for dipping. Bonus points if you serve them in those little paper-lined baskets—total diner nostalgia.
- Salad Sidekick: A simple iceberg wedge with blue cheese crumbles cuts through the richness perfectly. Or go green with a quick arugula salad—just toss with lemon juice and olive oil.
- Game Day Spread: Surround your wraps with bowls of tortilla chips, pickled jalapeños, and a big pitcher of icy lemonade. Suddenly you’re the host with the most!
- Kids’ Corner: For little ones, I cut wraps into “sushi rolls” and serve with apple slices and yogurt ranch dip. They think it’s fun finger food—I call it a parenting win.
- Breakfast Remix: Hear me out—leftover wraps reheated with a fried egg on top? Life-changing hangover cure (not that I’d know…).
Truth? These wraps shine solo too—no sides required when you’re parked on the couch with Netflix. But if you want to fancy it up, these pairings never disappoint!
Storage & Reheating Instructions
Let’s be real—these wraps are so good, leftovers are rare in my house. But if you somehow resist eating all four at once (no judgment either way!), here’s how to keep them tasting amazing later:
Fridge storage: Wrap each one tightly in foil or plastic wrap, then pop them in an airtight container. They’ll stay fresh for up to 2 days—any longer and the tortillas get sad and soggy. Pro tip: Write “EAT ME FIRST” on the container so no one “accidentally” forgets about them!
Reheating magic: The microwave is tempting, but it turns your crispy wrap into a floppy mess. Instead:
- Skillet method: My go-to! Unwrap and toast in a dry skillet over medium heat for 2-3 minutes per side until the tortilla’s crisp and the filling’s piping hot. It’s like they’re fresh-made!
- Oven hack: Great for batches. Place wraps on a baking sheet at 350°F for 8-10 minutes. Add a quick broil at the end if you love extra crunch.
- Air fryer trick: 3 minutes at 375°F makes them impossibly crisp. Just don’t crowd them—give each wrap breathing room.
Freezer warning: I don’t recommend freezing—the dairy separates weirdly when thawed. But if you must, wrap tightly in foil then plastic, freeze for up to 1 month, and reheat straight from frozen in the oven (add 5 extra minutes). They won’t be perfect, but they’ll do in a pinch!
Nutritional Information
Okay, let’s talk numbers—because sometimes you just gotta know what you’re diving into! Remember: These are estimates and can vary based on your specific brands and ingredient amounts. (That extra handful of cheese you “accidentally” added? Yeah, that counts!) Here’s the scoop per wrap:
- Calories: 450 – consider it fuel for your next Netflix marathon
- Protein: 25g – thanks to that chicken and cheese power duo
- Fat: 22g (10g saturated) – the delicious cost of all that creamy goodness
- Carbs: 40g – mostly from those happy little macaroni elbows
- Sodium: 800mg – buffalo sauce packs a salty punch, no surprises there
- Fiber: 2g – hey, every gram counts!
Want to lighten it up? Try reduced-fat cheese, less butter, or whole wheat tortillas. But personally? I say embrace the indulgence—life’s too short for sad mac and cheese wraps!
Frequently Asked Questions
I’ve gotten so many questions about these Buffalo Chicken Mac & Cheese Wraps over the years—here are the ones that pop up most often with my real-deal answers:
Can I make these wraps ahead of time?
Absolutely! Assemble them up to 4 hours ahead and keep them wrapped tightly in the fridge. Just wait to toast them until right before serving—cold tortillas + hot skillet = crispy perfection. The filling actually tastes even better after the flavors mingle a bit!
Can I freeze these for later?
Honestly? I don’t recommend it. Dairy-based sauces like this mac and cheese tend to get grainy and separate when thawed. If you’re desperate, freeze just the filling (sans tortillas) for up to a month, then reheat gently with a splash of milk before wrapping. But fresh is always best with this recipe!
How can I make these less spicy?
Easy fixes! Start by halving the buffalo sauce (or use mild wing sauce). Mix in a tablespoon of ranch or blue cheese dressing with the chicken—it cools the heat while keeping that tangy flavor. For super-sensitive palates (looking at you, kids!), skip the sauce entirely and just season the chicken with garlic powder and paprika.
What’s the best way to keep the wraps from falling apart?
Two secrets: Don’t overfill (stick to 3/4 cup filling max), and toast them seam-side down first—that heat seals the deal! If you’re still nervous, secure with toothpicks before toasting (just warn eaters to remove them). Warm tortillas are more flexible too—10 seconds in the microwave works wonders.
Can I use different pasta shapes?
Of course! Small shells, cavatappi, or even penne hold the sauce beautifully. Just avoid long noodles like spaghetti—they make rolling tricky. My kids love when I use fun shapes like dinosaur pasta (don’t judge my parenting wins). The key is cooking it al dente so it doesn’t turn mushy in the wrap.
Ready to Make These Wraps?
Alright, my fellow mac-and-cheese rebels—it’s go time! I can practically hear your tortillas calling from the pantry. Whether you’re feeding hangry kids, prepping game-day snacks, or just treating yourself to something gloriously cheesy (no judgment here), these Buffalo Chicken Mac & Cheese Wraps are about to become your new kitchen BFF.
When you whip up a batch, snap a pic and tag me—I live for your cheesy, saucy creations! Got a genius twist? Swap the chicken for pulled pork? Added bacon (bless you)? Drop your hacks in the comments so we can all level up our wrap game. And if this recipe saves your dinner sanity like it has mine a hundred times, give it those five shiny stars—it’s the virtual high-five that keeps me sharing these family favorites! Now go forth and wrap all the things!
Print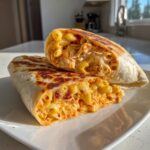
Buffalo Chicken Mac & Cheese Wraps in 25 Flat Minutes
- Total Time: 25 minutes
- Yield: 4 wraps 1x
- Diet: Low Lactose
Description
A delicious twist on classic mac and cheese, combined with buffalo chicken for a spicy kick, all wrapped in a tortilla for easy eating.
Ingredients
- 2 cups cooked macaroni
- 1 cup shredded cooked chicken
- 1/4 cup buffalo sauce
- 1 cup shredded cheddar cheese
- 1/4 cup cream cheese
- 1/4 cup milk
- 4 large flour tortillas
- 2 tbsp butter
- 1/2 tsp garlic powder
- 1/2 tsp onion powder
- Salt and pepper to taste
Instructions
- In a pan, melt butter over medium heat.
- Add cream cheese, milk, cheddar cheese, garlic powder, and onion powder. Stir until smooth.
- Add cooked macaroni and mix well.
- In a bowl, toss shredded chicken with buffalo sauce.
- Lay out tortillas and evenly distribute the mac and cheese mixture.
- Top with buffalo chicken.
- Fold the sides of the tortilla inward and roll tightly.
- Heat a pan over medium heat and lightly toast the wraps for 1-2 minutes per side.
- Serve warm.
Notes
- Adjust buffalo sauce for more or less spice.
- Use rotisserie chicken for quicker prep.
- Store leftovers in an airtight container for up to 2 days.
- Prep Time: 10 minutes
- Cook Time: 15 minutes
- Category: Main Dish
- Method: Stovetop
- Cuisine: American
Nutrition
- Serving Size: 1 wrap
- Calories: 450
- Sugar: 3g
- Sodium: 800mg
- Fat: 22g
- Saturated Fat: 10g
- Unsaturated Fat: 8g
- Trans Fat: 0g
- Carbohydrates: 40g
- Fiber: 2g
- Protein: 25g
- Cholesterol: 80mg
Keywords: buffalo chicken, mac and cheese, wraps, easy dinner, spicy


