
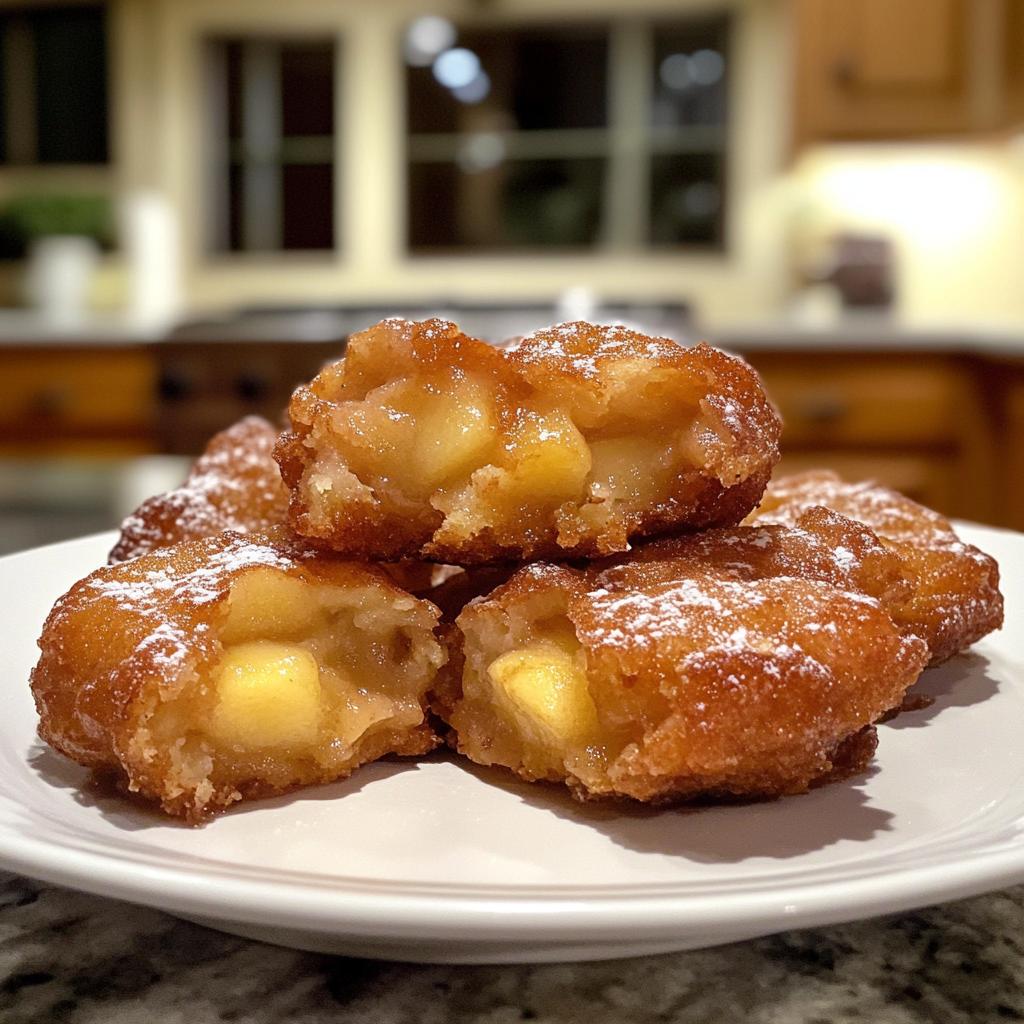
There’s nothing quite like biting into a warm apple fritter – that perfect mix of cinnamon-spiced apples and tender dough. But let’s be honest, the guilt from all that frying oil can ruin the fun. That’s why I fell in love with these baked apple fritters. They give you all that cozy fall flavor without the grease splatters or heavy feeling afterward.
I first tried baking them when my toddler begged for “donuts” but I wanted something healthier. Now they’re our Sunday morning tradition – the whole house smells like apple pie while they bake. The best part? You get that same golden-brown exterior and soft interior without deep frying. Just toss the ingredients together, pop them in the oven, and in 20 minutes you’ve got a treat that feels indulgent but isn’t.
These baked apple fritters remind me of my grandma’s kitchen, but with a modern twist that fits our busy lives. They’re proof that sometimes the healthier version can actually taste better!
Why You’ll Love These Baked Apple Fritters
Honestly, once you try this baked version, you might never go back to the fried kind. They’re everything you crave in a fritter—just lighter, easier, and packed with that irresistible apple-cinnamon goodness.
Healthier Alternative
No vat of boiling oil needed here! Baking cuts out so much fat while still giving you that golden crust we all love. The apples keep them perfectly moist without swimming in grease. My kids gobble them up, and I don’t feel guilty because they’re actually somewhat wholesome.
Quick & Easy
From bowl to oven in 10 minutes flat—that’s my kind of recipe. The batter comes together with just a couple of bowls and a spoon. Even on rushed mornings, I can whip these up while my coffee brews. The hardest part? Waiting for them to bake!
Perfect for Any Occasion
Breakfast? Check. After-school snack? Absolutely. Fancy dessert with ice cream? Oh yes. These fritters adapt to whatever you need. I’ve served them at brunches, packed them in lunchboxes, and even brought them to potlucks. They always disappear fast!
“: “`html “> — “`html }Good news
— Okay, let’s get baking! These apple fritters come together so easily – even on sleepy mornings when my brain hasn’t had its coffee yet. Just follow these simple steps and you’ll have golden, apple-packed goodness in no time. Grab your biggest mixing bowl – you’ll want room to stir! Whisk together the flour, sugar, baking powder, salt, cinnamon and nutmeg. Don’t skip the spices – they’re what give these baked apple fritters that warm, cozy flavor. I like to use a fork to really blend everything evenly. In another bowl, beat the eggs until they’re nice and frothy. Then stir in the milk and vanilla. Pro tip: Use room temperature ingredients here – it helps everything mix together smoothly without overworking the batter. Now the fun part! Pour the wet ingredients into the dry and gently stir until just combined. The batter will be thick – that’s perfect. Then fold in those beautiful diced apples. I like mine chunky so you get big bites of fruit, but you can dice smaller if you prefer. Scoop heaping spoonfuls onto your prepared baking sheet (about 1/4 cup each). Give them space to puff up! Brush the tops with melted butter – this gives that golden finish we all love. Bake at 375°F for 15-20 minutes until they’re beautifully browned. You’ll know they’re done when your kitchen smells like an apple orchard! After making these dozens of times (yes, we’re obsessed!), I’ve picked up some tricks that take them from good to “wow!” First, always use firm apples – Granny Smiths are my go-to because they hold their shape and give that perfect tart contrast to the sweet batter. Don’t overmix! A few lumps are totally fine and keep them tender. For an extra treat, drizzle with a simple powdered sugar glaze while they’re still warm – the fritters will soak it up like little sponges of happiness! Warm baked apple fritters straight from the oven are pure magic – but don’t limit yourself to eating them plain! My favorite way is with a big scoop of vanilla ice cream melting over the top (the hot-cold combo is heavenly). For breakfast, I’ll pair them with my morning coffee – the cinnamon and apples taste even better with each sip. These keep beautifully too! Just let them cool completely, then pop them in an airtight container. They’ll stay fresh for 2-3 days at room temperature. If you want to keep them longer (though in my house they never last that long), you can freeze them for up to a month. To reheat, just 30 seconds in the microwave brings back that fresh-baked taste – perfect for when you need a quick apple fix! Now, I’m no dietitian, but I know some folks like to keep track of what they’re eating. Here’s the scoop on these baked apple fritters – they’re way lighter than the fried version, but still packed with flavor! Remember, these numbers are just estimates – your actual amounts might vary depending on your exact ingredients. Each fritter (and trust me, you’ll want more than one!) comes in at about 150 calories. There’s 8g of sugar – mostly from the apples and just a bit of added sugar to balance the tartness. You’re getting 2g of fiber from those fresh apples too, which is a nice bonus. Compared to traditional fried fritters that can run 300+ calories each, these baked beauties are definitely the smarter choice. They’ve got 3g of fat (only 1g saturated), 28g carbs, and 4g of protein to help keep you satisfied. No trans fats here – just real ingredients! Of course, if you add that optional glaze I mentioned, you’ll bump up the sugar a bit. But that’s the beauty of homemade – you control what goes in. Either way, these are treats you can feel good about! Q1. Can I use other fruits besides apples in these baked fritters? Q2. How can I make these baked apple fritters gluten-free? Q3. Can I prepare the batter ahead of time? Q4. Why do my fritters sometimes come out dry? Q5. Can I make mini baked apple fritters? I’d love to hear how your baked apple fritters turn out! Did you stick with classic Granny Smiths or try another apple variety? Maybe you discovered a new favorite glaze combination? Drop a comment below and share your experience – I read every single one (usually while nibbling on a fresh batch of fritters myself). If this recipe becomes part of your regular rotation like it has for my family, consider giving it a star rating to let others know it’s a winner. And don’t forget to snap a picture of your golden-brown beauties before they disappear – tag me if you share on social media so I can see your handiwork! Happy baking, friends! May your kitchen always smell like cinnamon and your fritters always come out perfectly tender. Now go enjoy your well-deserved treat – you’ve earned it! Baked apple fritters are a healthier twist on the classic fried version. These treats are soft, sweet, and packed with fresh apple flavor. Keywords: baked apple fritters, apple dessert, healthy fritters
“`html
—
—
the oven noj>
}
}
—
“sHow to Make Baked Apple Fritters
Step 1: Mix Dry Ingredients
Step 2: Whisk Wet Ingredients
Step 3: Fold in Apples
Step 4: Bake to Perfection
Tips for Perfect Baked Apple Fritters
Serving and Storage
Nutritional Information
Frequently Asked Questions
Absolutely! While apples are my favorite (especially tart Granny Smiths), pears work beautifully too – just make sure they’re firm. I’ve even tried peaches in summer when they’re perfectly ripe. The key is using fruit that holds its shape during baking. Berries tend to get too juicy, but diced stone fruits like nectarines or plums can be delicious alternatives.
I’ve had great success swapping the all-purpose flour for a 1:1 gluten-free baking blend. My sister (who has celiac disease) loves when I make them this way! Just be sure your baking powder is gluten-free too. The texture comes out slightly denser but still wonderfully tender – and all that cinnamon-apple flavor shines through just the same.
Honestly, I don’t recommend it. The baking powder starts working as soon as it hits the liquid, so your fritters won’t rise as nicely if the batter sits. But here’s my time-saving trick: Measure all your dry ingredients the night before and keep them covered. In the morning, just add the wet ingredients and apples – you’ll have fresh baked apple fritters in no time!
Oh no – dry fritters are the worst! Two likely culprits: Either you overmixed the batter (stop stirring as soon as the flour disappears) or baked them too long. Every oven is different, so start checking at 15 minutes. They’re perfect when a toothpick comes out with just a few moist crumbs. Also, don’t skip brushing with butter – it adds moisture and helps prevent dryness.
Yes, and they’re adorable! Just use a tablespoon to scoop smaller portions onto your baking sheet. Reduce the baking time to about 10-12 minutes. These mini versions are perfect for kids’ lunchboxes or party platters. My toddler calls them “apple cookies” and happily gobbles them up – parenting win!
Baked Apple Fritters: 20-Minute Healthy Bliss
Description
Ingredients
Instructions
Notes
Nutrition


