
Ah, spring! It’s that magical time of year when flowers bloom, the sun shines a little brighter, and everything feels new and alive. I just love how spring celebrations bring people together, whether it’s a birthday party, a baby shower, or simply a sunny afternoon with friends. There’s something so uplifting about incorporating the vibrant colors and themes of the season into our gatherings. That’s where my *spring cake designs* come into play!
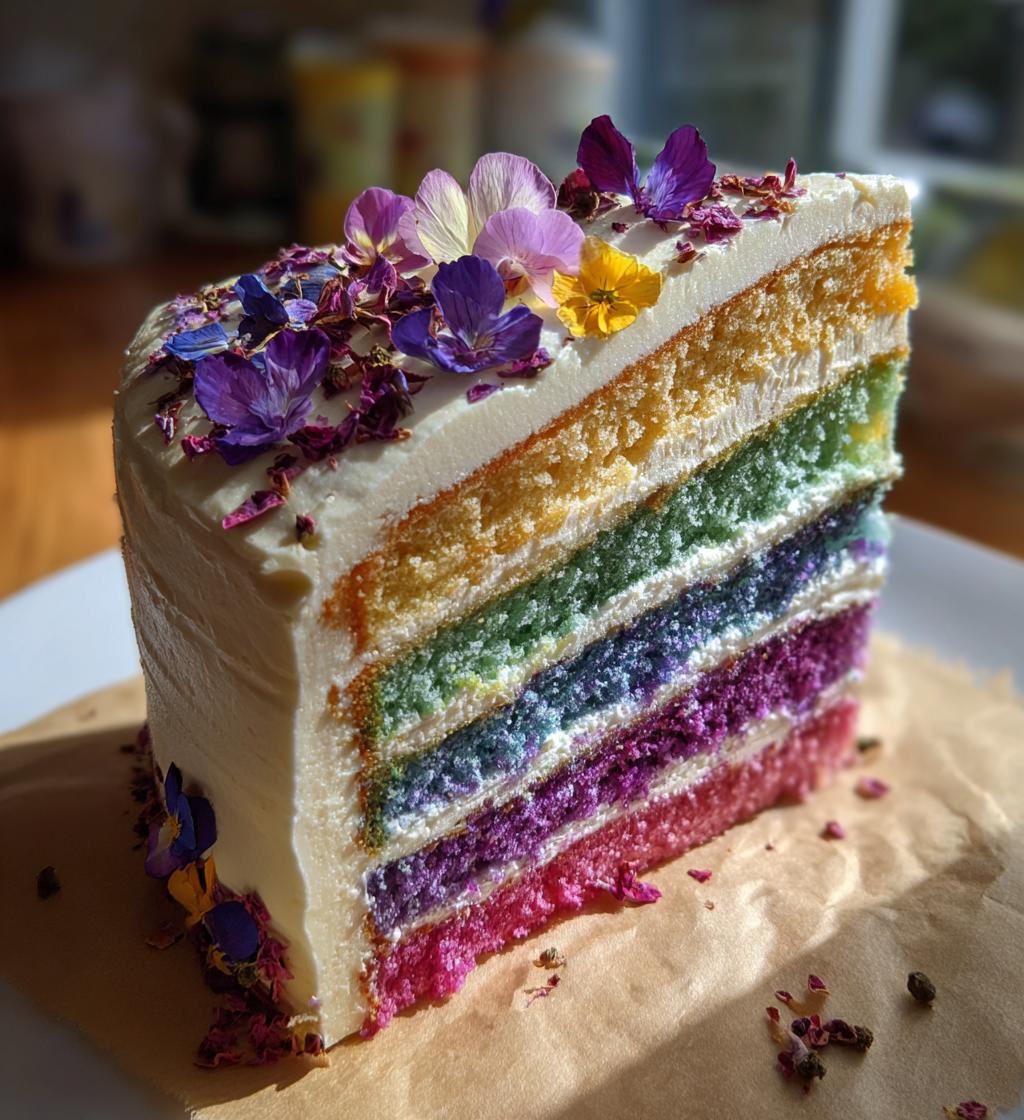
Picture this: a beautiful cake adorned with pastel shades of pink, yellow, and green, showcasing stunning edible flowers that look almost too pretty to eat (but trust me, you’ll want to!). These cakes not only taste delightful but also serve as a centerpiece that brings joy and excitement to any celebration. I mean, who doesn’t get giddy at the sight of a colorful, floral masterpiece? Plus, they’re surprisingly easy to create! Join me as we dive into the delicious world of spring cake designs and make your next gathering a little brighter and sweeter.
Ingredients List
To create these stunning spring cake designs, you’ll need a few simple ingredients that come together beautifully. Here’s what you’ll need:
- 2 cups all-purpose flour
- 1 1/2 cups granulated sugar
- 1 cup unsalted butter, softened to room temperature
- 4 large eggs
- 1 cup whole milk
- 2 tsp baking powder
- 1 tsp vanilla extract
- 1/2 tsp salt
- Food coloring (various colors for that vibrant spring touch)
- Buttercream frosting (for that luscious finish)
- Edible flowers for decoration (because who doesn’t love a floral touch?)
Make sure your butter is softened; it really helps in creating that light and fluffy texture we’re after. And don’t skimp on the eggs – they’re essential for that perfect rise! You can play around with the food coloring to achieve whatever spring palette makes your heart sing. Let’s get baking!
How to Prepare Instructions
Now that we’ve gathered all our ingredients, it’s time to bring this beautiful spring cake to life! Let’s go through the steps together so you can create a stunning centerpiece for your next gathering.
Prepping the Oven and Mixing Ingredients
First things first, preheat your oven to 350°F (175°C). This is crucial, as a properly preheated oven ensures even baking. While that’s warming up, grab a large mixing bowl and cream together the softened butter and granulated sugar until it’s light and fluffy. This should take about 2-3 minutes; you want it to look almost like whipped cream! Next, add in the eggs one at a time, mixing well after each addition. Trust me, this step helps to incorporate air and gives your cake that lovely rise.
Once the eggs are well mixed, stir in the vanilla extract. In another bowl, whisk together the all-purpose flour, baking powder, and salt. This dry mixture is important to ensure everything is evenly distributed. Now, it’s time to add the dry ingredients to your butter mixture, alternating with the whole milk. Start and finish with the flour mixture, gently mixing until combined. You don’t want to overmix – just stop when you see a few flour streaks!
Dividing and Coloring the Batter
Here comes the fun part! Divide your batter evenly into several bowls, depending on how many colors you want to use. Add a few drops of food coloring to each bowl and mix until you achieve your desired shades. I love using pastel colors for that soft spring look, but feel free to get creative! You can even combine colors to create unique shades. Just remember, a little goes a long way, so start with a few drops and add more as needed.
Baking and Cooling the Cakes
Now it’s time to pour your colorful batter into prepared cake pans. If you’re using multiple colors, you can layer them or swirl them together for a marbled effect. Bake in the preheated oven for 25-30 minutes, or until a toothpick inserted into the center comes out clean. Keep an eye on them, as oven times can vary! When they’re ready, remove the cakes from the oven and let them cool in the pans for about 10 minutes before transferring them to a wire rack. Cooling is super important, as frosting a warm cake can lead to a melty mess!
Frosting and Decorating
Once your cakes have completely cooled, it’s time to frost! I recommend chilling your buttercream frosting for about 30 minutes before applying it; this makes spreading so much easier. Start by placing one layer of cake on a serving plate, spread a generous layer of frosting on top, and then add the next layer. Continue until all layers are stacked. Don’t worry if it’s not perfect – a rustic look is totally in!
Finally, it’s time to decorate! Use your edible flowers to create a stunning, fresh look. You can scatter them on top or even arrange them in a beautiful pattern. Remember, presentation is key, and these flowers will elevate your cake from ordinary to extraordinary. Enjoy every beautiful slice, and watch everyone marvel at your spring masterpiece!
Why You’ll Love This Recipe
- Visually Stunning: The vibrant colors and floral decorations make these spring cake designs the star of any gathering. They’re not just desserts; they’re eye-catching centerpieces that will wow your guests.
- Easy to Prepare: With straightforward steps and simple ingredients, you don’t need to be a baking expert to create these beautiful cakes. The process is fun and forgiving, so you can enjoy every moment in the kitchen!
- Versatile for Any Occasion: Whether it’s a birthday, baby shower, or a sunny picnic, these cakes fit right in. You can customize the colors and decorations to match any theme or celebration.
- Deliciously Moist: Thanks to the quality ingredients and proper mixing technique, you’ll end up with a soft, moist cake that everyone will love. Trust me, one slice won’t be enough!
- Creative Freedom: The recipe encourages you to get creative with colors and designs. You can experiment with different hues or even add sprinkles or fruit for extra flair!
Tips for Success
To make your spring cake designs truly shine, here are some practical tips that will help you achieve the best results. Trust me, these little tricks can make a big difference!
- Adjusting Colors: Experiment with your food coloring to get just the right shades for spring! Start with a few drops, mix, and then add more if you want a bolder hue. If you’re going for pastels, mix in a little white frosting to lighten the colors. It’s all about finding the balance that makes you smile!
- Using Different Cake Pan Shapes: Don’t feel limited to round pans! You can use square, rectangular, or even heart-shaped pans to create unique designs. Just make sure to adjust the baking time slightly, as different shapes can affect how quickly the cakes cook through.
- Chilling Your Frosting: If your buttercream is too soft to spread, pop it in the fridge for about 30 minutes. Chilled frosting spreads like a dream and helps you achieve that smooth, professional finish. Plus, it’s easier to work with when it’s firm!
- Layering for Height: For a show-stopping cake, make several thinner layers instead of just two thick ones. This not only looks stunning but also allows for more frosting in between each layer, making every bite even more delicious!
- Decorating with Edible Flowers: When it comes to edible flowers, make sure they’re safe to eat! Rinse them gently and pat them dry before decorating your cake. Fresh flowers not only add beauty but also a lovely touch of flavor.
- Practice Patience: Don’t rush the cooling process! Letting your cakes cool completely ensures that the frosting stays put and doesn’t slide off. It’s worth the wait, I promise!
With these tips in your back pocket, you’re all set to create a stunning spring cake that will impress everyone at your gathering. Happy baking!
Variations
The beauty of spring cake designs lies in their versatility! You can easily adapt this recipe to keep things exciting and fresh. Here are some fun ideas to inspire your creativity:
- Color Schemes: While pastel colors are a classic choice for spring, don’t hesitate to explore bolder shades! Think vibrant pinks, sunny yellows, and deep blues. You could even go for a rainbow theme—layer the colors in sections for a stunning surprise when you cut the cake!
- Flavor Variations: Why not jazz up the flavor of your cake? Consider adding lemon or almond extract for a delightful twist. You can also fold in some zesty lemon zest or even a sprinkle of lavender for a floral note that complements the spring theme beautifully.
- Alternative Decorations: Besides edible flowers, you can use fresh fruits like strawberries, blueberries, or citrus slices for decoration. They add a pop of color and freshness, plus they taste amazing! Drizzle some fruit puree over the top for an extra touch of elegance.
- Layered Flavors: Instead of the classic buttercream frosting, try a cream cheese frosting or whipped ganache for a different flavor profile. You can also add layers of fruit compote between the cake layers for that fresh, fruity burst in every bite!
- Themed Designs: You can easily adapt your cake to suit various occasions. For baby showers, consider soft blues or pinks with cute animal toppers. For Easter, think about incorporating mini chocolate eggs and bunny decorations. The possibilities are endless!
- Fun Shapes: Use different cake molds to create fun shapes like flowers, butterflies, or even a tiered cake for special celebrations. The shape can really make your cake stand out and add a festive flair to your spring gatherings!
With these variations in mind, you can make each spring cake a unique masterpiece that reflects your style and the joy of the season. Happy baking, and let your creativity blossom!
Storage & Reheating Instructions
Once you’ve created your stunning spring cake designs, you might have some leftovers (if you’re lucky!). Here’s how to store them properly so they stay fresh and delicious.
First off, make sure your cake is completely cooled before storing it. If you have leftover slices, wrap each one tightly in plastic wrap or place them in an airtight container. This helps prevent the cake from drying out and keeps it moist for days to come. If you’re dealing with a whole cake, you can cover it with plastic wrap or store it in a cake dome to protect those lovely decorations.
For longer storage, consider placing the wrapped cake in the fridge. It should be good for about 4-5 days. If you want to keep it even longer, you can freeze the cake! Just wrap it tightly in plastic wrap and then in aluminum foil to keep out any air. It’ll stay fresh in the freezer for up to 3 months. When you’re ready to enjoy it again, just transfer it to the fridge to thaw overnight.
If you want to reheat slices, pop them in the microwave for about 10-15 seconds, just enough to take the chill off. Be careful not to overdo it, or you’ll end up with a cake that’s too warm and loses that delightful texture! If you prefer a more traditional approach, you can warm slices in the oven at 350°F (175°C) for about 5-10 minutes. This will help revive that fresh-baked taste.
With these storage and reheating tips, you can enjoy your beautiful spring cake designs for days to come. Happy indulging!
Nutritional Information
When indulging in these delightful spring cake designs, it’s good to know what you’re getting in each slice! Here’s a breakdown of the typical nutritional values per serving (about one slice), but keep in mind that these are estimates and can vary based on specific ingredients and portion sizes:
- Calories: 350
- Fat: 18g
- Saturated Fat: 10g
- Unsaturated Fat: 8g
- Trans Fat: 0g
- Cholesterol: 75mg
- Sodium: 150mg
- Carbohydrates: 45g
- Fiber: 1g
- Sugar: 28g
- Protein: 4g
Enjoying a slice of this cake can feel like a little celebration in itself, and knowing these numbers can help you treat yourself mindfully. So go ahead, savor that slice, and let the flavors of spring bring joy to your day!
FAQ Section
Got questions about creating your stunning *spring cake designs*? I’ve got you covered! Here are some common queries and my tips to help you out:
Can I substitute ingredients for dietary needs?
Absolutely! If you need a dairy-free option, you can use plant-based butter and almond or oat milk. For a gluten-free version, try a gluten-free all-purpose flour blend. Just keep in mind that the texture might vary slightly.
What’s the best way to decorate my cake?
Decoration is all about creativity! Besides edible flowers, consider using fresh fruits or even chocolate shavings for a decadent touch. If you want to add a personal touch, write a message on top with extra frosting using a piping bag.
How can I achieve even layers?
Using a kitchen scale to measure your batter can help ensure each layer is equal. You can also use a serrated knife to level off the tops of the cakes after they cool, giving you a nice, flat surface to stack.
Can I make the cake ahead of time?
Definitely! You can bake the cakes a day or two in advance. Just store them wrapped in plastic wrap at room temperature. Frost them the day of your event for the best look and taste!
With these tips in mind, you’re all set to create beautiful spring cake designs that will impress everyone at your gathering!
Print
Spring Cake Designs for Joyful Celebrations and Memories
- Total Time: 1 hour
- Yield: 8 servings 1x
- Diet: Vegetarian
Description
A collection of beautiful spring cake designs that celebrate the season’s colors and themes.
Ingredients
- 2 cups all-purpose flour
- 1 1/2 cups granulated sugar
- 1 cup unsalted butter, softened
- 4 large eggs
- 1 cup whole milk
- 2 tsp baking powder
- 1 tsp vanilla extract
- 1/2 tsp salt
- Food coloring (various colors)
- Buttercream frosting
- Edible flowers for decoration
Instructions
- Preheat your oven to 350°F (175°C).
- In a bowl, cream together the butter and sugar until light and fluffy.
- Add eggs one at a time, mixing well after each addition.
- Stir in the vanilla extract.
- In another bowl, mix flour, baking powder, and salt.
- Gradually add the dry ingredients to the wet mixture, alternating with milk.
- Divide the batter into different bowls and add food coloring as desired.
- Pour the colored batter into cake pans.
- Bake for 25-30 minutes or until a toothpick comes out clean.
- Let the cakes cool before frosting them with buttercream.
- Decorate with edible flowers.
Notes
- Adjust the colors to your preference.
- Use different shapes of cake pans for varied designs.
- Chill the frosting for easier spreading.
- Prep Time: 30 minutes
- Cook Time: 30 minutes
- Category: Dessert
- Method: Baking
- Cuisine: American
Nutrition
- Serving Size: 1 slice
- Calories: 350
- Sugar: 28g
- Sodium: 150mg
- Fat: 18g
- Saturated Fat: 10g
- Unsaturated Fat: 8g
- Trans Fat: 0g
- Carbohydrates: 45g
- Fiber: 1g
- Protein: 4g
- Cholesterol: 75mg
Keywords: spring cake designs, seasonal cakes, colorful cakes, floral cakes


