
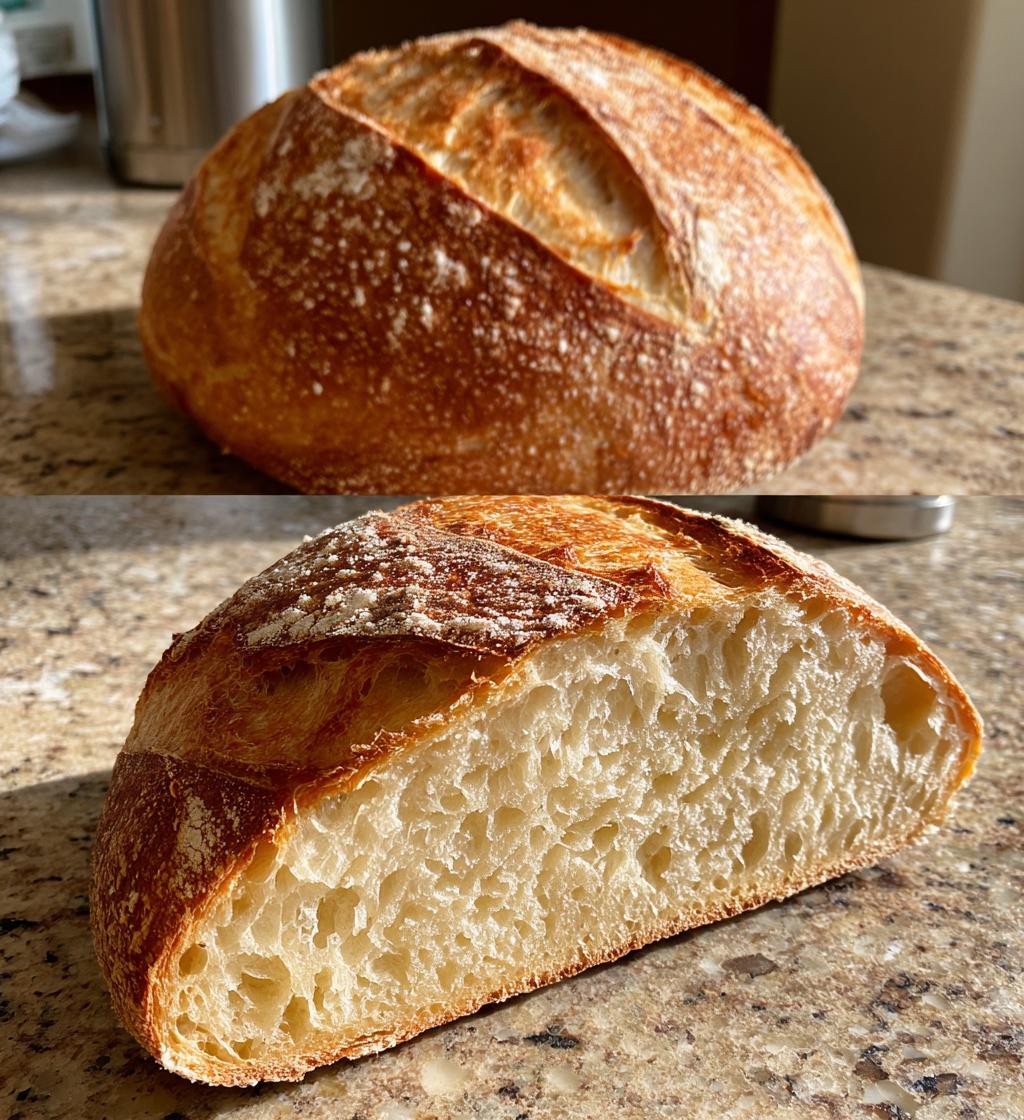
Have you ever marveled at the beautiful patterns on a perfectly baked loaf of sourdough bread? That artful touch comes from a technique called sourdough scoring, and trust me, it’s a game changer in bread baking! Not only does scoring create stunning designs, but it also plays a crucial role in controlling how your dough expands in the oven. When you make those precise cuts on the dough’s surface, you’re allowing it to rise beautifully while preventing unsightly cracks. Plus, it adds a professional finish that’s sure to impress your family and friends!
Getting the hang of sourdough scoring might seem daunting at first, but with a little practice, you’ll find it to be a fun and rewarding part of your baking routine. So, grab your tools, and let’s dive into this simple yet essential technique that will elevate your sourdough game to a whole new level!
Ingredients List
Before we get started, let’s gather our ingredients. You’ll need:
- Sourdough bread dough – This is the star of the show! You can make your own from scratch or use a pre-made batch that’s been properly fermented. Just make sure it’s ready for baking—smooth, elastic, and full of those lovely bubbles!
That’s it! It’s all about that dough, so make sure it’s high-quality for the best results. The magic of sourdough scoring lies in how well you handle this single ingredient. Trust me, when you treat your dough right, you’ll be rewarded with a loaf that’s both beautiful and delicious!
How to Prepare Instructions
Now that you have your dough ready, let’s dive into the steps for scoring and baking your sourdough! Follow these simple instructions to achieve that perfect loaf.
Step 1: Prepare Your Sourdough Bread Dough
First things first, your sourdough bread dough should be at its peak! After the final proofing, it should feel soft and slightly puffy to the touch, with a smooth texture full of those delightful air pockets. If it’s too sticky, you can gently knead in a little flour to make it more manageable. Remember, the goal is to keep it elastic but not overly dry. Once it’s in the right shape, place it on a floured surface, ready for scoring.
Step 2: Preheat Your Oven
Next, it’s time to preheat your oven to a sizzling 450°F (232°C). Preheating is essential because it helps create that initial burst of steam when the dough hits the hot surface, allowing for maximum oven spring. This makes all the difference in achieving a beautifully risen loaf with a crisp crust. So, don’t skip this step!
Step 3: Scoring the Dough
Now for the fun part—scoring! Grab a sharp razor blade or a bread lame; this tool makes all the difference in achieving clean cuts. Hold the blade at a slight angle and make swift, decisive cuts across the surface of the dough. You can create simple slashes or intricate designs—whatever suits your fancy! The key is to score just deep enough to allow for expansion but not so deep that you cut through the dough entirely.
Step 4: Baking the Dough
Once your dough is scored, carefully transfer it into the preheated oven. If you’re using a Dutch oven, open it up and place the dough inside; this will help trap steam for that perfect crust. Bake for about 30 minutes, or until the crust turns a rich golden brown and the loaf sounds hollow when tapped. The anticipation will be worth it when you pull that gorgeous loaf out of the oven!
Why You’ll Love This Recipe
Sourdough scoring isn’t just about looks; it’s a crucial step that enhances your baking experience! Here’s why you’ll fall in love with this technique:
- Beautiful Presentation: Those elegant patterns make your bread look like a work of art!
- Controlled Expansion: Scoring allows your dough to rise evenly, preventing unsightly cracks.
- Creative Expression: You can experiment with different designs, making each loaf uniquely yours.
- Improved Crust: Scoring helps create a crisp, crunchy crust that’s simply irresistible.
Trust me, once you master sourdough scoring, you’ll see and taste the difference in every loaf!
Tips for Success
To ensure your sourdough scoring is on point, here are some handy tips to keep in mind:
- Use a Sharp Blade: A sharp razor or bread lame is crucial! A dull blade can drag through the dough, leading to messy cuts.
- Score Just Before Baking: Timing is everything! Make your cuts right before placing the dough in the oven to maintain its structure.
- Practice Makes Perfect: Don’t worry if your first attempts aren’t perfect. Experiment with different patterns and depths to find what works best for you.
- Keep the Dough Taut: Gently shape and tension your dough before scoring. A taut surface makes it easier to create clean cuts.
With these tips, you’ll be well on your way to scoring like a pro!
Variations
Once you’ve got the basics of sourdough scoring down, why not get creative? There are so many fun patterns to try! Here are a few ideas to spark your imagination:
- Classic Crosshatch: Create a series of diagonal cuts that crisscross across the surface for a beautiful, rustic look.
- Leaf Design: Make cuts that resemble leaves or petals, giving your loaf a charming, organic vibe.
- Waves: Use a gentle, wave-like motion with your blade for a playful pattern that adds texture.
- Spiral: Start from the center and work your way outward in a spiral pattern for a striking visual effect.
Feel free to experiment with depths and angles to achieve unique results that reflect your personal style! Each loaf can be a canvas for your creativity.
Nutritional Information Section
When you bake up a beautiful loaf of sourdough, you’re not just treating your taste buds; you’re also nourishing your body! Here’s a breakdown of the typical nutritional values per slice (1 slice equals about 80 calories):
- Calories: 80
- Fat: 1g
- Saturated Fat: 0g
- Trans Fat: 0g
- Carbohydrates: 15g
- Fiber: 1g
- Protein: 3g
- Sodium: 200mg
- Sugar: 0.5g
Keep in mind that these values can vary based on the ingredients you use and the size of your slices. But no matter the numbers, each bite of your homemade sourdough will be filled with love and goodness!
FAQ Section
Got questions about sourdough scoring? You’re not alone! Here are some common queries I hear, along with my answers to help you on your bread-baking journey:
Q1: What is the best tool for scoring sourdough?
A sharp razor blade or a bread lame works best for scoring. They allow for clean cuts that won’t drag through the dough, ensuring beautiful patterns!
Q2: How deep should I score my dough?
You want to score deep enough to allow for expansion—about ¼ inch is ideal. This depth helps prevent the dough from bursting uncontrollably during baking.
Q3: Can I score my dough after it’s risen?
Absolutely! Just make sure to score it right before baking to maintain its structure and ensure a lovely oven spring.
Q4: What happens if I don’t score my sourdough?
If you skip the scoring, your dough may expand unevenly, leading to cracks or a less appealing loaf. Scoring is essential for even rising and a great crust!
Q5: Can I use my scoring technique for other types of bread?
Definitely! The scoring techniques you use for sourdough can be applied to many other bread types, adding a personal touch to your baking!
What to Do Next
I’d love to hear how your sourdough scoring adventures go! Feel free to leave a comment below and share your thoughts or any creative patterns you tried. If you enjoyed this recipe, don’t forget to give it a rating and share it on your social media. Happy baking!
Print
Sourdough Scoring: 4 Tips for Stunning Loaves Every Time
- Total Time: 45 minutes
- Yield: 1 loaf
- Diet: Vegetarian
Description
Sourdough scoring is a technique used to create patterns on the surface of the dough before baking. It allows for controlled expansion during baking.
Ingredients
- Sourdough bread dough
Instructions
- Prepare your sourdough bread dough.
- Preheat your oven to the desired temperature.
- Use a sharp razor or bread lame for scoring.
- Make a clean cut on the surface of the dough.
- Place the dough in the oven and bake.
Notes
- Score just before baking for best results.
- Experiment with different patterns.
- Prep Time: 15 minutes
- Cook Time: 30 minutes
- Category: Baking
- Method: Oven
- Cuisine: Various
Nutrition
- Serving Size: 1 slice
- Calories: 80
- Sugar: 0.5g
- Sodium: 200mg
- Fat: 1g
- Saturated Fat: 0g
- Unsaturated Fat: 0g
- Trans Fat: 0g
- Carbohydrates: 15g
- Fiber: 1g
- Protein: 3g
- Cholesterol: 0mg
Keywords: sourdough scoring, bread baking, bread decoration


