
Nothing says Christmas like the scent of buttery cookies dusted with powdered sugar wafting through the house. For me, making snowball cookies is as much a part of our holiday tradition as hanging stockings or decorating the tree. I can still picture my grandmother’s flour-dusted apron as she’d let me roll the warm cookies in sugar, turning my fingers into a snowy mess. These melt-in-your-mouth treats, also called Russian tea cakes, have been our family’s favorite Christmas cookie for generations.
There’s something magical about how simple ingredients – butter, sugar, nuts – transform into these delicate little snowballs. They’re the first cookies to disappear from our holiday cookie trays every year. My kids now fight over who gets to do the final powdered sugar coating, just like I did with my grandma. This snowball cookies recipe Christmas tradition connects us to sweet memories while creating new ones with each batch we bake together.
Why You’ll Love This Snowball Cookies Recipe Christmas
Let me tell you why these little powdered sugar wonders have been my go-to Christmas cookie for years. First off, they’re ridiculously easy to make – no fancy decorating skills needed! Just wait until you see how:
- They transform into perfect little snowballs with that magical double sugar coating
- The texture literally melts in your mouth (I dare you to eat just one!)
- They look so festive piled high on holiday cookie trays
- They make the sweetest homemade gifts (I always pack them in pretty tins)
Honestly, the hardest part is keeping them around long enough to share! The combination of buttery dough and crunchy nuts makes them irresistible, and that snowy powdered sugar coating? Pure Christmas magic.
Snowball Cookies Recipe Christmas Ingredients
Here’s the beautiful thing about these cookies – you probably have most of these ingredients in your pantry right now! But let me share a few tips about each one to make sure your snowball cookies turn out perfect:
- 1 cup unsalted butter, softened – This means real butter at room temperature (not melted!). I leave mine out for about 30 minutes before baking. You should be able to press your finger into it easily.
- 1/2 cup powdered sugar – This goes in the dough, but don’t worry – we’ll use more for that gorgeous snowy coating later!
- 2 teaspoons vanilla extract – The good stuff makes a difference here. I splurge on pure vanilla for these holiday cookies.
- 2 1/4 cups all-purpose flour – No need to sift, just spoon it into your measuring cup and level it off.
- 1/4 teaspoon salt – This little bit enhances all the other flavors.
- 3/4 cup finely chopped pecans or walnuts – Chop them small so they distribute evenly. I use my food processor for this and pulse just a few times.
- Additional powdered sugar for rolling – You’ll need about 1 cup extra for that signature snowball look!
See? Nothing fancy, just simple ingredients that turn into something magical. I always double the recipe because these disappear fast at holiday parties!
Essential Equipment for Snowball Cookies
The best part about making these cookies? You don’t need any fancy baking tools! Here’s what I grab from my kitchen:
- A sturdy mixing bowl – Glass or stainless steel both work great
- Electric mixer – Though you could mix by hand if you’re feeling nostalgic (and strong!)
- Baking sheets – I usually need two for a full batch
- Parchment paper – Lifesaver for easy cleanup and no sticking
- Measuring cups and spoons – For getting those ratios just right
That’s it! No cookie presses, piping bags, or special gadgets required. Just simple tools for simple (but amazing) cookies.
How to Make Snowball Cookies Recipe Christmas
Okay, let’s get to the fun part – making these little powdered sugar clouds of joy! I’ve made this snowball cookies recipe Christmas tradition so many times I could do it in my sleep, but I’ll walk you through each step carefully. Follow these instructions, and you’ll have perfect melt-in-your-mouth cookies every time.
Mixing the Dough
First things first – preheat your oven to 350°F (175°C). Trust me, you want that oven nice and hot before the cookies go in. While it’s heating up, let’s make the dough:
Start by creaming the softened butter and powdered sugar together until they’re light and fluffy. This is where the magic begins! I use my electric mixer on medium speed for about 2 minutes. You’ll know it’s ready when the mixture turns pale and almost whipped-looking. Scrape down the sides of the bowl halfway through – those sneaky bits of butter love to hide there.
Next, mix in the vanilla extract. Then gradually add the flour and salt. The dough will get thick – that’s normal! Finally, stir in those finely chopped nuts until they’re evenly distributed. The dough should hold together when pressed but not be sticky. If it feels too soft, pop it in the fridge for 15-20 minutes.
Shaping and Baking
Now for the fun part – shaping! Roll the dough into 1-inch balls (about the size of a walnut) and place them on parchment-lined baking sheets about 1 inch apart. I like to use a small cookie scoop for uniform size, but your hands work just fine too.
Bake for 12-15 minutes until the bottoms are lightly golden. The tops should stay pale – that’s how you know they’re perfectly baked. Don’t wait for them to brown all over! I set my timer for 12 minutes and check them – they often need just another minute or two.
The Double Sugar Coating
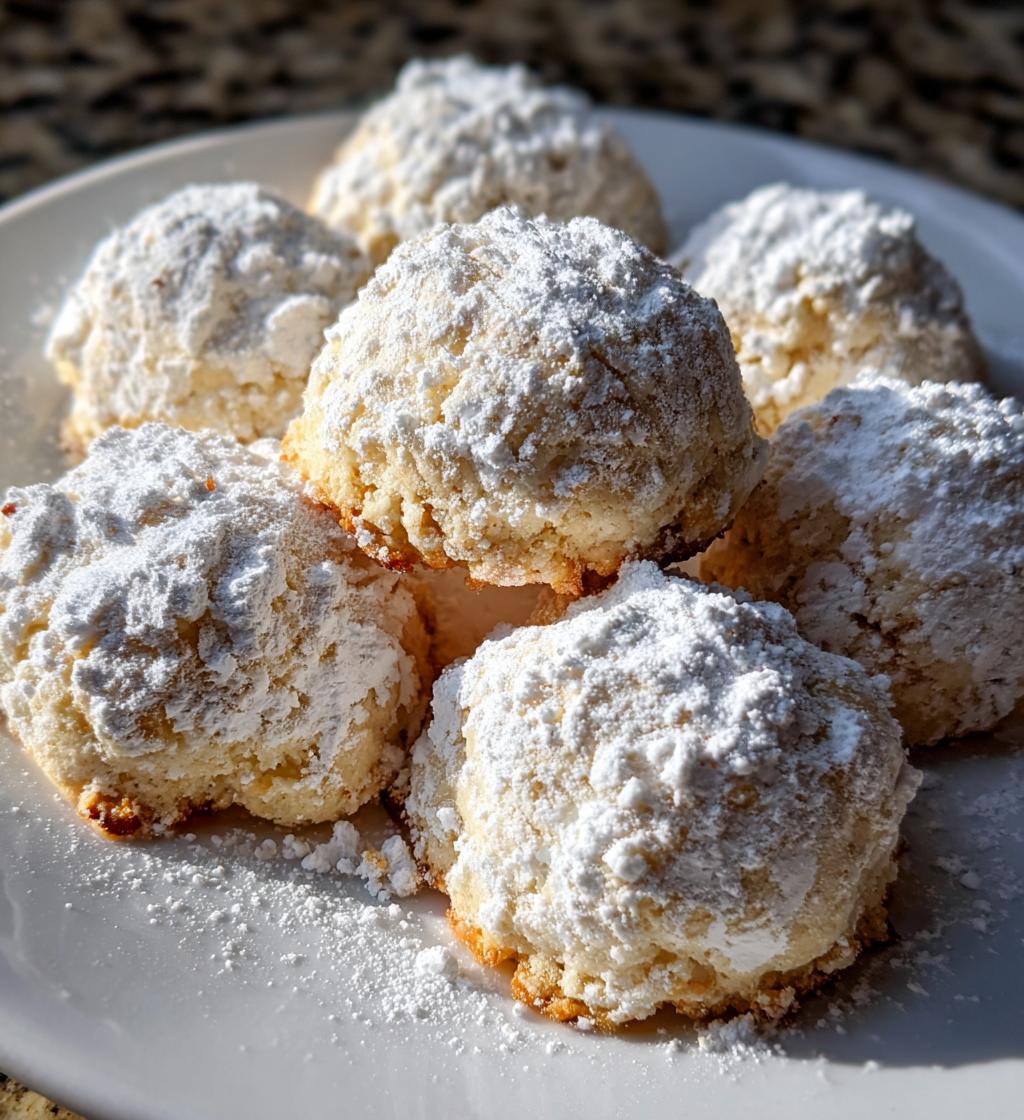
Here’s the secret to those gorgeous snowy cookies – the double sugar coating! Let the cookies cool just enough to handle (about 5 minutes), then roll them in powdered sugar while still warm. This first coating will melt slightly into the cookies.
After they’ve cooled completely (about 30 minutes), roll them in powdered sugar again. This second coating gives them that beautiful snowy look we all love. Pro tip: I put the powdered sugar in a shallow bowl and gently toss a few cookies at a time to coat them evenly without breaking.
And voila! You’ve just made the most magical Christmas cookies that will disappear faster than you can say “snowball!”
Pro Tips for Perfect Christmas Snowball Cookies
After making hundreds (maybe thousands!) of these cookies over the years, I’ve picked up some tricks that guarantee perfect snowballs every time. First – if your dough feels sticky when shaping, don’t panic! Just pop it in the fridge for 15-20 minutes. The butter firms up beautifully.
Always use fresh nuts – stale ones can make your cookies taste bitter. I store mine in the freezer to keep them fresh longer. And here’s my secret weapon: sift your powdered sugar before rolling! It makes the coating silky smooth instead of lumpy.
For storage, keep them in an airtight container at room temperature. If the sugar coating gets absorbed (it happens!), just give them another quick roll in powdered sugar before serving. They’ll look freshly made!
Snowball Cookies Variations
While I’m fiercely loyal to my grandma’s classic snowball cookies recipe Christmas version, I’ve played around with some fun twists over the years. My favorite? Swapping vanilla for almond extract – it gives these cookies such a lovely, delicate flavor that pairs beautifully with the nuts.
You can also try:
- Different nuts like hazelnuts or almonds (just make sure to chop them super fine)
- A pinch of cinnamon in the dough for a warm holiday spice
- Mini chocolate chips folded in for a sweet surprise
The basic recipe is so forgiving – feel free to get creative! Though I’ll warn you, my family still insists the original is best.
Storing Your Snowball Cookies
Here’s my foolproof method for keeping these delicate cookies fresh and beautiful. I always store them in an airtight container at room temperature – no refrigeration needed! The cookies will stay perfect for up to a week this way.
Now, don’t panic if you notice the powdered sugar coating disappears a bit after a day or two. That’s totally normal! Just give them a quick re-roll in powdered sugar right before serving. I keep a little bowl of extra sugar handy for this exact purpose. They’ll look freshly made and taste just as amazing as day one.
Snowball Cookies Recipe Christmas FAQs
Over the years, I’ve gotten so many questions about these beloved Christmas cookies! Let me answer the most common ones that pop up every holiday season:
Can I freeze snowball cookies?
Absolutely! These freeze like a dream – just wait until you pull out a batch mid-December and they taste freshly baked. My trick? Freeze them before the final powdered sugar coating. Bake as usual, do the first sugar roll, then freeze in a single layer. When ready to serve, thaw at room temperature and give them that second snowy coating. They’ll be perfect!
Is there a gluten-free option?
Yes! I’ve had great success using a 1:1 gluten-free flour blend (I like the ones with xanthan gum already added). The texture comes out nearly identical to the original – just make sure your other ingredients are gluten-free too. My cousin with celiac says these are her favorite holiday treat now!
Why did my cookies crumble?
Oh no! This usually happens from overbaking. Remember – snowball cookies should stay pale on top with just lightly golden bottoms. If they bake too long, they dry out. Also, make sure you’re measuring your flour correctly (spoon it into the cup, don’t scoop!). And don’t skip creaming the butter and sugar – this step adds necessary structure.
What are the best nuts to use?
I’m partial to pecans (they have such a buttery flavor!), but walnuts work beautifully too. The key is to chop them very fine so they distribute evenly. If you’re feeling fancy, try toasted hazelnuts – just be sure to remove the skins first. For nut allergies, you can leave them out entirely, though the texture will be slightly different.
Still have questions? Don’t hesitate to ask! I could talk about these little powdered sugar wonders all day. After all, they’re not just cookies – they’re edible Christmas memories.
Nutritional Information
Now, I’m not one to count calories during the holidays (life’s too short!), but I know some folks like to keep track. Here’s the scoop on what’s in these little snowballs of joy. Just remember – these numbers are estimates based on the exact ingredients I use, so yours might vary slightly depending on your brand choices.
Per cookie (assuming you get 36 from the batch):
- Calories: 90
- Sugar: 5g
- Sodium: 15mg
- Fat: 6g (3g saturated, 2g unsaturated)
- Carbohydrates: 8g
- Protein: 1g
- Cholesterol: 10mg
Honestly? I think the joy these cookies bring is worth every delicious calorie. But if you’re watching portions, I completely understand – just know it’s nearly impossible to stop at one! That buttery, melt-in-your-mouth texture is downright addictive. My advice? Savor each bite slowly and enjoy every crumb – that’s what holiday baking is all about.
Print
Irresistible 45-Minute Snowball Cookies Recipe Christmas Magic
- Total Time: 30 minutes
- Yield: 36 cookies 1x
- Diet: Vegetarian
Description
Snowball cookies are a classic Christmas treat, also known as Russian tea cakes or Mexican wedding cookies. These buttery, melt-in-your-mouth cookies are rolled in powdered sugar for a snowy appearance.
Ingredients
- 1 cup unsalted butter, softened
- 1/2 cup powdered sugar
- 2 teaspoons vanilla extract
- 2 1/4 cups all-purpose flour
- 1/4 teaspoon salt
- 3/4 cup finely chopped pecans or walnuts
- Additional powdered sugar for rolling
Instructions
- Preheat oven to 350°F (175°C). Line baking sheets with parchment paper.
- Cream butter and powdered sugar until light and fluffy.
- Mix in vanilla extract.
- Gradually add flour and salt, mixing until combined.
- Stir in chopped nuts.
- Shape dough into 1-inch balls and place on baking sheets.
- Bake for 12-15 minutes until bottoms are lightly golden.
- Cool slightly, then roll warm cookies in powdered sugar.
- Cool completely, then roll in powdered sugar again.
Notes
- Store in an airtight container for up to 1 week.
- Dough can be refrigerated for 30 minutes if too soft.
- For even baking, space cookies 1 inch apart.
- Prep Time: 15 minutes
- Cook Time: 15 minutes
- Category: Dessert
- Method: Baking
- Cuisine: International
Nutrition
- Serving Size: 1 cookie
- Calories: 90
- Sugar: 5g
- Sodium: 15mg
- Fat: 6g
- Saturated Fat: 3g
- Unsaturated Fat: 2g
- Trans Fat: 0g
- Carbohydrates: 8g
- Fiber: 0g
- Protein: 1g
- Cholesterol: 10mg
Keywords: snowball cookies, Christmas cookies, powdered sugar cookies, holiday baking


