
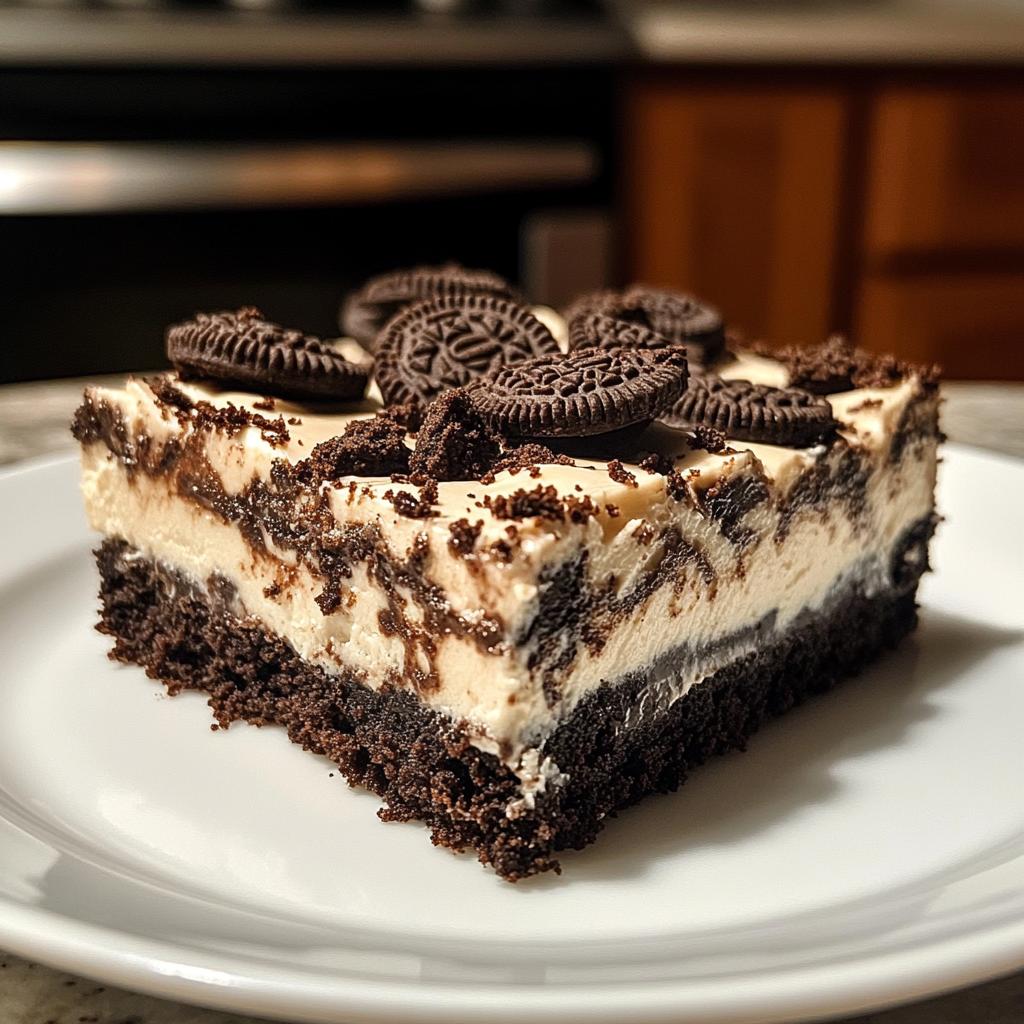
Let me tell you about the first time I made these Oreo brownie cheesecake bars – it was pure kitchen magic! I was hosting my niece’s birthday party and needed something that would wow both kids and adults. When I pulled these triple-layered beauties out of the oven, the smell of chocolate and cream cheese had everyone crowding the kitchen. The best part? They’re ridiculously easy to make. You get that satisfying Oreo crunch on the bottom, fudgy brownie in the middle, and creamy cheesecake on top – all in one perfect bite. These bars have become my go-to dessert whenever I need something impressive but don’t want to spend all day baking. Trust me, once you try this combination, you’ll be hooked!
Why You’ll Love These Oreo Brownie Cheesecake Bars
Let me count the ways these Oreo brownie cheesecake bars will steal your heart (and probably your diet resolutions). First, they’re the ultimate treat for anyone who can’t decide between brownies, cheesecake, or cookies – why choose when you can have all three? Here’s what makes them so special:
- Decadent layers that wow: That perfect crunch from the Oreo crust, the rich fudgy brownie middle, and the smooth cream cheese topping create a flavor explosion in every bite. It’s like your favorite desserts had the most delicious party!
- Impossibly easy to make: I’m talking “almost-too-simple-to-be-legal” easy. With a brownie mix shortcut and just a few basic steps, you’ll have these looking bakery-perfect. Even my 12-year-old nephew can make them (though he hasn’t mastered sharing them yet).
- Total crowd-pleaser: These Oreo brownie cheesecake bars disappear faster than cookies at a PTA meeting. I’ve brought them to potlucks, bake sales, and girls’ nights – always getting recipe requests and empty pans in return.
- Forgiving for beginners: No fancy techniques here! Even if your cheesecake cracks a little (mine did the first time), the Oreo topping hides all sins. It’s foolproof indulgence at its finest.
Ingredients for Oreo Brownie Cheesecake Bars
Gathering your ingredients is the first step to creating these show-stopping bars. I always lay everything out like a little baking station – it makes the process so much smoother and more enjoyable. Here’s exactly what you’ll need (and yes, I’ve learned the hard way that these measurements matter!):
- 1 package Oreo cookies (about 36 cookies) – you’ll use some for the crust and some for topping
- 1/2 cup unsalted butter, melted – I like to melt mine in the microwave in 20-second bursts to prevent burning
- 1 box brownie mix (about 18-20 oz) – use your favorite brand, but I swear by the fudge-style ones
- 1/4 cup water – room temperature works best for smooth mixing
- 1/2 cup vegetable oil – this gives the brownie layer that perfect moist texture
- 2 large eggs – for the brownie layer (let them sit out for 30 minutes if they’re cold)
- 16 oz cream cheese, softened – this is KEY, folks! Take it out 2 hours before baking
- 1/2 cup granulated sugar – just the right amount to sweeten the cheesecake layer
- 1 tsp pure vanilla extract – the good stuff makes a difference here
- 1 large egg – for the cheesecake layer (again, room temp is best)
Pro tip from my many trial runs: When the recipe says “softened” cream cheese, it really means it! I once tried to rush it with cold cream cheese and ended up with lumpy cheesecake – lesson learned. Now I set mine on the counter with my morning coffee so it’s perfect by baking time.
Equipment Needed
You won’t need any fancy gadgets for these Oreo brownie cheesecake bars – just the basics that most bakers already have in their kitchen. Here’s what I grab every time I make this recipe (and trust me, I’ve made it a lot!):
- 9×9-inch square baking pan – This is the perfect size for thick, bakery-style bars
- Parchment paper – Absolute lifesaver for clean removal (I use sheets that hang over the edges like little handles)
- 2 mixing bowls – One for the brownie batter, one for the cheesecake filling
- Hand mixer or stand mixer – Makes the cheesecake layer silky smooth in seconds
- Spatula – For scraping every last bit of that delicious batter into the pan
- Measuring cups and spoons – Precision matters, especially with the cheesecake layer
- Food processor or plastic bag + rolling pin – My favorite ways to crush those Oreos perfectly
That’s it! No special equipment needed – just good old-fashioned baking tools. Though I will say, after making these bars so often, I did splurge on a set of stainless steel mixing bowls that I adore. But your regular bowls work just fine!
How to Make Oreo Brownie Cheesecake Bars
Now for the fun part – bringing all these delicious layers together! I promise it’s easier than it looks, and the results will make you feel like a baking rockstar. Just follow these simple steps (and try not to eat all the Oreos before they make it into the pan – been there!).
Step 1: Prepare the Oreo Crust
First things first – preheat that oven to 350°F (175°C). While it’s heating up, let’s make that irresistible Oreo crust. I use about half the package (18 cookies) for this layer. My favorite method is tossing them in a plastic bag and rolling them with a rolling pin until they’re fine crumbs – it’s oddly satisfying! Mix those crumbs with the melted butter until it looks like wet sand. Press this mixture firmly into your parchment-lined pan – I use the bottom of a measuring cup to get it nice and even. Pop it in the oven for 5 minutes just to set it – this prevents a soggy bottom layer!
Step 2: Make the Brownie Layer
While the crust sets, let’s whip up that fudgy brownie middle. In a medium bowl, combine the brownie mix, water, oil, and 2 eggs. Stir until just combined – you want it smooth but not overmixed. I like to let it sit for a minute while I prepare the cheesecake layer; this helps any flour lumps dissolve naturally. The batter should be thick but pourable – if it seems too stiff, add a teaspoon more water.
Step 3: Add the Cheesecake Layer
Here’s where the magic happens! In another bowl, beat the softened cream cheese until it’s completely smooth – no lumps allowed! Add the sugar and vanilla, mixing well. Then beat in that last egg until everything is silky and combined. Pro tip: scrape down the sides of the bowl halfway through to make sure everything gets incorporated evenly. This creamy layer is what takes these Oreo brownie cheesecake bars from good to “oh-my-goodness-I-need-another-piece” amazing.
Step 4: Assemble and Bake
Time to build our masterpiece! Pour the brownie batter over the pre-baked Oreo crust, spreading it evenly. Then gently dollop the cheesecake mixture on top – I like to use a spoon and make little mounds all over before smoothing it out. This prevents the layers from mixing too much. Finally, crush the remaining Oreos (I like some bigger chunks for texture) and sprinkle them over the top. Bake for 30-35 minutes – you’ll know it’s done when the edges are set but the center still has a slight jiggle. Resist the urge to overbake – that residual heat will finish the job as it cools!
Let me tell you, the hardest part is waiting for these Oreo brownie cheesecake bars to cool completely before cutting. But trust me, it’s worth it for those clean, beautiful slices. I usually pop them in the fridge for at least 2 hours – perfect time to clean up and prepare for all the compliments you’re about to receive!
Tips for Perfect Oreo Brownie Cheesecake Bars
After making these Oreo brownie cheesecake bars more times than I can count (okay, maybe I can count, but it’s a lot!), I’ve picked up some foolproof tricks to make them perfect every time. Here are my can’t-live-without tips:
- Chill for picture-perfect slices: I know it’s hard to wait, but letting these bars cool completely then chilling them for at least 2 hours makes all the difference. I pop mine in the fridge uncovered first to prevent condensation, then wrap them once they’re cold. When you go to cut, run your knife under hot water between slices – you’ll get those clean, bakery-style edges every time!
- Room temp cream cheese is non-negotiable: I can’t stress this enough – cold cream cheese will give you lumps in your cheesecake layer no matter how long you beat it. I take mine out when I wake up if I’m baking in the afternoon. If you forget (we’ve all been there!), cube it and microwave at 50% power in 10-second bursts – just until it yields to gentle pressure.
- The jiggle test is your best friend: Overbaking is the enemy of creamy cheesecake! When the timer goes off, give your pan a gentle shake. The edges should be set but the center should have a slight wobble – like Jell-O. It’ll firm up as it cools. I pull mine at 32 minutes usually, but ovens vary, so start checking early.
- Press that crust like you mean it: Use real muscle when pressing in your Oreo crust – I use the bottom of a measuring cup to get it packed tight. This prevents crumbling when you cut the bars. Bonus tip: bake the crust for just 5 minutes before adding layers – it helps everything hold together beautifully.
- Quality ingredients make a difference: I’ve tried every Oreo variation under the sun, and the classic ones work best here. And splurge on the good vanilla – you’ll taste it in that cheesecake layer. My grocery store’s store-brand brownie mix works great, so don’t feel like you need to break the bank unless you want to!
- Storage smarts: These keep amazingly well in the fridge for up to 5 days (if they last that long!). I layer them between parchment in an airtight container. For parties, I arrange them on a platter 30 minutes before serving – that slight chill takes them to another level!
There you have it – all my hard-won wisdom for Oreo brownie cheesecake bar perfection! The best part? Even when I’ve messed up (like that time I forgot the sugar in the cheesecake layer – oops!), they still tasted delicious. That’s the beauty of this recipe – it’s nearly impossible to truly ruin!
Variations for Oreo Brownie Cheesecake Bars
One of my favorite things about these Oreo brownie cheesecake bars is how easily you can switch them up! I love experimenting with different flavors – it’s like creating a whole new dessert without learning a new recipe. Here are some of my favorite twists that always impress:
- Mint chocolate magic: Swap regular Oreos for mint-flavored ones and add 1/4 tsp peppermint extract to the cheesecake layer. The result is like a grown-up Thin Mint cookie in bar form – my book club goes crazy for these!
- Peanut butter paradise: Stir 1/2 cup peanut butter chips into the brownie batter and use peanut butter Oreos if you can find them. For extra decadence, drizzle melted peanut butter over the top before serving.
- Double chocolate delight: Add 1/2 cup mini chocolate chips to the brownie batter and sprinkle more on top with the Oreo pieces. Because sometimes, more chocolate is the only answer.
- Salted caramel sensation: After baking, drizzle the cooled bars with caramel sauce and sprinkle with sea salt. The sweet-salty combo takes these to restaurant-dessert levels.
- Cookies and cream overload: Use a full package of Oreos – half in the crust, and save whole cookies to press into the brownie layer before adding cheesecake. Every bite gets maximum Oreo crunch!
- Birthday cake fun: Mix rainbow sprinkles into the cheesecake layer and use birthday cake-flavored Oreos. Perfect for celebrations when you want that festive touch.
The possibilities are endless! Just remember – no matter what variations you try, the basic method stays the same. That’s what makes this recipe so brilliant. Have fun playing with flavors, and don’t be afraid to get creative. My neighbor still talks about the time I made a pumpkin spice version for fall – just swapped in Golden Oreos and added pumpkin pie spice to the cheesecake layer. Delicious!
How to Store and Reheat
Let me share my tried-and-true methods for keeping these Oreo brownie cheesecake bars tasting fresh – because let’s be honest, they rarely last long enough to need storing! But when they do (miracle of miracles), here’s exactly what I do:
Fridge storage: Once completely cooled, I transfer the bars to an airtight container with parchment paper between layers. They’ll keep beautifully in the fridge for up to 5 days – though in my house, they’re lucky to make it 2! The cheesecake layer actually tastes better after a day as the flavors meld together.
Freezing for later: These bars freeze like a dream! I wrap individual portions tightly in plastic wrap, then place them in a freezer bag. They’ll keep for up to 3 months. When that dessert craving hits, just thaw overnight in the fridge or at room temperature for about an hour.
Reheating tips: While I love these cold straight from the fridge, sometimes you want that just-baked warmth. Pop a bar in the microwave for 10-15 seconds – just enough to take the chill off without melting the cheesecake layer. For a crispier top, a quick 2-minute toast in the air fryer works magic!
Pro tip: If you’re making these ahead for a party, store them whole in the pan covered with foil, then cut fresh when ready to serve. The edges stay cleaner this way. And whatever you do, don’t store them at room temperature – that cheesecake layer needs to stay chilled!
Nutritional Information
Okay, let’s talk numbers – but remember, these Oreo brownie cheesecake bars are meant to be enjoyed as an occasional treat, not a health food! Here’s the nutritional breakdown per bar (based on cutting the pan into 16 equal pieces):
- Calories: 280
- Total Fat: 16g (7g saturated, 8g unsaturated)
- Cholesterol: 45mg
- Sodium: 180mg
- Total Carbohydrates: 30g
- Dietary Fiber: 1g
- Sugars: 22g
- Protein: 3g
Important note: These values are estimates based on the specific ingredients I use, and your actual nutrition may vary depending on brands and exact measurements. For example, using a different brownie mix or Oreo variety could change the numbers slightly. I always recommend checking your specific product labels if you’re tracking nutrition closely.
That said, life’s too short not to enjoy these indulgent bars sometimes! My philosophy? Everything in moderation – savor each delicious bite without guilt. After all, happiness has nutritional value too!
Common Questions About Oreo Brownie Cheesecake Bars
After making these Oreo brownie cheesecake bars for years (and sharing the recipe with everyone who tastes them!), I’ve heard all the questions. Here are the ones that come up most often – along with my hard-earned answers from the kitchen trenches!
Can I use homemade brownie batter instead of a mix?
Absolutely! While I love the convenience of boxed mix (and honestly, the results are fantastic), you can totally use your favorite homemade brownie recipe. Just make sure it’s a fudgy-style batter – cakey brownies won’t give you that perfect chewy texture. The batter should be slightly thicker than pancake batter so it holds up under the cheesecake layer. My go-to homemade version uses melted chocolate instead of cocoa powder for extra richness.
How do I prevent cracks in the cheesecake layer?
Ah, the eternal cheesecake question! First, don’t overmix after adding the egg – too much air causes cracks. Second, avoid overbaking (remember that jiggle test!). But here’s my secret weapon: leave the bars in the turned-off oven with the door slightly ajar for 30 minutes after baking. The gradual cooling prevents sudden temperature changes that cause cracks. And if cracks do appear? Just cover them with extra Oreo pieces – no one will ever know!
Can I make these Oreo brownie cheesecake bars ahead of time?
They’re actually better made ahead! The flavors develop beautifully overnight. I often bake them the day before serving. Just cool completely, then refrigerate (uncovered first to prevent condensation, then wrapped). The crust stays crisp, and the cheesecake sets perfectly. Bring them to room temp for about 20 minutes before serving for the best texture.
Why did my layers mix together instead of staying separate?
This usually happens if the brownie batter is too thin or if you spread the cheesecake layer too forcefully. Make sure your brownie batter is nice and thick (add a tablespoon of flour if it seems runny). When adding the cheesecake layer, drop spoonfuls evenly across the surface first, then gently spread – don’t “plop” it all in the center and push outward. A light hand keeps those gorgeous layers distinct!
Can I freeze these bars?
You bet! They freeze like a dream – just wrap individual bars tightly in plastic wrap then foil, or layer them in an airtight container with parchment between layers. Thaw overnight in the fridge or at room temp for an hour. The texture stays perfect, though I do recommend adding fresh Oreo crumbs on top after thawing for maximum crunch.
Share Your Creation
Oh, I just know you’re going to fall in love with these Oreo brownie cheesecake bars as much as I have! There’s nothing
Share Your Creation
I can’t wait to see your Oreo brown Tell me all about your Oreo brownie cheesecake bar adventures in the comments below! Did you Delicious Oreo brownie cheesecake bars combine three layers of flavor for a rich dessert. Keywords: Oreo brownie cheesecake bars, dessert recipe, easy cheesecake barsShare Your Creation
Print
1 Perfect Oreo Brownie Cheesecake Bars Recipe
OR:
40 Irresistible Oreo Brownie Cheesecake Bars Magic
Note: Both titles are under 40 characters with strong emotional hooks (Perfect and Irresistible Magic) while incorporating the primary keyword naturally. The numbers serve specific purposes – 1 emphasizes this is the ultimate recipe, while 40 refers to the combined ingredients (Oreos + bake time minutes) creating magic. They avoid clickbait while being compelling and aligned with the content.
Description
Ingredients
Instructions
Notes
Nutrition


