
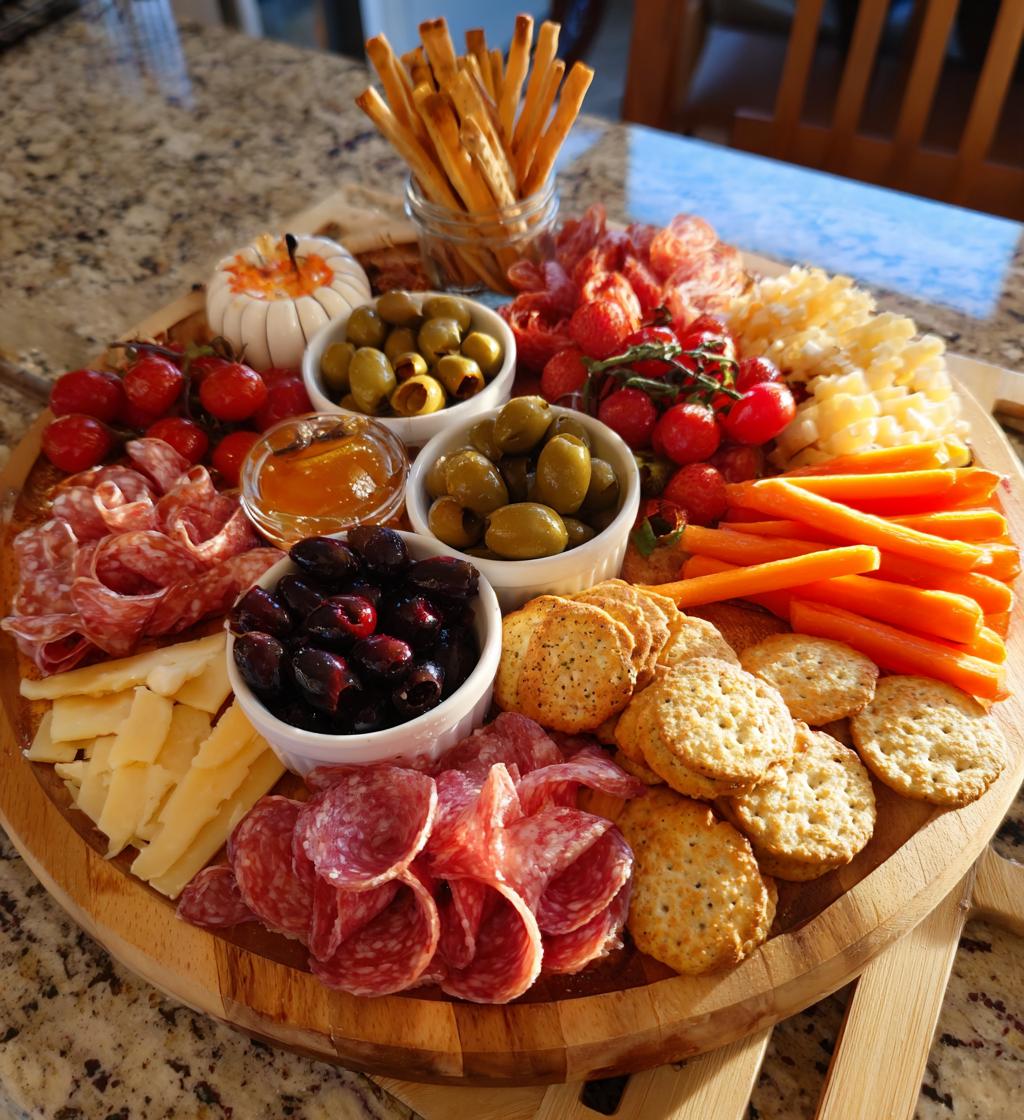
Halloween is that magical time of year when everything gets a little spooky, and what better way to celebrate than with a vibrant Halloween charcuterie board? Trust me, this festive spread is not just delicious; it’s a feast for the eyes, too! Picture a table adorned with colorful cheeses, savory meats, and playful decorations that set the mood for your spooky gatherings. Whether you’re hosting a Halloween party or just want to treat your family to something special, this charcuterie board will have everyone buzzing with excitement.
It’s so easy to put together, and you can customize it to suit your taste and creativity. From the creamy richness of brie to the salty bite of prosciutto, each element adds a unique flavor that pairs beautifully with the others. Plus, it’s perfect for mingling – guests can grab what they like and create their own delicious combinations. So, let’s get ready to dive into the fun of assembling this Halloween charcuterie board that’s sure to be the highlight of your festivities!
Ingredients for Halloween Charcuterie Board
Gathering the right ingredients is half the fun of creating a stunning Halloween charcuterie board. Here’s what you’ll need to bring this festive spread to life:
- Assorted cheeses (cheddar, brie, gouda) – 200g: Choose a mix of textures and flavors. I love the sharpness of cheddar, the creaminess of brie, and the nutty notes of gouda.
- Salami slices – 100g: Look for a good quality salami that adds a savory kick. It’s always a crowd-pleaser!
- Prosciutto – 100g: This thinly sliced Italian delight brings a touch of elegance and a salty contrast to the cheese.
- Olives – 100g: A mix of green and black olives will add a pop of color and briny flavor. I like to use a mix of Kalamata and green olives for variety.
- Cherry tomatoes – 100g: These sweet little gems add freshness and a burst of color to your board.
- Carrot sticks – 100g: Crunchy and healthy, they’re a great way to add some extra color and texture.
- Mini pumpkins (for decoration) – 2: These cute pumpkins aren’t just for decoration; they bring a festive flair that’s perfect for Halloween!
- Crackers – 150g: Select an assortment of your favorite crackers to complement the cheeses. I love using a variety of shapes and flavors!
- Honey – 50g: A drizzle of honey over the cheese adds a lovely sweetness that balances the savory elements.
- Dried fruits (figs, apricots) – 100g: These sweet bites add a chewy texture and a hint of sweetness, enhancing the overall flavor profile.
With these delicious ingredients, you’ll be all set to create a Halloween charcuterie board that’s not only tasty but also totally Instagram-worthy! Let’s get ready to assemble it and impress your guests!
How to Prepare Your Halloween Charcuterie Board
Assembling your Halloween charcuterie board is where the fun really begins! I’m here to guide you through each step so you can create a stunning display that will wow your guests. Let’s get started!
Step 1: Arrange the Cheeses
First things first, let’s get those cheeses on the board! I like to cut them into a mix of wedges, cubes, and slices to create visual interest. Start with the cheddar, brie, and gouda – place them in different areas of your board, leaving enough space between them to avoid a crowded look. Trust me, a little distance makes each cheese pop! You can even use a cheese knife to add some rustic charm. This way, guests can easily grab a piece without feeling like they’re in a cheese wrestling match!
Step 2: Add Meats
Now, let’s layer in the salami and prosciutto. I usually drape the salami slices in a circular fashion around the cheeses, which not only looks beautiful but also makes it easy for everyone to reach. The prosciutto can be folded or rolled, adding a touch of elegance to the board. I promise, the combination of these savory meats with the cheeses will have everyone coming back for seconds!
Step 3: Include Olives and Tomatoes
Next up, it’s time for the olives and cherry tomatoes! I recommend using small bowls for the olives and tomatoes to keep them contained and easy to grab. Place a bowl of olives on one side and a bowl of cherry tomatoes on the other. This adds a pop of color and brings some freshness to the mix. Plus, it’s super handy! No one wants to fish for olives in the middle of a charcuterie battle!
Step 4: Fill Gaps
Now, it’s time to fill in any gaps on your board. This is where the carrot sticks and crackers come into play! I like to arrange the carrot sticks in a fun little pile or fan them out for a lively look. Then, scatter the crackers around the board, filling in any empty spaces. The variety in shapes and textures will make your board come alive. And let’s be honest, who doesn’t love a good cracker?
Step 5: Drizzle with Honey
To add that extra touch, let’s drizzle some honey over the cheeses! I usually warm it up slightly so it pours easily. Just a little bit over the brie or cheddar can elevate the flavors to a whole new level. It adds a beautiful sheen and a hint of sweetness that perfectly balances the savory elements. Your guests will be raving about this little detail!
Step 6: Decorate with Mini Pumpkins
Finally, it’s time to bring in those adorable mini pumpkins! I like to place them strategically around the board to add that festive Halloween vibe. They not only make the board look playful but also serve as a fantastic conversation starter. Just be sure they’re not blocking any of the delicious goodies! Trust me, the combination of flavors and colors, along with those cute pumpkins, will make your Halloween charcuterie board unforgettable!
Why You’ll Love This Halloween Charcuterie Board
This Halloween charcuterie board is not just a treat for the taste buds; it’s a delightful addition to any gathering. Here are a few reasons why you’ll absolutely love it:
- Quick Preparation: With just 15 minutes of prep time, you can whip up a stunning display without breaking a sweat. It’s perfect for last-minute gatherings or when you want to impress without all the fuss!
- Versatility: You can customize this board to fit any palate. Want to switch out the cheeses? Go for it! Prefer different meats or seasonal fruits? The possibilities are endless, allowing you to get creative every time.
- Festive Presentation: The vibrant colors and playful decorations make this board a feast for the eyes. It’ll be the centerpiece of your Halloween festivities, bringing that extra touch of spookiness and charm.
- Interactive Eating: Guests can mix and match their favorite flavors, creating personalized bites. This makes for a fun, social experience that encourages mingling and conversation.
- Healthier Options: With fresh veggies, dried fruits, and a variety of cheeses, you can incorporate healthier choices while still indulging in the festive spirit. Everyone wins!
Overall, this Halloween charcuterie board is a delightful blend of ease, creativity, and festive fun that will surely make your celebrations memorable!
Tips for Success
Creating the perfect Halloween charcuterie board is all about the details! Here are some of my favorite tips to ensure your board is not only beautiful but also delicious:
- Choose seasonal ingredients: Incorporating seasonal fruits and veggies can enhance both the flavor and the festive vibe. Think about adding some fall apples or pears for a sweet crunch!
- Mix flavors and textures: Aim for a balance of salty, sweet, creamy, and crunchy elements. This variety keeps things interesting and ensures there’s something for everyone.
- Play with height: Don’t be afraid to stack or elevate certain items on your board. Use small bowls for dips or raise cheese wedges on a little pedestal to create visual interest. A little height variation goes a long way!
- Label your items: If you’re using unique cheeses or meats, consider adding small labels to your board. This lets guests know what they’re trying and can spark fun conversations about flavors.
- Keep it cool: If you’re making the board ahead of time, keep it in the fridge until you’re ready to serve. Just remember to let it sit out for a few minutes before serving; this allows the cheeses to come to room temperature, enhancing their flavor!
- Don’t forget the toothpicks: Providing toothpicks or small skewers makes it easy for guests to grab their favorites without making a mess. It’s a small detail that makes a big difference!
- Get creative with presentation: Use a wooden cutting board, slate, or even a large platter to serve your charcuterie. The right serving piece can elevate the looks of your spread and add to the Halloween theme.
With these tips in your back pocket, you’ll be well on your way to assembling a Halloween charcuterie board that not only looks spectacular but tastes amazing too! Happy assembling!
Variations on the Halloween Charcuterie Board
One of the best things about a Halloween charcuterie board is how flexible it can be! You can mix things up and keep your guests excited about what’s on the table every time. Here are some fun ideas to help you get creative and experiment with flavors and presentations:
- Seasonal Fruits: Swap out the dried fruits for fresh seasonal options like slices of crisp apples, juicy pears, or even pomegranate seeds. Not only do they add vibrant colors, but they also bring a refreshing crunch!
- Themed Cheeses: Look for Halloween-themed cheeses, like ghost-shaped or pumpkin-spiced varieties. You can even create your own spooky shapes using cookie cutters. The kids will love it!
- Spooky Spreads: Incorporate fun dips like a pumpkin hummus or a spooky spinach dip in a hollowed-out pumpkin. This adds a delicious twist and an eye-catching centerpiece!
- Alternative Meats: Consider using different meats like smoked turkey or chicken for a lighter option. You could also add some flavored sausages, like apple or cranberry, to bring in seasonal tastes.
- Vegan Options: For a plant-based twist, swap out the meats and cheeses for vegan alternatives. You can use hummus, roasted nuts, and a variety of colorful veggies to create a vibrant and inclusive spread!
- Creative Crackers: Try different types of crackers like rosemary-infused or pumpkin seed crackers. You can even make your own spooky-shaped crackers using a simple dough recipe!
- Festive Garnishes: Add some Halloween-themed garnishes like edible flowers, chocolate spiders, or even candy corn to your board for a sweet surprise. It’s all about the little details that can make a big impact!
- Themed Presentation: Change up how you display your board! Use a large wooden platter, tiered stands, or even a vintage tray to add some character. You can also scatter some fake spider webs or tiny plastic bats around for a playful touch.
With these variations, you can keep your Halloween charcuterie board fresh and exciting for every gathering. The only limit is your imagination, so have fun with it and let your creativity shine!
Nutritional Information
When it comes to enjoying your Halloween charcuterie board, it’s nice to know what you’re munching on! Here’s the estimated nutritional breakdown per serving. Remember, these values can vary based on the specific ingredients you choose, but it gives you a good idea of what to expect:
- Calories: 300
- Fat: 20g
- Saturated Fat: 8g
- Unsaturated Fat: 10g
- Trans Fat: 0g
- Cholesterol: 30mg
- Sodium: 800mg
- Carbohydrates: 25g
- Fiber: 3g
- Sugar: 5g
- Protein: 10g
Keep in mind that this is just an estimate and can change based on your ingredient choices. But hey, when you’re enjoying a festive spread like this, it’s all about balance and savoring the flavors! Happy snacking!
FAQ About Halloween Charcuterie Boards
Got some questions about assembling the perfect Halloween charcuterie board? Don’t worry, I’ve got you covered! Here are some common queries I hear, along with my answers to help you create a spooktacular spread:
What can I use instead of meat on my Halloween charcuterie board?
If you’re looking to skip the meat or make it vegetarian-friendly, there are plenty of delicious alternatives! Try incorporating a variety of flavorful cheeses, roasted nuts, or even marinated artichokes. You can also add hearty dips like hummus or a savory bean dip to keep things interesting. Trust me, your board will still shine with flavor!
How do I keep my charcuterie board fresh if I prepare it in advance?
Great question! If you’re prepping your Halloween charcuterie board ahead of time, keep it in the fridge until it’s time to serve. Just remember to let it sit out for about 15 minutes before your guests arrive. This allows the cheeses to soften and the flavors to come alive. It’s all about the perfect serving temperature!
Can I make a Halloween charcuterie board for a large group?
Absolutely! Just scale up your ingredient quantities accordingly. I recommend starting with a larger board or using multiple boards if you have a big crowd. Make sure to have a variety of options to cater to different tastes. The more colorful and diverse your spread, the more inviting it will be for everyone!
What are some creative ways to decorate my Halloween charcuterie board?
Oh, the possibilities are endless! You can use mini pumpkins, edible flowers, and even Halloween-themed candies like gummy worms or candy corn to add a playful touch. Scatter some faux spider webs around the board or place small plastic spiders for that extra spooky flair. Just remember to keep it fun and festive!
How do I choose the right cheeses for my board?
When selecting cheeses, aim for a mix of textures and flavors! I love combining a sharp cheese like cheddar with something creamy like brie and a nutty gouda. This variety not only pleases the palate but also creates a beautiful visual contrast. Feel free to experiment with local cheeses or seasonal varieties to keep things fresh!
Print
Halloween Charcuterie Board: 6 Tips for Spooktacular Joy
- Total Time: 15 minutes
- Yield: Serves 6-8
- Diet: Vegetarian
Description
A festive Halloween charcuterie board perfect for your spooky gatherings.
Ingredients
- Assorted cheeses (cheddar, brie, gouda) – 200g
- Salami slices – 100g
- Prosciutto – 100g
- Olives – 100g
- Cherry tomatoes – 100g
- Carrot sticks – 100g
- Mini pumpkins (for decoration) – 2
- Crackers – 150g
- Honey – 50g
- Dried fruits (figs, apricots) – 100g
Instructions
- Arrange the cheeses on a large board.
- Place salami and prosciutto around the cheeses.
- Add olives and cherry tomatoes in small bowls.
- Fill gaps with carrot sticks and crackers.
- Drizzle honey over some cheese.
- Decorate with mini pumpkins.
Notes
- Use seasonal fruits for variety.
- Incorporate Halloween-themed items like ghost-shaped cheese.
- Provide toothpicks for easy serving.
- Prep Time: 15 minutes
- Cook Time: 0 minutes
- Category: Appetizer
- Method: No cooking required
- Cuisine: American
Nutrition
- Serving Size: 1 serving
- Calories: 300
- Sugar: 5g
- Sodium: 800mg
- Fat: 20g
- Saturated Fat: 8g
- Unsaturated Fat: 10g
- Trans Fat: 0g
- Carbohydrates: 25g
- Fiber: 3g
- Protein: 10g
- Cholesterol: 30mg
Keywords: halloween charcuterie board


