

There’s something magical about old fashioned fudge that takes me right back to my grandmother’s kitchen – the rich chocolate scent filling the air, the sound of her wooden spoon scraping against the heavy saucepan, and that glorious moment when the glossy mixture finally set into perfect creamy squares. This isn’t just candy; it’s edible nostalgia.
What makes this old fashioned fudge recipe special? It’s the same simple, foolproof method my grandma used for decades – no fancy gadgets or hard-to-find ingredients. Just cocoa powder, sugar, milk and love (okay, plus butter and vanilla, but the love’s the secret ingredient). I can still picture her flour-dusted recipe card with “DON’T STIR AFTER BOILING!” written in all caps – her golden rule for perfect fudge every time.
Now I make batches with my kids during the holidays, watching their eyes light up when we lift that first perfect square from the pan. That’s the real magic of old fashioned fudge – it’s not just delicious, it’s a sweet tradition you can pass down.
Why You’ll Love This Old Fashioned Fudge
Listen, I know there are a million fudge recipes out there, but trust me—this one’s special. It’s the kind of recipe that makes people say “Wow, you made this?” with that look of pure delight on their faces. Here’s what makes it so darn lovable:
- Creamy perfection every time: That smooth, melt-in-your-mouth texture? That’s the magic of getting the temperature just right (238°F, baby!). No crumbly disasters here.
- Pantry staple ingredients: Sugar, cocoa, milk—you probably have everything right now. No running out for expensive chocolate bars or obscure extracts.
- One-pot wonder: My grandma’s heavy saucepan and a wooden spoon were all she ever used. No mixers, no fancy gadgets—just good old-fashioned technique.
- Gift-worthy results: Wrap these beauties in parchment with twine, and boom—you’ve got holiday presents that’ll make you look like a professional chocolatier.
Oh, and here’s my favorite part—that moment when you pour the glossy mixture into the pan and just know it’s going to set up perfectly. Pure kitchen magic, my friend.
Ingredients for Old Fashioned Fudge
Here’s the beautiful thing about this recipe—it only needs six simple ingredients, and I bet you’ve got most in your kitchen right now. But listen close, because each one plays a starring role in creating that perfect fudge texture we’re after:
- 2 cups granulated sugar – Not packed, just gently spooned into your measuring cup. This is our sweet foundation.
- 1/2 cup unsweetened cocoa powder – The good stuff! I like the deep flavor of natural cocoa, but Dutch-process works too in a pinch.
- 1 cup whole milk – None of that skim milk business here—we need the fat for that creamy mouthfeel.
- 1/4 cup unsalted butter – Room temperature, please! Cold butter won’t incorporate properly.
- 1 teaspoon vanilla extract – The real deal, not imitation. It makes all the difference.
- 1/4 teaspoon salt – Just a pinch to balance all that sweetness.
Pro tip from my grandma: Let everything sit on the counter for about 30 minutes before starting—room temp ingredients combine so much better. Now grab that saucepan and let’s make some magic!
Essential Equipment for Old Fashioned Fudge
Now, don’t let the word “equipment” scare you—we’re keeping it gloriously simple here, just like Grandma did. But these few tools make all the difference between fudge dreams and fudge disasters:
- Heavy-bottomed saucepan – Thin pans burn faster than my patience when someone opens the oven door during baking. Go for thick aluminum or stainless steel.
- Candy thermometer – Non-negotiable! That perfect 238°F is our golden ticket to creamy fudge nirvana.
- Wooden spoon – My grandma swore by hers—no metal spoons that conduct heat and burn your hands!
- 8×8-inch baking pan – Glass or metal works fine, but line it with parchment paper unless you want to wrestle your fudge out later.
See? Nothing fancy—just the basics that’ll have you making fudge like a pro. Now where did I put that trusty wooden spoon…
How to Make Old Fashioned Fudge
Okay, here’s where the magic happens! I’ll walk you through each step just like Grandma taught me—with plenty of warnings about where most people go wrong. Follow these instructions to the letter, and you’ll be rewarded with the creamiest, dreamiest fudge you’ve ever tasted.
Preparing the Fudge Mixture
First things first—line that 8×8 pan with parchment paper. Trust me, you’ll thank me later when your fudge pops right out. Now grab your heavy saucepan and combine all the ingredients except the vanilla—sugar, cocoa, milk, butter, and salt. Here’s my golden rule: stir constantly over medium heat until it comes to a boil. I mean it—no wandering off to check your phone! Those sugar crystals need constant attention to dissolve properly.
You’ll know it’s ready when the mixture goes from grainy to glossy and starts bubbling like a little chocolate volcano. This usually takes about 5-7 minutes of patient stirring. Don’t rush it!
Cooking to Perfect Temperature
Once boiling, reduce heat to medium-low and clip on your candy thermometer. Now comes the hard part—no more stirring! I know it’s tempting, but stirring now can cause crystallization (aka grainy fudge). Just let it bubble gently until it hits exactly 238°F—the magical “soft ball” stage.
This takes about 10-12 minutes, but watch closely near the end. The temperature climbs fast at the finish line! If it goes over 240°F, your fudge will be too hard. Under 235°F? Too soft. Patience is key here—Grandma would hover over that pot like a hawk!
Finishing and Setting the Fudge
Remove from heat immediately at 238°F and stir in the vanilla—it’ll sizzle and smell heavenly. Now the waiting game begins—let it cool undisturbed until the bottom of the pan feels just warm (not hot) to the touch, about 110°F. This takes 30-45 minutes depending on your kitchen temperature.
Now grab your wooden spoon and beat like crazy until the mixture loses its gloss and thickens to a pudding-like consistency—about 5 minutes. Pour into your prepared pan, smooth the top, and let set at room temperature for at least 2 hours before cutting. The hardest part? Not sneaking a taste early!
Tips for Perfect Old Fashioned Fudge
After countless batches (and yes, a few flops), I’ve learned these foolproof tricks that’ll make your fudge the talk of the town. Listen close—these are the secrets Grandma never wrote down!
- Fresh cocoa is non-negotiable: That dusty can in your pantry from last Christmas? Toss it. Fresh cocoa powder makes all the difference in flavor.
- Don’t scrape the saucepan sides: Those crystallized bits along the edge? Leave them be! Scraping them in can cause graininess.
- Humidity is the enemy: Rainy day? Your fudge might take longer to set. I sometimes cheat by popping it in the fridge for 30 minutes.
- Grainy fudge rescue: If disaster strikes, melt it back down with 2 tbsp milk and reheat to 238°F. Works like magic!
- Butter your thermometer: A quick swipe prevents sugar crystals from forming on the probe—my favorite kitchen hack!
Remember, even imperfect fudge still tastes amazing. My first batch looked like chocolate gravel—but disappeared just as fast!
Variations of Old Fashioned Fudge
Once you’ve mastered the basic recipe (and trust me, you will!), it’s time to play! This old fashioned fudge is like a blank chocolate canvas just waiting for your creative touches. Here are my favorite ways to mix it up:
- Nutty delight: Stir in 1/2 cup chopped walnuts or pecans right before pouring into the pan. The crunch against that creamy fudge? Perfection!
- Peppermint twist: Swap vanilla for peppermint extract and crush some candy canes on top for a holiday version that’ll make your house smell like Christmas.
- Salty-sweet magic: Sprinkle flaky sea salt over the top just before it sets—the contrast will make your taste buds sing!
- Marshmallow swirl: Drop spoonfuls of marshmallow crease onto the poured fudge and swirl with a knife for a rocky road vibe.
My kids love pressing mini M&Ms into the top before it sets—makes for the happiest little squares you ever did see!
Storing and Serving Old Fashioned Fudge
Here’s the beautiful thing about this fudge—it keeps like a dream! Just store it in an airtight container at room temperature with parchment between layers (those squares get sticky when they’re cozy). No fridge needed—that just makes it too hard. It’ll stay perfect for up to two weeks… if it lasts that long!
For serving? Room temperature is key—cold fudge loses its creamy magic. I like to arrange pieces on Grandma’s vintage cake stand about an hour before guests arrive. The sight alone makes everyone’s eyes light up!
Old Fashioned Fudge Nutrition Information
Now, let’s be real—we’re not eating fudge for its health benefits! But for those curious minds, here’s the scoop on what’s in each delicious square (based on cutting the batch into 16 pieces):
- Calories: About 120 per piece
- Sugar: 15g (hey, it’s candy!)
- Fat: 4g (that’s the butter working its magic)
Remember, these numbers are estimates—your exact nutrition may vary depending on ingredients and how big you cut those squares (no judgment if they’re “generous” portions!). The real nutrition value? Pure joy in every bite!
Common Questions About Old Fashioned Fudge
Over the years, I’ve gotten all sorts of questions about this recipe—some from panicked friends with fudge emergencies at midnight! Here are the answers to everything you might wonder about old fashioned fudge:
Can I use Dutch-process cocoa?
Absolutely! While I prefer the slightly sharper taste of natural cocoa, Dutch-process works beautifully. Just don’t mix them halfway through—stick with one type for consistent results. The only real difference? Dutch-process gives a slightly darker color and mellower flavor.
Why is my fudge grainy?
Oh honey, we’ve all been there! Graininess usually means one of three things: you stirred after boiling (the cardinal sin!), your sugar didn’t fully dissolve at the start, or your thermometer was off. Next time, resist that stirring urge and make sure your thermometer is calibrated—I test mine in boiling water (should read 212°F) before each batch.
How long does it keep?
Properly stored in an airtight container, this fudge stays dreamy for up to 2 weeks at room temperature. After that, it might dry out a bit—but let’s be honest, it never lasts that long in my house!
Can I double the batch?
Technically yes, but I don’t recommend it for beginners. Doubling requires a much bigger pan and careful heat adjustment—the extra volume takes longer to reach temperature evenly. My advice? Make two separate batches back-to-back instead. You’ll have better control and less stress!
Can I freeze old fashioned fudge?
You bet! Wrap individual pieces tightly in wax paper, then seal in a freezer bag. It keeps beautifully for 2-3 months. Thaw at room temperature for an hour before serving—no microwave unless you want fudge soup!
Share Your Old Fashioned Fudge
Nothing makes me happier than seeing your fudge creations! Snap a photo of those glossy squares and tag me—I want to celebrate your success! Leave a comment below with any tweaks you made or questions you have. And if this recipe brought back sweet memories for you, share those stories too—that’s what makes old fashioned fudge so special!
Print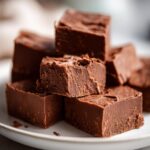
Grandma’s Secret Old Fashioned Fudge Recipe in 6 Simple Steps
- Total Time: 30 minutes
- Yield: 16 pieces 1x
- Diet: Vegetarian
Description
A classic old fashioned fudge recipe that’s rich, creamy, and easy to make.
Ingredients
- 2 cups granulated sugar
- 1/2 cup cocoa powder
- 1 cup milk
- 1/4 cup butter
- 1 teaspoon vanilla extract
- 1/4 teaspoon salt
Instructions
- Combine sugar, cocoa, milk, butter, and salt in a saucepan.
- Cook over medium heat, stirring constantly until mixture boils.
- Reduce heat and simmer without stirring until it reaches 238°F (114°C) on a candy thermometer.
- Remove from heat and add vanilla extract.
- Let cool slightly, then beat until thick and creamy.
- Pour into a greased pan and let set before cutting into squares.
Notes
- Use a heavy-bottomed saucepan to prevent burning.
- Do not stir while simmering to avoid crystallization.
- Store in an airtight container at room temperature.
- Prep Time: 10 minutes
- Cook Time: 20 minutes
- Category: Dessert
- Method: Stovetop
- Cuisine: American
Nutrition
- Serving Size: 1 piece
- Calories: 120
- Sugar: 15g
- Sodium: 30mg
- Fat: 4g
- Saturated Fat: 2.5g
- Unsaturated Fat: 1g
- Trans Fat: 0g
- Carbohydrates: 20g
- Fiber: 1g
- Protein: 1g
- Cholesterol: 10mg
Keywords: old fashioned fudge, homemade fudge, easy fudge recipe


