
Oh, let me tell you about the magic of *easy Irish soda bread*! This bread is like a warm hug on a chilly day, and it couldn’t be simpler to whip up. Seriously, if you’ve never baked bread before, this is the perfect starting point. With just four basic ingredients, you’ll be amazed at how quickly you can create something so wholesome and delicious.
Growing up, my family would make this bread to celebrate St. Patrick’s Day, and the smell of it baking would fill our home with such warmth and nostalgia. It’s a recipe that’s been passed down through generations, and each time I bake it, I feel a connection to my roots. The charm of *easy Irish soda bread* lies not just in its flavor, but in the stories that come with it.
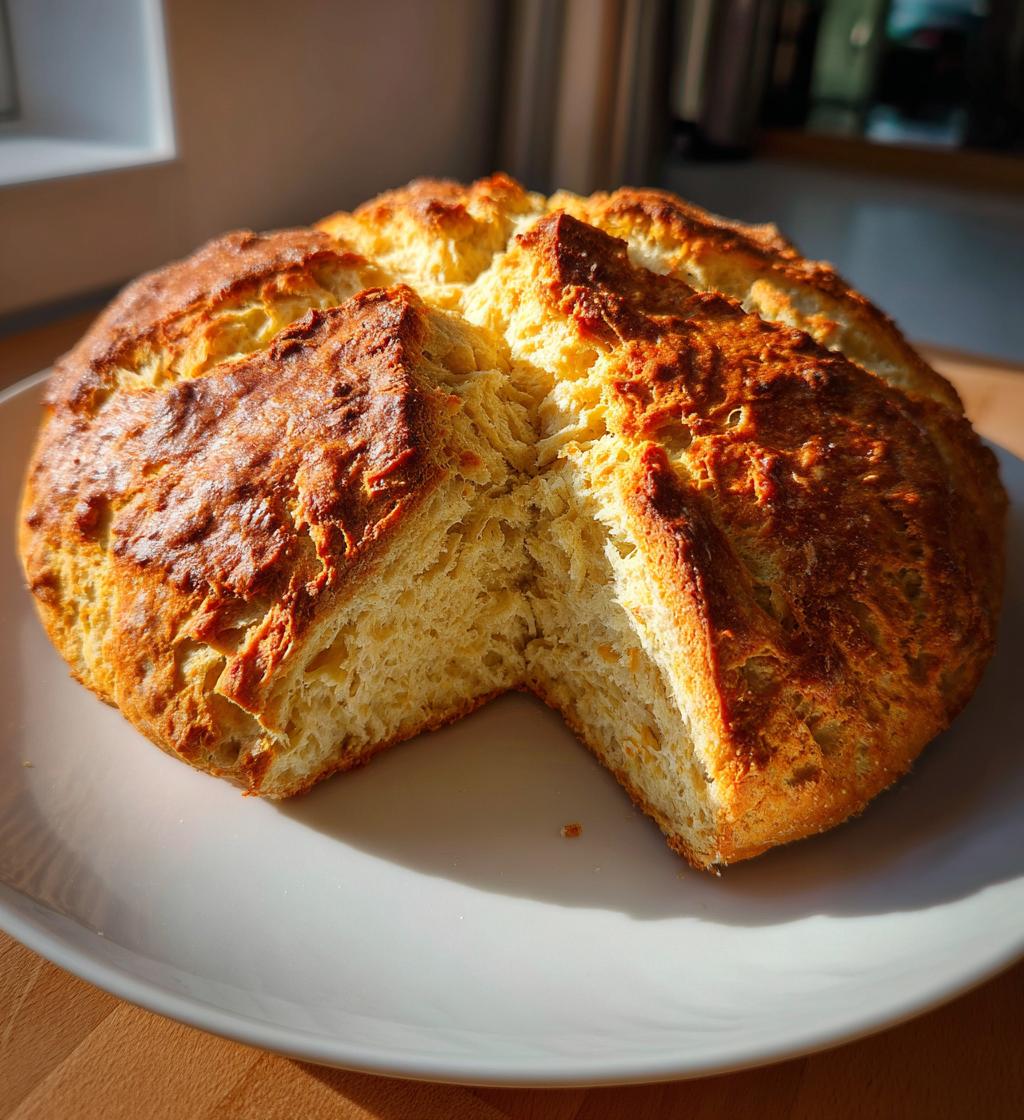
What I love most is how forgiving this recipe is. You don’t need fancy equipment or complicated techniques—just a bowl, a spoon, and your hands! The crusty exterior gives way to a tender, slightly tangy interior, and it’s simply perfect with a pat of butter or a spoonful of jam. Trust me, once you get the hang of it, you’ll be making this bread on repeat, and your friends and family will be begging for more!
Ingredients List
Here’s what you’ll need to make the most delightful *easy Irish soda bread*. Trust me, you probably have most of these ingredients right in your kitchen!
- 4 cups all-purpose flour: This forms the base of your bread, giving it structure and that lovely, hearty texture.
- 1 teaspoon baking soda: This is your leavening agent, helping the bread rise just enough to create that perfect crumb.
- 1 teaspoon salt: A crucial ingredient that enhances the flavors and balances the sweetness of the bread.
- 1.5 cups buttermilk: This adds moisture and a hint of tanginess that makes the bread irresistible. If you don’t have buttermilk, I’ll share some easy substitutes later!
Gather these simple ingredients, and you’ll be on your way to baking up a delicious loaf in no time! Each one plays a vital role, so don’t skip anything, okay?
How to Prepare Instructions
Preheat the Oven
First things first, you’ll want to preheat your oven to 425°F (220°C). Preheating is super important because it helps the bread rise beautifully right from the start. Trust me, there’s nothing worse than a loaf that didn’t get enough heat to puff up nicely!
Mix Dry Ingredients
In a large bowl, combine your 4 cups of all-purpose flour, 1 teaspoon of baking soda, and 1 teaspoon of salt. Just grab a whisk or a fork and mix them together well. You want everything evenly distributed so that your bread rises uniformly. It’s a simple step, but it sets the foundation for a great loaf!
Incorporate Buttermilk
Now, make a little well in the center of your dry ingredients. This is where the magic happens! Pour in your 1.5 cups of buttermilk. Don’t be shy—let it sink right into that well. Then, using a wooden spoon or your hands, start stirring. You want to mix until a shaggy dough begins to form. It’s okay if it looks a bit messy; that’s part of the charm!
Form the Dough
Once your dough is coming together, turn it out onto a floured surface. Here’s where you gently knead it. You don’t want to overdo it—just about 5-7 times to bring everything together. Too much kneading and it might turn out tough, and we want that lovely tender texture!
Shape the Loaf
Next, shape your dough into a round loaf. This is an important step because it helps the bread rise evenly. Aim for a nice, smooth top. You can pat it down gently to flatten it a bit. Remember, this bread is rustic, so don’t stress too much about perfection!
Prepare for Baking
Now, place your shaped loaf on a baking sheet lined with parchment paper. Here’s the fun part—take a sharp knife and cut a deep cross on top of the loaf. This isn’t just for decoration; it helps the bread expand while baking, ensuring that gorgeous crust we all love!
Bake the Bread
Pop that loaf into your preheated oven and bake for about 30 minutes. You’ll know it’s done when it’s golden brown and sounds hollow when you tap on the bottom. If you’re unsure, you can always use a toothpick—just make sure it comes out clean!
Cool and Serve
Once it’s out of the oven, let your masterpiece cool on a wire rack for about 10-15 minutes. This helps set the crumb. When you’re ready to serve, slice it up and enjoy it warm with a generous spread of butter or a dollop of your favorite jam. Seriously, nothing beats that fresh-baked taste!
Why You’ll Love This Recipe
- Quick Preparation: You can whip up this *easy Irish soda bread* in about 15 minutes, making it perfect for a last-minute addition to any meal or gathering.
- Beginner-Friendly: No fancy techniques or equipment needed! If you can mix, knead, and shape, you’re all set to make this delightful bread.
- Deliciously Simple: The combination of just four ingredients creates a scrumptious loaf that’s crispy on the outside and soft on the inside. It’s pure comfort food!
- Versatile Enjoyment: This bread pairs beautifully with soups, stews, or simply slathered with butter or jam. Trust me, it’s great for breakfast, lunch, or dinner!
- Cultural Connection: Baking this bread is like inviting a piece of Irish tradition into your home. It’s a lovely way to celebrate heritage and share stories with family and friends.
Tips for Success
To ensure your *easy Irish soda bread* turns out perfectly every time, here are some tried-and-true tips that I’ve learned along the way. Trust me, these little nuggets of wisdom will make a big difference in your baking journey!
Pay Attention to Your Kneading
When it comes to kneading, less is definitely more! You want to knead just enough to bring the dough together—about 5-7 gentle kneads will do the trick. Over-kneading can lead to a tough loaf, and we’re aiming for that tender, melt-in-your-mouth texture. Just think of it like giving your dough a little love without overdoing it!
Monitor Baking Time Closely
Every oven is a bit different, so keep a close eye on your bread as it bakes. While 30 minutes is usually perfect, you might find your bread needs a few extra minutes or even a bit less. A golden-brown crust and a hollow sound when you tap the bottom are your best indicators of doneness. Don’t hesitate to trust your instincts!
Use Quality Ingredients
The quality of your ingredients really matters! Opt for fresh buttermilk for that tangy flavor and moist crumb. If you can, buy a good brand of all-purpose flour. It might seem simple, but these choices make a noticeable difference in taste and texture. Oh, and make sure your baking soda is fresh—an old box can lead to a flat loaf!
Let it Cool Properly
After baking, cooling your soda bread on a wire rack is essential. This allows air to circulate around the bread, preventing it from getting soggy on the bottom. Plus, it helps set the crumb, giving you that perfect slice when you’re ready to enjoy it. Patience is key, my friend!
Experiment and Have Fun!
Finally, don’t be afraid to make this recipe your own! Once you’ve mastered the basics, try adding in some herbs or spices, or even a handful of raisins for a sweet twist. This bread is so versatile, and the best part is that it still holds onto that lovely Irish charm no matter how you customize it!
Nutritional Information Section
Let’s talk about what you’re getting in each delightful slice of this *easy Irish soda bread*! Here’s a typical breakdown of the nutritional values per serving (that’s one slice, my friend). Keep in mind, these are estimates, but they’ll give you a good idea of what you’re enjoying:
- Calories: 130
- Fat: 0.5g
- Saturated Fat: 0g
- Unsaturated Fat: 0.5g
- Trans Fat: 0g
- Carbohydrates: 28g
- Fiber: 1g
- Protein: 4g
- Sugar: 0.5g
- Sodium: 150mg
- Cholesterol: 0mg
As you can see, it’s a light yet satisfying bread that won’t weigh you down. Perfect for slathering with butter or enjoying with your favorite spread! Enjoy every bite knowing it’s a wholesome addition to your meal!
FAQ Section
Got questions about *easy Irish soda bread*? Don’t worry, I’ve got you covered! Here are some common queries I hear, along with my tried-and-true answers.
Can I store leftovers, and how should I do it?
Absolutely! After your bread has cooled completely, store any leftovers in an airtight container. This keeps it fresh for a few days. If you want to enjoy it later, slice it up and freeze the pieces. Just pop them in the toaster or microwave to warm them up—easy peasy!
What can I use instead of buttermilk?
If you don’t have buttermilk on hand, don’t fret! You can easily make a substitute by mixing 1.5 cups of milk with 1.5 tablespoons of vinegar or lemon juice. Let it sit for about 5-10 minutes until it thickens slightly. Voila! You’ve got your very own homemade buttermilk!
Can I add ingredients like herbs or cheese?
Oh, definitely! Once you’ve nailed the basic recipe, feel free to experiment. Adding fresh herbs like rosemary or thyme can give your bread a delightful twist. You can also fold in some grated cheese for a savory touch. Just keep in mind that extra ingredients might alter the baking time slightly, so watch it closely!
Why does my bread come out dense?
If your *easy Irish soda bread* turns out a bit denser than expected, it might be due to over-kneading or not enough leavening. Remember, be gentle when kneading—just enough to bring it together! Also, check that your baking soda is fresh, as old leavening agents won’t work as well.
Can I make this bread gluten-free?
Yes! You can substitute the all-purpose flour with a good gluten-free blend specifically designed for baking. Just keep an eye on the consistency of the dough; you may need to adjust the liquid a bit. Enjoy the gluten-free version without missing out on that lovely Irish charm!
Print
Easy Irish Soda Bread: 5 Simple Steps to Comforting Bliss
- Total Time: 45 minutes
- Yield: 1 loaf 1x
- Diet: Vegetarian
Description
Easy Irish soda bread recipe for beginners.
Ingredients
- 4 cups all-purpose flour
- 1 teaspoon baking soda
- 1 teaspoon salt
- 1.5 cups buttermilk
Instructions
- Preheat your oven to 425°F (220°C).
- In a large bowl, mix flour, baking soda, and salt.
- Make a well in the center and pour in the buttermilk.
- Stir until a dough forms.
- Turn the dough onto a floured surface and knead gently.
- Shape the dough into a round loaf.
- Place the loaf on a baking sheet and cut a cross on top.
- Bake for 30 minutes or until golden brown.
- Cool on a wire rack before slicing.
Notes
- Store leftovers in an airtight container.
- Serve with butter or jam.
- Prep Time: 15 minutes
- Cook Time: 30 minutes
- Category: Bread
- Method: Baking
- Cuisine: Irish
Nutrition
- Serving Size: 1 slice
- Calories: 130
- Sugar: 0.5g
- Sodium: 150mg
- Fat: 0.5g
- Saturated Fat: 0g
- Unsaturated Fat: 0.5g
- Trans Fat: 0g
- Carbohydrates: 28g
- Fiber: 1g
- Protein: 4g
- Cholesterol: 0mg
Keywords: easy irish soda bread


