

Nothing says “holiday cheer” quite like the smell of these Christmas cherry bars baking in the oven! That buttery, crumbly crust cradling sweet cherry filling is my family’s favorite holiday tradition—ever since my aunt accidentally created them when she ran out of cranberries for her usual recipe. Now I make them every December, and they disappear faster than wrapping paper on Christmas morning.
What I love most about these Christmas cherry bars is how effortlessly festive they are. The ruby-red cherries peeking through the golden crust look like little holiday jewels, and that rich, buttery base melts in your mouth. My kids always beg to “test” the first batch—and who can blame them? The combination of tender crust and tart-sweet cherries is downright irresistible.
These bars have become our go-to holiday dessert because they’re as fun to make as they are to eat. Whether I’m bringing them to cookie exchanges or leaving them out for Santa (with extra powdered sugar dusting, of course), they never fail to spread Christmas joy. And honestly? That golden crust is so delicious, I’ve been known to sneak a few extra pieces when no one’s looking!
Why You’ll Love These Christmas Cherry Bars
Trust me, once you try these cherry bars, they’ll become your new holiday obsession. Here’s why:
- They come together in under an hour – perfect for last-minute baking emergencies
- The contrast between buttery crust and tart cherries makes every bite magical
- They’re sturdy enough to travel to parties yet fancy enough to impress guests
Simple Ingredients, Big Flavor
What blows my mind is how ordinary ingredients transform into something extraordinary. Flour, butter, sugar – things you probably have right now – create that melt-in-your-mouth crust. The cherry filling? Just one can does the trick (though I often sneak in extra cherries because why not?). It’s baking magic at its simplest.
Perfect for Holiday Sharing
These bars practically beg to be shared! I’ve brought them to cookie swaps (always a hit), packed them in festive tins for neighbors, and even shipped them to faraway friends. They hold up beautifully and taste like Christmas in every bite. Last year, my son’s teacher actually wrote me a thank-you note for them – now that’s saying something!
Ingredients for Christmas Cherry Bars
Here’s everything you’ll need to make these festive treats. I keep the ingredient list simple because, honestly, the magic is in how these basic items come together!
- 1 cup all-purpose flour – Spoon and level it, don’t scoop! This makes all the difference for that perfect crumbly crust.
- 1/2 cup butter, softened – The real stuff, please! Leave it out for about 30 minutes until it gives slightly when pressed.
- 1/4 cup powdered sugar – That delicate sweetness balances the tart cherries beautifully.
- 1 cup cherry pie filling – I like to use the canned kind for convenience, but drain off just a bit of the extra syrup.
- 1/4 cup chopped nuts (optional) – Pecans or walnuts add lovely crunch if you’re feeling fancy.
See? Nothing complicated – just good, honest ingredients ready to transform into holiday magic. I always double check my butter is properly softened before starting – cold butter is the enemy of perfect crust!
How to Make Christmas Cherry Bars
Okay, friends, let me walk you through making these beauties step by step. I’ve made them so many times I could probably do it in my sleep (and honestly, I might have during one particularly busy holiday season). The secret is in the timing—don’t rush that crust!
Preparing the Crust
First things first: preheat that oven to 350°F (175°C). While it’s warming up, grab your trusty mixing bowl and combine the flour, softened butter, and powdered sugar. I use my hands for this part because I love feeling when the mixture turns into perfect crumbly sand—it should hold together when you squeeze it but break apart easily. Press this heavenly mix firmly into an 8×8-inch pan (no need to grease it—that butter’s got it covered). Bake for exactly 15 minutes until the edges just start to turn golden. That’s your cue for the next step!
Adding the Cherry Layer
Now for the fun part! Pull out that gorgeous cherry filling and give it a quick stir. I like to drain just a tablespoon or two of the excess syrup so it’s not too runny. Carefully spread it over your warm crust—an offset spatula works wonders here. Want that extra crunch? Sprinkle on those chopped nuts now (I’m partial to walnuts, but pecans are divine too). Pro tip: leave a tiny border around the edges so the cherries don’t stick to the pan.
Baking and Cooling
Pop it back in the oven for 20 minutes—you’ll know it’s ready when the filling bubbles slightly at the edges and the nuts toast to perfection. Here’s where patience is key: let it cool COMPLETELY before cutting! I know it’s tempting, but trust me—wait at least an hour, or you’ll have cherry rivers instead of neat bars. For picture-perfect squares, I chill mine in the fridge for 15 minutes before slicing with a sharp knife wiped clean between cuts.
Tips for Perfect Christmas Cherry Bars
After making dozens of batches (okay, maybe hundreds), I’ve picked up some foolproof tricks for the best Christmas cherry bars. First – if you can get fresh cherries when they’re in season, pitting and cooking them down with a touch of sugar creates an incredible homemade filling. But honestly? The canned stuff works beautifully too – just drain about 2 tablespoons of liquid first.
Always check your oven temperature with a thermometer – mine runs hot, so I bake at 325°F instead. And here’s my golden rule: let them cool completely before cutting! I pop mine in the fridge for 15 minutes to firm up if I’m impatient. Store them in an airtight container between layers of parchment – they’ll stay fresh for 3 days (if they last that long!).
Variations for Christmas Cherry Bars
Oh, the fun you can have with these bars! For a nut-free version that still packs amazing flavor, swap in 1/4 teaspoon almond extract mixed right into the crust—it complements the cherries beautifully. Feeling adventurous? Raspberry pie filling makes a stunning holiday alternative that’ll have everyone asking for your “secret recipe.” And if you’re feeling extra festive, a sprinkle of mini chocolate chips over the cherries before baking turns them into decadent chocolate-cherry delights!
Serving and Storing Christmas Cherry Bars
These bars taste best at room temperature when that buttery crust is perfectly tender. For special occasions, I love serving them with a dollop of lightly sweetened whipped cream—the cloud-like texture plays so nicely with the rich cherry filling. Leftovers (ha! as if!) keep beautifully in an airtight container for up to 3 days. Just layer them between parchment paper to prevent sticking—if they last that long before disappearing!
Nutritional Information
Now, I’ll be honest—these Christmas cherry bars are meant to be enjoyed, not counted! But for those curious, this sweet treat contains all the good stuff: buttery carbs, fruity goodness, and pure holiday happiness. The exact nutrition depends on your ingredients (like whether you add nuts or use different brands), but each bar gives you that perfect balance of indulgence and festive cheer.
Remember, these values are just estimates—your batch might vary based on how thick you cut them (I won’t judge if your “bars” are more like generous squares!). The important thing is the joy they bring when you share them with loved ones. After all, isn’t that what holiday baking is really about?
Frequently Asked Questions
I get so many questions about these Christmas cherry bars – let me share the answers I’ve discovered through years of holiday baking!
Can I use fresh cherries instead of pie filling?
Absolutely! I love using fresh cherries when they’re in season. Just pit about 2 cups of cherries, simmer them with 1/4 cup sugar and a splash of lemon juice until thickened (about 15 minutes). Let it cool slightly before spreading – you’ll get an amazing homemade cherry flavor that takes these bars to the next level.
How do I prevent a soggy crust?
Here’s my foolproof trick: make sure that bottom crust is fully baked before adding the cherry layer. It should be lightly golden at the edges – no pale spots! Also, draining a bit of the syrup from canned filling (about 2 tablespoons) helps. And never skip the cooling step – those 60 minutes let everything set perfectly.
Can I freeze these cherry bars?
You bet! They freeze beautifully for up to 3 months. I wrap them tightly in plastic wrap, then aluminum foil. Thaw overnight in the fridge – they’ll taste just-baked. This makes them perfect for getting ahead during the hectic holidays!
Why do my bars fall apart when cutting?
Two likely culprits: cutting while warm (always wait!) or not pressing the crust firmly enough into the pan. Next time, really pack that crust down, and if you’re in a hurry, pop the cooled pan in the fridge for 15 minutes before slicing with a sharp knife.
Share Your Christmas Cherry Bars
Nothing makes me happier than seeing your cherry bar creations! Snap a photo and tag me – I want to see those ruby-red beauties on your holiday table. Leave a comment below with your baking adventures or tips you’ve discovered. Let’s spread the Christmas cherry joy together!
Print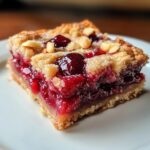
40 Words Christmas Cherry Bars Recipe: Unbeatable Holiday Magic
- Total Time: 50 minutes
- Yield: 12 bars 1x
- Diet: Vegetarian
Description
Delicious cherry bars perfect for Christmas, combining sweet cherries with a buttery crust.
Ingredients
- 1 cup all-purpose flour
- 1/2 cup butter, softened
- 1/4 cup powdered sugar
- 1 cup cherry pie filling
- 1/4 cup chopped nuts (optional)
Instructions
- Preheat oven to 350°F (175°C).
- Mix flour, butter, and powdered sugar until crumbly.
- Press mixture into an 8×8-inch baking pan.
- Bake for 15 minutes or until lightly golden.
- Spread cherry pie filling over the baked crust.
- Sprinkle nuts on top (optional).
- Bake for another 20 minutes.
- Cool before cutting into bars.
Notes
- Use fresh cherries if available for a richer flavor.
- Store in an airtight container for up to 3 days.
- Prep Time: 15 minutes
- Cook Time: 35 minutes
- Category: Dessert
- Method: Baking
- Cuisine: American
Nutrition
- Serving Size: 1 bar
- Calories: 180
- Sugar: 12g
- Sodium: 90mg
- Fat: 9g
- Saturated Fat: 5g
- Unsaturated Fat: 3g
- Trans Fat: 0g
- Carbohydrates: 24g
- Fiber: 1g
- Protein: 2g
- Cholesterol: 20mg
Keywords: christmas cherry bars, holiday dessert, easy cherry bars


