
Oh, the joy of creating beautiful Christmas cake decorations! There’s something truly magical about transforming a simple cake into a festive masterpiece that brings smiles to everyone around the table. This recipe is all about letting your creativity shine as you mix colors and textures, crafting unique designs that capture the spirit of the holidays. Trust me, once you dive into the world of Christmas cake decorations, you won’t want to stop! You can use fondant, royal icing, and even a sprinkle of edible glitter to make your cake sparkle like a winter wonderland. Plus, it’s a delightful way to bond with family or friends as you decorate together. So grab your supplies and let’s embark on this fun, yummy journey to make the most festive cake ever!
Ingredients
Gathering the right ingredients is the first step in making your Christmas cake decorations truly shine! Here’s what you’ll need:
- Fondant – 500g: This versatile icing will give your cake that smooth, polished look. You can find it in various colors or buy plain white and tint it yourself.
- Royal icing – 250g: Perfect for adding intricate details, this icing hardens beautifully, allowing you to create lovely patterns and decorations.
- Edible glitter – 50g: A must-have for that extra sparkle! It’ll make your cake shimmer like the twinkling lights on a Christmas tree.
- Candy canes – 5 pieces: These classic festive treats not only taste great but also make adorable cake toppers!
- Marzipan – 200g: This delicious almond paste acts as a great base for your fondant, giving the cake flavor and helping the fondant stick.
- Food coloring – various colors: Use these to tint your fondant for creative designs. I always keep a variety on hand to mix and match!
- Sprinkles – 100g: These little gems will add color and fun to your decorations, making everything look extra festive.
Make sure you have everything ready before you start decorating. It’s all about having fun and being creative, so don’t hesitate to mix and match these ingredients to suit your festive spirit!
How to Prepare Christmas Cake Decorations
Getting started on your Christmas cake decorations is half the fun! Let’s break it down step-by-step to ensure everything goes smoothly and you end up with a show-stopping cake that dazzles everyone. Ready? Here we go!
Preparing the Cake
First things first, you need to make sure your cake is completely cool before you even think about decorating. Trust me, if it’s warm, your icing will melt and ruin all your hard work! Once it’s out of the oven, let it cool in the pan for about 10-15 minutes, then transfer it to a wire rack to cool completely. This step is crucial because a cool cake will hold all your beautiful decorations without any trouble. If you’re feeling fancy, you can even level the top of your cake with a serrated knife to create a nice, flat surface for decorating.
Covering with Marzipan
Now, let’s talk about marzipan. This step is essential because it acts as a protective layer that keeps your cake moist and provides a sticky surface for the fondant to adhere to. Start by rolling out your marzipan on a clean, dusted surface until it’s about 5mm thick. Drape it over your cooled cake, smoothing it out gently with your hands. Don’t worry if it doesn’t look perfect at first; you can use a smoother or your fingers to get rid of any lumps and bumps. Trim any excess marzipan from the bottom. This step gives your cake both flavor and a lovely base for your festive decorations!
Rolling Out Fondant
Next up is fondant! Roll it out on a clean, dusted surface just like you did with the marzipan. Aim for about 5mm thick again. If your fondant is too sticky, just dust it lightly with some icing sugar. When it’s ready, lift it carefully (I like to use a rolling pin to help with this) and place it over your marzipan-covered cake. Start smoothing from the top down, pushing out any air bubbles toward the edges. This will give your cake that beautiful, polished finish we’re all after!
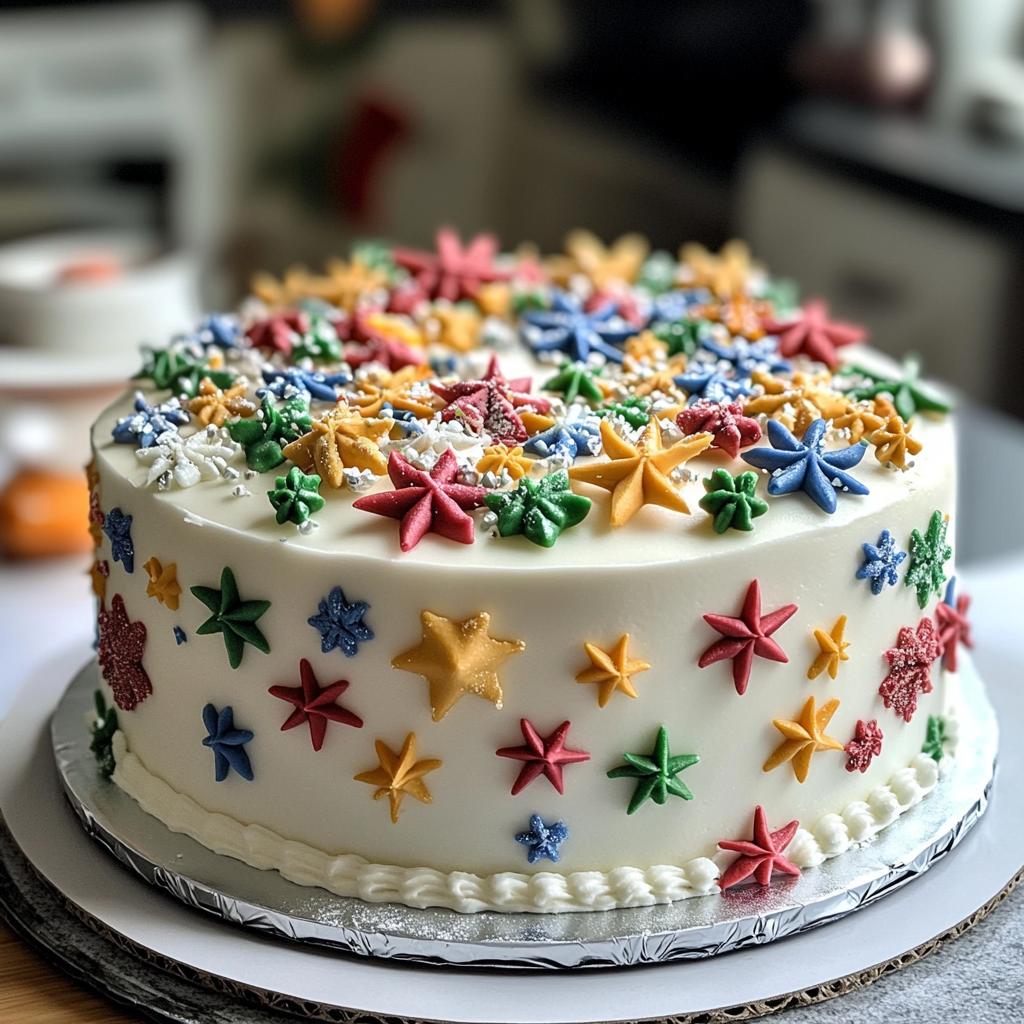
Creating Decorative Shapes
Time to get creative! Grab your food coloring and tint some fondant to make fun shapes like stars, snowflakes, and holly leaves. Just knead the color into your fondant until it’s evenly mixed. For shapes, roll the fondant out again and use cookie cutters to create your festive designs. You can have so much fun with this part! Don’t forget to let your shapes set for a bit before placing them on the cake; it’ll help them hold their form better.
Adding Royal Icing Details
Now let’s add some intricate details with royal icing. This icing is amazing because it dries hard, allowing you to pipe all sorts of beautiful designs. Use a piping bag (or a plastic bag with a corner snipped off) to create swirls, borders, or even little snowflakes on your cake. Practice on a piece of parchment paper if you’re not feeling confident; it’s a great way to get the hang of it before going for the cake!
Final Touches with Edible Glitter and Sprinkles
What’s a Christmas cake without a little sparkle? Use your edible glitter and sprinkles to add that festive touch! Just sprinkle them on top of your cake or around the edges. I like to do this step last so that everything stays fresh and beautiful. A little goes a long way, so don’t overdo it unless you want a glitter explosion!
Positioning Candy Canes
Lastly, let’s give your cake that signature holiday touch with candy canes! Position them around the top or stick a few into the cake for a cute, whimsical effect. You can even crush some and sprinkle them over the top for extra crunch and flavor. Be creative with placement – it’s all about what looks best to you!
And there you have it! Follow these steps, and you’ll create stunning Christmas cake decorations that will have everyone oohing and aahing at your holiday gathering. Enjoy the process and let your creativity run wild!
Tips for Success
To make sure your Christmas cake decorations turn out perfectly, here are some handy tips to keep in mind! First, always work with a clean surface when rolling out marzipan and fondant. It makes a world of difference in achieving that smooth finish. Don’t rush when covering the cake; take your time to smooth out any bumps – patience pays off!
If your fondant starts to stick, a light dusting of icing sugar will help, but don’t overdo it; too much can dry it out. When using royal icing, make sure your cake is completely cooled and your icing is the right consistency – not too runny or too stiff. Finally, let your decorations set for a bit before moving the cake to avoid smudging. Enjoy the decorating process, and remember, it’s all about having fun and being creative!
Nutritional Information
As we dive into the delicious world of Christmas cake decorations, it’s good to know what you’re enjoying! Here’s a breakdown of the typical nutritional values for a slice of your beautifully decorated cake. Keep in mind that these values are estimates and can vary based on specific ingredients and portion sizes:
- Serving Size: 1 slice
- Calories: 250
- Fat: 10g
- Saturated Fat: 5g
- Unsaturated Fat: 3g
- Trans Fat: 0g
- Carbohydrates: 35g
- Sugar: 20g
- Fiber: 1g
- Protein: 2g
- Sodium: 50mg
- Cholesterol: 15mg
These figures give you a snapshot of what to expect when you indulge in your festive creation. Enjoy every bite, knowing you’ve crafted something delicious and beautiful!
FAQ Section
How long will the decorations last?
When stored properly, your Christmas cake decorations can last quite a while! If you keep your cake in a cool, dry place and cover it with a cake dome or plastic wrap, the decorations should stay fresh for about 3 to 5 days. Just be careful not to expose it to moisture, as that can make the decorations sticky and less appealing. If you’re planning to make your cake well in advance, I’d recommend adding the decorations just a day or two before serving to keep everything looking its best!
Can I use different colors of fondant?
Absolutely! Using different colors of fondant is a fantastic way to get creative and personalize your cake. You can mix colors to create custom shades or even swirl them together for a fun marbled effect. Just remember to knead the color into the fondant thoroughly until it’s evenly distributed. If you’re feeling adventurous, try using seasonal colors like deep reds, greens, and golds to really capture that festive spirit!
What if I don’t have royal icing?
No worries at all! If you don’t have royal icing on hand, there are several alternatives you can use for decoration. A simple buttercream frosting works great for piping designs, though it won’t harden like royal icing. You could also use melted chocolate or a mixture of powdered sugar and milk to create a glaze. Just adjust the consistency to your liking, and you’ll still achieve beautiful results. Get creative, and don’t hesitate to experiment with what you have!
Why You’ll Love This Recipe
- Easy Preparation: With just a handful of ingredients, creating stunning Christmas cake decorations is a breeze! You’ll be amazed at how simple the process is, even if you’re new to baking.
- Festive Appeal: Your beautifully decorated cake will be the star of any holiday gathering. The vibrant colors, sparkling glitter, and fun shapes will have everyone excited and in the spirit of the season!
- Endless Creativity: This recipe allows you to express yourself! Mix and match colors, create unique designs, and add personal touches to make your cake truly one-of-a-kind.
- Quality Time: Decorating your cake can be a fun activity to share with family or friends. Gather loved ones around and enjoy building memories as you craft together!
- Impressive Results: You’ll feel like a professional baker as you transform a simple cake into a festive masterpiece. The compliments you receive will be worth every sprinkle!

Christmas Cake Decorations That Dazzle Instantly
- Total Time: 30 minutes
- Yield: 1 decorated cake
- Diet: Vegetarian
Description
A guide to creating beautiful Christmas cake decorations.
Ingredients
- Fondant – 500g
- Royal icing – 250g
- Edible glitter – 50g
- Candy canes – 5 pieces
- Marzipan – 200g
- Food coloring – various colors
- Sprinkles – 100g
Instructions
- Prepare your cake and allow it to cool completely.
- Cover the cake with a layer of marzipan.
- Roll out fondant and cover the cake smoothly.
- Use food coloring to tint fondant for decorations.
- Create shapes like stars, snowflakes, and holly leaves.
- Decorate the cake with royal icing for additional details.
- Add edible glitter and sprinkles for a festive touch.
- Position candy canes strategically on the cake.
- Let the decorations set before serving.
Notes
- Use a clean surface when rolling out fondant.
- Keep unused fondant covered to prevent drying out.
- Experiment with different colors for a unique look.
- Prep Time: 30 minutes
- Cook Time: 0 minutes
- Category: Dessert
- Method: Baking and decorating
- Cuisine: International
Nutrition
- Serving Size: 1 slice
- Calories: 250
- Sugar: 20g
- Sodium: 50mg
- Fat: 10g
- Saturated Fat: 5g
- Unsaturated Fat: 3g
- Trans Fat: 0g
- Carbohydrates: 35g
- Fiber: 1g
- Protein: 2g
- Cholesterol: 15mg
Keywords: christmas cake decorations, festive cake, holiday cake decor


