
Oh my gosh, have you ever tried making a themed charcuterie board? It’s like throwing a small party on a platter! I can’t tell you how much fun it is to create a colorful display of delicious bites that can fit any occasion. Whether it’s a cozy movie night, a festive holiday gathering, or even just a casual get-together with friends, themed charcuterie boards bring everyone together. The best part? They’re super easy to customize based on your tastes and what’s in season. I remember the first time I crafted one for a friend’s birthday – it was all about her favorite colors and flavors, and the look on her face was priceless. Trust me, there’s something magical about arranging cheeses, meats, and fruits together that makes your heart sing and your taste buds dance! Plus, you don’t need to be a culinary whiz to pull it off; it’s all about creativity, fun, and a little bit of flair. Let’s dive into how you can create your own masterpiece!
Ingredients List
Creating a stunning themed charcuterie board is all about the ingredients you choose! Here’s a handy list to get you started on your delicious journey:
- 1 cup assorted cheeses (cheddar, brie, gouda), sliced or cubed
- 1 cup variety of cured meats (salami, prosciutto, chorizo), rolled or folded
- 1 cup assorted crackers and sliced bread (like baguette or ciabatta)
- 1 cup fresh fruits (grapes, figs, apples), whole or sliced
- ½ cup mixed nuts (almonds, walnuts, or pecans)
- ½ cup olives (green and black) and pickles, served in small bowls
- ¼ cup spreads (honey, grainy mustard, or hummus) in little containers
- Fresh herbs for garnish (like rosemary or thyme) to add a pop of color
Feel free to mix and match based on your theme and what ingredients tickle your taste buds! You can go all out with gourmet options or keep it simple and classic. The beauty of a charcuterie board is its versatility, so don’t hesitate to personalize it to your heart’s content!
How to Prepare Instructions
Now comes the fun part – putting together your themed charcuterie board! It’s all about arranging those beautiful ingredients in a way that’s not only delicious but also visually stunning. Let’s break it down step by step so you can impress everyone with your creation!
Step-by-Step Guide
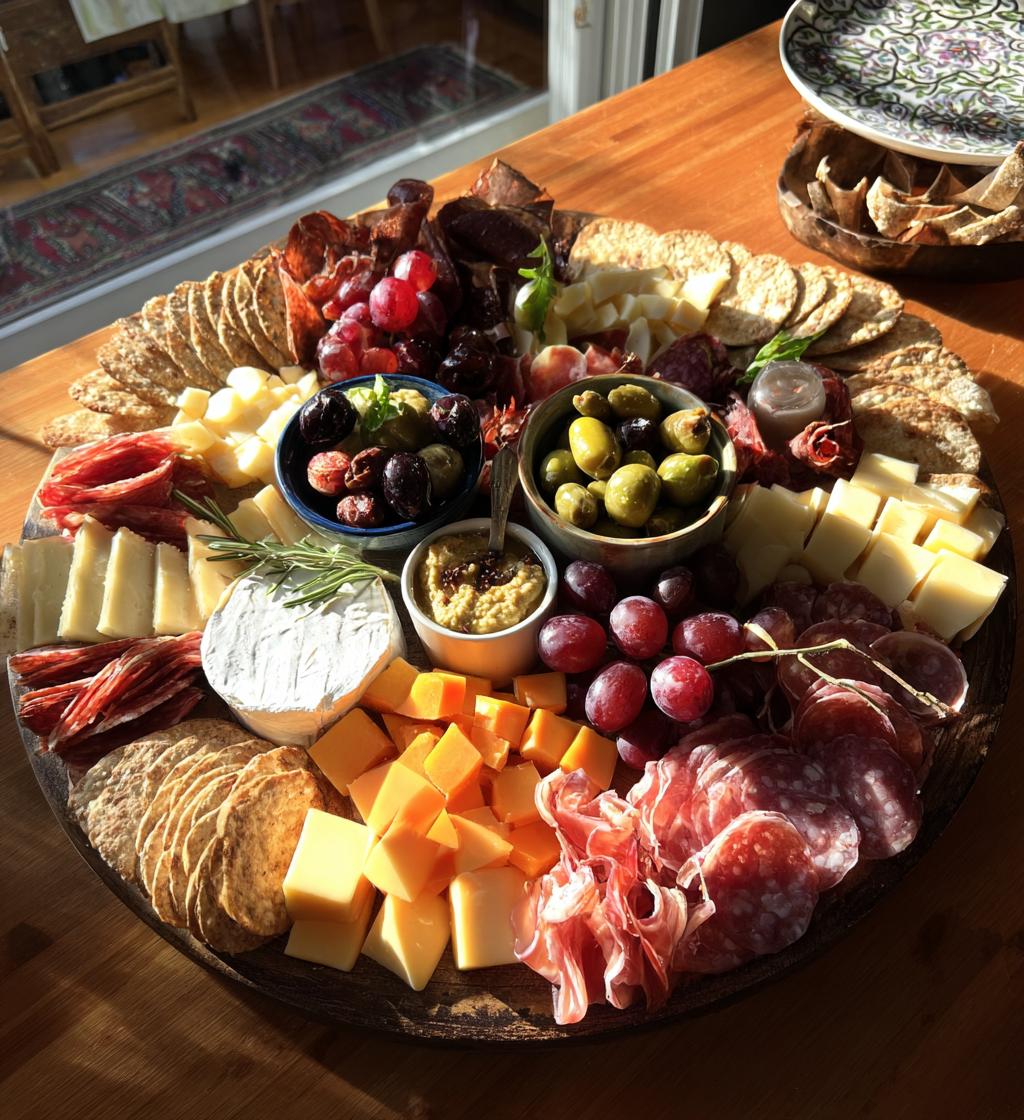
First things first, you’ll want to choose a large wooden board or a platter. I love using a rustic wooden board because it adds a lovely touch to the presentation, but you can use any large surface you have. Just make sure it’s clean and ready to go!
Next, let’s start with the cheeses. Place your assorted cheeses on one side of the board. I usually go for a mix of textures – maybe a creamy brie alongside a sharp cheddar and a nutty gouda. This not only gives variety but also looks gorgeous! You can cut them into slices or cubes, depending on your preference.
Right next to the cheeses, arrange your cured meats. I like to roll or fold them into little piles. This adds height and dimension to your board, creating a nice visual contrast with the cheeses. Plus, it makes it super easy for guests to grab a piece!
Now it’s time for the crackers and bread. Scatter them around the cheeses and meats. You can even create a little stack of sliced baguette or ciabatta for an inviting touch. Make sure to leave some gaps for the fruits and nuts – we want to keep it looking abundant and inviting!
Speaking of gaps, fill them with fresh fruits and nuts. I love adding grapes, figs, and apple slices for a pop of color and sweetness. They not only taste great but also add freshness to the board. For the nuts, sprinkle them in small clusters – almonds and walnuts are my favorites!
Now, let’s add some small bowls for olives and pickles. I find that having them in individual bowls keeps the flavors contained and makes it easier for people to serve themselves. Plus, it adds a nice touch of elegance!
Don’t forget the spreads! Place those in little containers scattered around the board. Honey, grainy mustard, and hummus are fantastic choices. They provide delightful flavor combinations and give everyone something extra to dip into.
Finally, garnish your board with fresh herbs. I like to use rosemary and thyme because they not only look pretty but also add a lovely aroma. Just a few sprigs here and there can elevate your presentation to the next level!
And voilà! You’ve created a themed charcuterie board that’s bursting with flavor and personality. Once it’s all arranged, take a moment to admire your handiwork before serving. Trust me, the smiles you get when your guests see it will be worth every bit of effort!
Why You’ll Love This Recipe
- Quick and Easy to Prepare: With minimal cooking required, you can whip up a stunning charcuterie board in just 20 minutes! Perfect for those last-minute gatherings.
- Visually Appealing: The vibrant colors and variety of textures make for a beautiful centerpiece that’s sure to impress your guests.
- Endless Customization: You can tailor your board to suit any occasion, whether it’s a cozy night in, a holiday celebration, or a fancy cocktail party. Themed options are limitless!
- Great for Sharing: Charcuterie boards are meant for mingling, making them a great way to encourage conversation and connection among guests.
- Dietary Friendly: With a little creativity, it’s easy to accommodate dietary restrictions, whether you need gluten-free options or vegetarian choices.
- Perfect for Any Skill Level: You don’t need to be a master chef to create a gorgeous board; it’s all about using your imagination and having fun with the ingredients!
Tips for Success
Creating the perfect charcuterie board is all about the little details that make a big impact! Here are some of my favorite pro tips to help you elevate your board to the next level:
- Choose a Theme: Start with a fun theme that reflects the occasion or season. Whether it’s a picnic in the park or a cozy holiday gathering, having a theme can guide your ingredient choices and make the board even more appealing!
- Mix Textures and Flavors: Aim for a balance of textures and flavors. Combine creamy cheeses with crunchy nuts, sweet fruits with savory meats, and soft spreads with crispy crackers. This mix not only enhances the eating experience but also keeps things exciting!
- Vibrant Colors: Don’t shy away from color! Use a variety of fruits and vegetables for visual appeal. Think bright red grapes, deep purple figs, and crisp green apples. A colorful board is simply more inviting and appetizing!
- Layering for Depth: When arranging your ingredients, think about layering. Place taller items like cheese wedges in the back and smaller items like nuts and fruits in the front. This creates depth and makes your board look more dynamic.
- Use Different Heights: Elevate some ingredients with small bowls or stands. This adds interest and makes it easy for guests to grab what they want. Plus, it can create a stunning visual effect that draws people in!
- Leave Space for Grazing: Make sure to leave some breathing room between items. This way, guests can easily reach for what they want without knocking everything over. A well-spaced board encourages everyone to dig in!
- Seasonal Ingredients: Try to incorporate seasonal ingredients whenever possible. Not only do they taste better, but they can also inspire your theme and keep things fresh and exciting!
- Final Touches: Don’t forget to add those little finishing touches! A drizzle of honey over cheese, a sprinkle of freshly cracked pepper, or a few edible flowers can really take your board from good to unforgettable.
With these tips in your back pocket, you’ll be a charcuterie board pro in no time! Just remember to have fun and let your creativity shine. Happy assembling!
Variations
One of the best things about charcuterie boards is their incredible versatility! You can easily switch things up to match the occasion or your guests’ preferences. Here are some fun ideas for themed charcuterie boards that will keep your gatherings exciting and delicious:
Your Favorite Movie Night Board
For a cozy movie night, focus on comfort foods! Swap out the gourmet cheeses for creamy mozzarella and pepper jack. Add some sliced pepperoni and smoked sausage instead of fancy cured meats. Include popcorn in a fun bowl, some chocolate-covered pretzels, and a few candy bars for sweet surprises. Fresh fruits like strawberries and tangerines can add a refreshing touch to balance it all out!
Seasonal Celebration Board
During the fall, create a harvest-themed board! Think sharp cheddar, smoky gouda, and a pumpkin-spiced cream cheese spread. Dried fruits like cranberries and apricots work beautifully alongside roasted nuts and spiced pumpkin seeds. Add some sliced apples and pears, and don’t forget a few small bowls of caramel sauce or apple butter for dipping!
Brunch Board Extravaganza
How about a delightful brunch charcuterie board? Use a mix of cheeses like creamy goat cheese and herbed feta. Layer in some crispy turkey meat, smoked salmon, or even mini quiches. Pair with fresh bagels, croissants, and an assortment of spreads like cream cheese, fruit preserves, and honey. Add fresh fruit like berries, sliced kiwi, and citrus segments for a refreshing burst!
Italian Feast Board
If you’re in the mood for an Italian flair, opt for a selection of cheeses like pecorino, fontina, and a nice aged parmesan. Include cured meats like salami and prosciutto, along with marinated artichokes and roasted red peppers. Fresh basil leaves can add an aromatic touch, and you can serve some bruschetta or focaccia on the side. Don’t forget to include a bowl of balsamic glaze for drizzling!
Beachy Picnic Board
For a fun summer picnic, go for a light and refreshing beach-themed board! Choose cheeses like feta and mozzarella balls, paired with fresh fruits like watermelon, cantaloupe, and berries. Add some slices of honeydew and mint leaves for an extra refreshing hit. Include light crackers or pita chips, along with a zesty yogurt dip or tzatziki for a delightful twist!
Remember, the key to a fantastic charcuterie board is to let your creativity shine through! Feel free to mix and match ingredients based on your favorite flavors and seasonal offerings. Every themed board is an opportunity for adventure in taste and presentation, so have fun with it!
Nutritional Information
When it comes to enjoying a themed charcuterie board, it’s essential to keep in mind that nutritional values can vary based on the specific ingredients and brands you choose. So, while I can’t provide precise numbers, here’s a general idea of what you might find in a typical serving of about 1/6 of the board:
- Calories: Approximately 350
- Fat: 25g
- Protein: 15g
- Carbohydrates: 15g
- Sugar: 5g
- Sodium: 600mg
- Fiber: 2g
- Cholesterol: 50mg
These values are just an estimate, so feel free to adjust your ingredient choices based on your dietary needs and preferences. Remember, the beauty of a charcuterie board is in its flexibility, allowing you to create a delicious spread that fits your lifestyle while still being a total crowd-pleaser!
FAQ Section
Q1: How do I choose the right ingredients for my themed charcuterie board?
Choosing ingredients is all about balancing flavors, textures, and colors! Start with a variety of cheeses that offer different taste profiles, like creamy, sharp, and nutty. Next, pick a selection of cured meats that complement those cheeses. Don’t forget to add some crunchy elements like crackers or bread, along with fresh fruits and nuts for sweetness and crunch. Think about your theme—if it’s a summer picnic, go for lighter, fresher options; if it’s a cozy winter gathering, embrace heartier flavors. Trust your instincts and have fun mixing and matching!
Q2: How can I accommodate dietary restrictions when making a charcuterie board?
It’s super easy to be inclusive! Start by asking your guests if they have any dietary restrictions. For gluten-free options, use rice crackers or veggie sticks instead of traditional bread. You can also offer dairy-free cheese alternatives for those with lactose intolerance. Always have a variety of fruits, nuts, and spreads to cater to different tastes. By personalizing your board with a few thoughtful choices, everyone can enjoy a delicious bite!
Q3: What’s the best way to arrange the ingredients on the board?
Arranging your ingredients is all about creating an inviting and visually appealing spread! Start with the larger items, like cheese, and place them around the board. Next, add the meats in little piles or rolls to create height. Fill in gaps with crackers, fruits, and nuts. Use small bowls for spreads, olives, or pickles to keep things organized and prevent mess. Remember to leave some space between items for easy access. A well-arranged board invites guests to dig in and enjoy!
Q4: How can I make a themed charcuterie board for a specific occasion?
Themed boards are all about creativity! Think about the occasion—holidays, birthdays, or even seasons—and let that inspire your ingredients. For a summer barbecue, you might include grilled meats and fresh veggies, while a winter holiday board could feature spiced cheeses and festive fruits. Use colors and flavors that reflect the theme, and don’t hesitate to add little decorative touches, like themed napkins or utensils, to enhance the experience!
Q5: Can I prepare my charcuterie board in advance?
Absolutely! You can prep many components ahead of time. Slice cheeses and meats, wash and cut fruits, and even arrange them on your board a few hours before your gathering. Just cover it with plastic wrap and keep it in the fridge until you’re ready to serve. However, I recommend waiting to add fresh herbs and spreads until just before serving to keep everything looking vibrant and fresh. This way, you can enjoy more time with your guests!
Storage & Reheating Instructions
After the party’s over, you might find yourself with some delicious leftovers from your themed charcuterie board. Don’t worry; I’ve got you covered on how to store those tasty bites so they stay fresh for your next snack time!
First off, if you have any leftover cheese, meats, or spreads, make sure to wrap them tightly in plastic wrap or store them in airtight containers. This helps keep them from drying out or absorbing any unwanted odors from your fridge. I usually put each type of cheese in its own container to help maintain its unique flavor. And if you’ve got any sliced meats left, it’s best to keep those separated as well to prevent them from getting mushy.
As for fresh fruits and nuts, they’re best enjoyed right away, but if you have any leftover, store them in separate containers as well. Berries, for instance, can get mushy if left out too long, so keep them dry and in a sealed container. Nuts can go into a glass jar or a resealable bag to keep them crunchy!
When you’re ready to serve your leftovers again, I recommend letting everything come to room temperature before digging in. This enhances the flavors and makes the cheeses nice and creamy again! Just take them out of the fridge about 30 minutes before you plan to enjoy them. If you’ve got spreads that have thickened up, a quick stir or a splash of water can help revive them.
For any breads or crackers, try to store them in a cool, dry place in their original packaging or a resealable bag to prevent them from getting stale. If they do get a bit soft, a quick toast in the oven can bring back that lovely crunch! Just keep an eye on them so they don’t burn.
And remember, while some items like cured meats and hard cheeses can last a few days in the fridge, it’s always best to consume your leftovers within 2-3 days for optimal freshness and flavor. So go ahead, savor the deliciousness, and enjoy your charcuterie board all over again!
Print
charcuterie board themes: 7 ways to impress your guests
- Total Time: 20 minutes
- Yield: Serves 4-6
- Diet: Gluten Free
Description
A guide to creating themed charcuterie boards for any occasion.
Ingredients
- Assorted cheeses (cheddar, brie, gouda)
- Variety of cured meats (salami, prosciutto, chorizo)
- Crackers and bread
- Fresh fruits (grapes, figs, apples)
- Nuts (almonds, walnuts)
- Olives and pickles
- Spreads (honey, mustard, hummus)
- Herbs for garnish (rosemary, thyme)
Instructions
- Choose a large wooden board or platter.
- Arrange cheeses on one side of the board.
- Place cured meats next to the cheeses.
- Add crackers and bread around the cheeses and meats.
- Fill in gaps with fresh fruits and nuts.
- Add olives and pickles in small bowls.
- Include spreads in small containers.
- Garnish with fresh herbs.
Notes
- Mix textures and colors for visual appeal.
- Adjust portions based on the number of guests.
- Consider dietary restrictions when selecting ingredients.
- Prep Time: 20 minutes
- Cook Time: 0 minutes
- Category: Appetizer
- Method: No-cook
- Cuisine: Varied
Nutrition
- Serving Size: 1/6 of board
- Calories: 350
- Sugar: 5g
- Sodium: 600mg
- Fat: 25g
- Saturated Fat: 10g
- Unsaturated Fat: 10g
- Trans Fat: 0g
- Carbohydrates: 15g
- Fiber: 2g
- Protein: 15g
- Cholesterol: 50mg
Keywords: charcuterie board themes, themed charcuterie, party platter, appetizer ideas


