
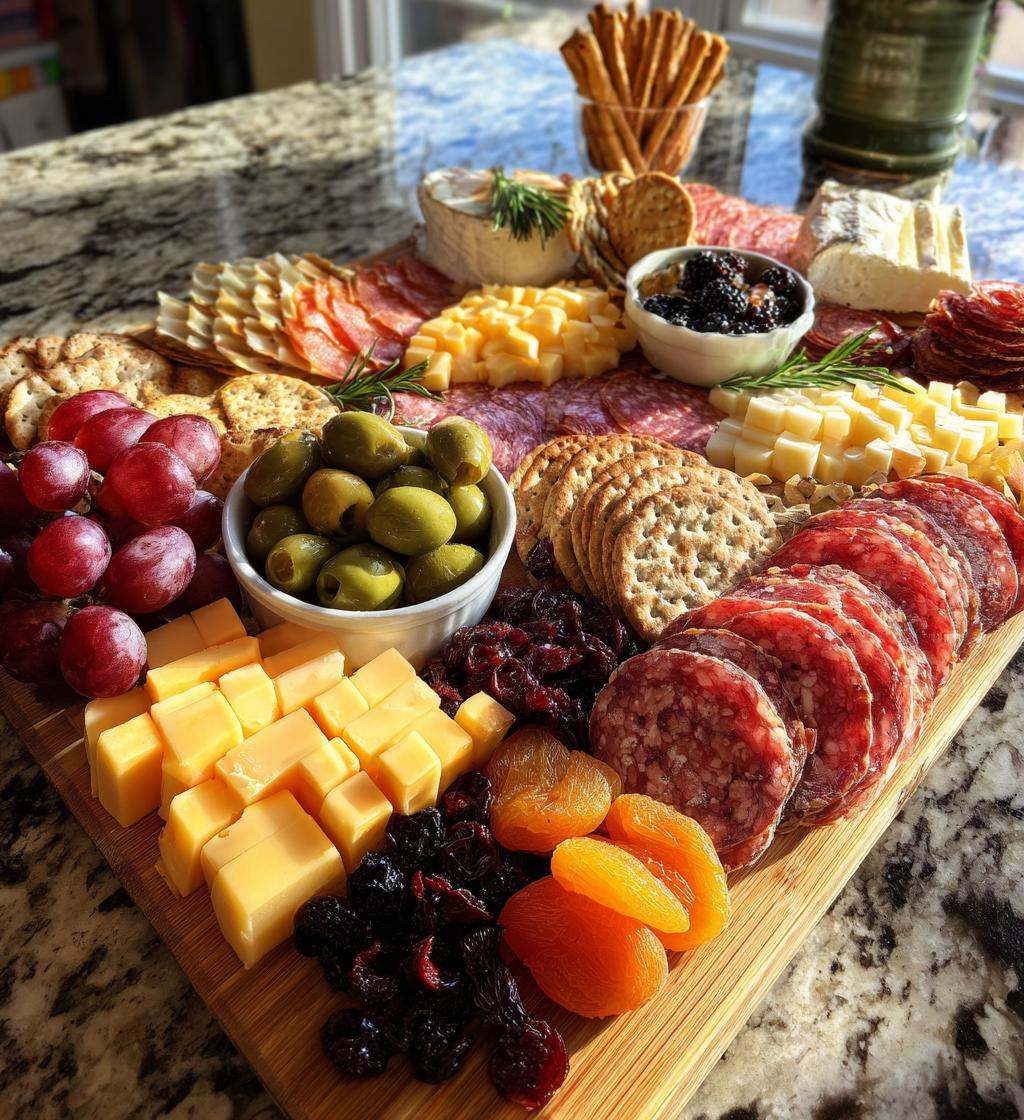
Oh my goodness, let me tell you why I absolutely love charcuterie board ideas! They’re not just food; they’re an experience! Picture this: you’re hosting friends for a cozy gathering, and instead of a traditional meal, you set out this stunning board overflowing with colorful cheeses, cured meats, fresh fruits, and crunchy nuts. It’s like a work of art that brings everyone together, sparking conversations and laughter! Trust me, there’s something magical about picking and choosing bites from a beautifully arranged spread.
What I adore most about charcuterie boards is how customizable they are. You can cater to everyone’s tastes and dietary preferences. Whether your friends are cheese lovers, meat enthusiasts, or veggie fans, there’s room for everyone! I remember the first time I assembled one for a gathering—it was a bit chaotic, but the smiles and compliments made it all worth it. It’s a simple and delightful way to elevate any occasion, and the best part? You can prep it in just 15 minutes! So, let’s dive into some fabulous charcuterie board ideas that will wow your guests and make your next gathering unforgettable!
Ingredients List
Creating the perfect charcuterie board is all about the variety and quality of ingredients you choose. Here’s a detailed list of what you’ll need, so you can gather everything before you start assembling. Each item plays a vital role in flavor, texture, and presentation!
- Assorted cheeses: Aim for about 1 pound total, mixing textures and flavors. I love using sharp cheddar (8 ounces, cubed), creamy brie (8 ounces, sliced), and smoky gouda (8 ounces, cut into wedges).
- Variety of cured meats: Go for about 8 ounces total. I often use salami (4 ounces, thinly sliced), prosciutto (2 ounces, folded), and chorizo (2 ounces, sliced into rounds) for a flavorful mix.
- Fresh fruits: Choose a handful of seasonal fruits for color and sweetness. I typically include grapes (1 cup, whole), figs (4, quartered), and apple slices (1 medium apple, thinly sliced).
- Dried fruits: About ½ cup total adds a chewy contrast. I recommend apricots (½ cup, halved) and cranberries (½ cup, whole).
- Nuts: A mix of nuts adds crunch—about ½ cup total works well. I like to use almonds (¼ cup, whole) and walnuts (¼ cup, chopped).
- Olives: About ½ cup, combining different varieties to enhance flavor. I usually go for green (¼ cup, pitted) and black olives (¼ cup, pitted).
- Crackers and bread: A good selection is key! I prepare about 1 cup of crackers (like water crackers or artisan crackers) and a baguette (1 whole, sliced into rounds).
- Spreads: Include a few small containers of spreads—about ½ cup total. I love to use honey (¼ cup), mustard (2 tablespoons), and hummus (¼ cup).
With this vibrant selection, you’re well on your way to creating a jaw-dropping charcuterie board that’ll have everyone raving! Feel free to adjust based on your preferences or what you have on hand; the best part is making it your own.
How to Prepare Instructions
Assembling a charcuterie board is like creating your own edible masterpiece! It’s all about layering flavors, textures, and colors to make it visually stunning and delicious. Let’s break it down step-by-step, so you can impress your guests with ease!
Selecting Your Board
The first step is to choose the right board or platter. It’s important to pick something large enough to hold all your delicious ingredients—think about 18 to 24 inches across. A wooden cutting board, a large ceramic platter, or even a marble slab works beautifully. Just make sure it’s clean and dry! You want your board to be the star of the show, so pick one that suits your style and complements the colors of your ingredients.
Arranging the Cheeses
Start with the cheeses since they’ll be the foundation of your board. Use a knife or cheese slicer to cut them into various shapes—cubes, slices, and wedges. Place them in different sections of the board, leaving room between them to add visual interest. Mix up the textures and colors—sharp cheddar, creamy brie, and smoky gouda look stunning side by side. Trust me, this is the part where your board starts to come to life!
Adding Cured Meats
Next up, it’s time for the cured meats! Lay the slices around the cheese, fanning them out or rolling them for an elegant touch. I love to mix different meats, like thinly sliced salami, folded prosciutto, and peppery chorizo. Make sure they’re nicely spaced out to keep everything looking balanced and inviting. You want people to be excited to dig in, right?
Filling Gaps with Fruits
Now, let’s add some color and sweetness! Fill in any gaps with fresh and dried fruits. Grapes, figs, and apple slices bring a refreshing taste that pairs beautifully with the cheeses and meats. Dried apricots and cranberries add a lovely chewy contrast. Just scatter them around, letting them spill into the open spaces—this makes everything feel abundant and inviting!
Incorporating Nuts and Olives
Sprinkle nuts around the board for that crunch factor—almonds and walnuts work wonderfully! I like to tuck them in the corners and alongside the fruits. For the olives, place them in a small bowl on the board to keep things tidy. A mix of green and black olives adds variety and a touch of sophistication. Plus, they’re a great little bite to enjoy alongside everything else!
Completing with Crackers and Spreads
Finally, it’s time to complete your charcuterie board with crackers and spreads. Arrange an assortment of crackers around the edges, and don’t forget to include some slices of baguette—these are perfect for dipping! For the spreads, use small containers or ramekins to hold honey, mustard, and hummus, and place them around the board. This not only looks great but makes it super easy for guests to scoop and enjoy!
And voilà! You’ve created a stunning charcuterie board that’s a feast for the eyes and the taste buds. Just remember, the best part is to have fun with it and make it your own!
Why You’ll Love This Recipe
- Quick & Easy: You can whip up a stunning charcuterie board in just 15 minutes! Perfect for when you need to impress without spending hours in the kitchen.
- Visually Appealing: The vibrant colors and textures of cheeses, meats, fruits, and nuts create an eye-catching centerpiece that’ll wow your guests.
- Customizable: Tailor your board to fit any dietary preferences—whether your friends are vegan, gluten-free, or meat lovers, there’s a way to make everyone happy!
- Great for Entertaining: Charcuterie boards spark conversation and encourage mingling, making them ideal for gatherings, parties, or casual get-togethers.
- Endless Variety: Each board can be unique! With so many ingredient combinations, you can always mix it up and keep things fresh and exciting.
Tips for Success
Creating a charcuterie board that wows is all about the little details, so here are some pro tips to elevate your board to the next level!
Mixing Textures and Flavors
One of the best ways to make your charcuterie board pop is by mixing textures and flavors. Combine creamy cheeses with crunchy nuts, and pair sweet fruits with savory meats. This contrast not only makes each bite exciting but also keeps your guests coming back for more! Think about balancing sharp and mild cheeses, as well as sweet and salty elements.
Rotating Ingredients Seasonally
Don’t be afraid to switch things up based on the season! In summer, you might want to add juicy berries and refreshing melon, while autumn calls for figs and spiced nuts. Keeping your ingredients seasonal not only enhances the flavor but also showcases what’s fresh and available. Plus, it keeps your boards interesting for repeat gatherings!
Playing with Color
Visual appeal is key! Aim for a vibrant rainbow of colors. Incorporate bright red strawberries, deep purple grapes, and green apples alongside your cheeses and meats. A colorful spread is like a feast for the eyes, and it’ll entice your guests to dig in. You can even garnish with fresh herbs like rosemary or basil for that extra touch!
Using Small Containers
For sauces, spreads, and small items like olives, use cute little bowls or ramekins. Not only does this keep things organized, but it also adds a lovely touch of elegance to your board. Plus, it prevents those tiny items from rolling around and getting lost in the mix!
Don’t Overcrowd
While you want your board to look abundant, be careful not to overcrowd it. Leave some space between the different components—it makes everything easier to reach and gives your board a more polished look. Trust me, a little breathing room goes a long way!
Personal Touches
Finally, don’t forget to add your personal flair! Whether it’s a favorite spread, a unique cheese you discovered, or a family recipe for homemade crackers, incorporating personal touches makes the charcuterie board uniquely yours. Your guests will appreciate the thought and care you put into it, and it’ll spark even more conversations!
With these tips in hand, you’re all set to create a charcuterie board that’s not only delicious but also a true showstopper. Happy assembling!
Variations
If you’re looking to switch things up and keep your charcuterie board exciting, you’re in for a treat! There are endless possibilities for variations that can cater to different tastes, themes, or even seasonal ingredients. Here are some of my favorite ideas to inspire your next spread!
Cheese Alternatives
Instead of sticking to the classic cheddar and brie, why not explore a world of flavors? Consider using blue cheese for a bold, tangy twist, or goat cheese for a creamy, spreadable option. If you want to get adventurous, try a flavored cheese, like herbed feta or smoked gouda, to introduce unique flavors. Don’t forget about vegan cheese options, which can be just as delightful!
Meat Swaps
For the meat lovers, switch out your usual cured meats to keep things fresh. Try smoked turkey or spicy capicola for different flavor profiles. If you’re feeling fancy, add some duck prosciutto or bresaola for a touch of elegance. And let’s not forget about plant-based alternatives—vegan deli slices can be a fantastic addition for those who prefer meat-free options!
Seasonal Ingredients
Embrace the seasons by incorporating seasonal fruits and veggies. In the summer, add fresh berries or melon balls for a refreshing touch. During the fall, swap in sliced pears and pomegranate seeds for a festive flair. You can even include some roasted pumpkin seeds or sliced radishes for added crunch and color!
Flavor Boosters
Elevate your board with some exciting flavor boosters! Consider adding a fig spread or spicy jalapeño jelly for a kick. You can also include marinated artichokes or roasted red peppers for a Mediterranean twist. And let’s not forget about fresh herbs—sprigs of rosemary or thyme not only look beautiful but can add a wonderful aroma and flavor to your board.
Themed Boards
Why not get a little creative and make themed boards? For a breakfast board, use a mix of cheeses, assorted jams, fresh fruits, and pastries. Or try a Mexican-inspired board with queso fresco, chorizo, tortilla chips, and guacamole. Themed boards can be a fun way to explore different culinary cultures and keep your gatherings lively!
With these variations, your charcuterie board can be as unique as you are! Mix and match ingredients based on what you love or what’s in season, and don’t hesitate to get a little creative. The goal is to have fun and make something that looks and tastes incredible. Happy assembling, and enjoy the deliciousness!
Storage & Reheating Instructions
Once you’ve created your beautiful charcuterie board, you might be wondering about what to do with any leftovers. Don’t worry; I’ve got you covered! Proper storage will keep your ingredients fresh and delicious for your next grazing session.
First off, any leftover cheeses should be wrapped tightly in plastic wrap or stored in an airtight container. This prevents them from drying out or absorbing other odors in the fridge. I usually put each type of cheese in its own container to keep their flavors distinct. Cured meats can also be stored similarly; just make sure to use a clean container to avoid cross-contamination.
As for fruits, they’re best enjoyed fresh, but if you have some leftover, store them in a sealed container in the fridge. Keep in mind that some fruits, like grapes and figs, will hold up better than sliced apples, which can brown quickly. If you have any dried fruits left, those can be kept in a cool, dark place in an airtight bag or jar.
Now, let’s talk about nuts and olives! Nuts can be stored in a cool, dry place, preferably in an airtight container to maintain their crunch. Olives should be kept in their brine in a sealed container in the fridge to retain their flavor.
Crackers and bread are best enjoyed fresh as well, but if you have extras, store them in a zip-top bag to keep them crisp. Just be cautious not to store them with moist ingredients, as this can lead to sogginess.
When it comes to reheating, most items from your charcuterie board don’t need to be heated at all, as they’re delightful served cold. However, if you happen to have leftover bread or crackers that have gone a bit soft, you can pop them in a preheated oven at 350°F (175°C) for a few minutes to crisp them back up. Just keep an eye on them to avoid burning!
So there you have it! With these storage tips, you’ll keep your charcuterie leftovers in tip-top shape for another round of delicious snacking. Enjoy every last bite, and remember, the best part of a charcuterie board is sharing it with friends and family, even if it’s the second time around!
Nutritional Information
Alright, let’s talk about the nutritional side of our fabulous charcuterie board! I always find it helpful to have a rough idea of what I’m serving, especially when it comes to sharing with friends and family. Now, keep in mind that these numbers are estimates based on typical servings, so they might vary a bit depending on your specific ingredients and portions.
- Calories: Approximately 300 per serving
- Total Fat: About 20g
- Saturated Fat: Roughly 8g
- Unsaturated Fat: Around 12g
- Trans Fat: 0g
- Cholesterol: Approximately 30mg
- Sodium: About 600mg
- Total Carbohydrates: Around 20g
- Dietary Fiber: Approximately 2g
- Sugars: About 5g
- Protein: Roughly 10g
This nutrient breakdown gives you a good sense of the deliciousness you’re indulging in! Feel free to adjust your ingredients to make it fit more into your dietary needs or preferences. Enjoy every bite, and remember, it’s all about balance and enjoying the company around you!
FAQ Section
Q1. What cheeses are best for a charcuterie board?
When it comes to cheeses, variety is key! I usually recommend mixing textures and flavors. Some crowd-pleasers are sharp cheddar, creamy brie, and smoky gouda. You can also experiment with blue cheese or goat cheese for some extra flair. Just make sure to include a mix of soft, hard, and aged cheeses to keep things interesting!
Q2. How do I choose cured meats for my board?
For cured meats, I like to aim for a variety that complements each other. Consider including salami, prosciutto, and chorizo for different flavors and textures. You want to balance the richness of the meats with the cheeses and fruits on your board. Feel free to swap in turkey or chicken deli meats for a lighter option!
Q3. Can I make a charcuterie board vegetarian or vegan?
Absolutely! For a vegetarian charcuterie board, simply skip the meats and load up on an array of cheeses, fresh fruits, nuts, and spreads. If you want to go vegan, there are fantastic plant-based cheeses available now. You can also include roasted veggies, hummus, and a selection of olives and fruits to keep it hearty and satisfying!
Q4. What are some good spreads to include?
Spreads add a delightful touch to your charcuterie board! I love using honey, mustard, and hummus for a mix of sweet and savory flavors. Other great options are fig jam, olive tapenade, or even a spicy salsa for a kick. Just put them in small bowls or ramekins for easy serving!
Q5. How do I store leftovers from my charcuterie board?
To store leftovers, wrap cheeses tightly in plastic wrap or place them in airtight containers to keep them fresh. Cured meats can be stored similarly, but make sure to use clean containers. Fruits should be sealed up too, although they’re best enjoyed fresh. Keep nuts in a cool, dry place, and store crackers in a zip-top bag to maintain their crunch. Most items don’t need reheating, so just enjoy them cold!
charcuterie board ideas that will impress your guests
- Total Time: 15 minutes
- Yield: Serves 6-8
- Diet: Vegetarian
Description
A collection of creative charcuterie board ideas for your next gathering.
Ingredients
- Assorted cheeses (cheddar, brie, gouda)
- Variety of cured meats (salami, prosciutto, chorizo)
- Fresh fruits (grapes, figs, apple slices)
- Dried fruits (apricots, cranberries)
- Nuts (almonds, walnuts)
- Olives (green and black)
- Crackers and bread (baguette, breadsticks)
- Spreads (honey, mustard, hummus)
Instructions
- Select a large board or platter.
- Arrange cheeses in different sections.
- Add cured meats around the cheeses.
- Fill gaps with fresh and dried fruits.
- Sprinkle nuts throughout the board.
- Place olives in a small bowl on the board.
- Add crackers and bread for dipping.
- Include spreads in small containers.
Notes
- Mix textures and colors for visual appeal.
- Consider dietary preferences of guests.
- Rotate ingredients for variety in flavors.
- Prep Time: 15 minutes
- Cook Time: 0 minutes
- Category: Appetizer
- Method: Assembling
- Cuisine: Various
Nutrition
- Serving Size: 1 serving
- Calories: 300
- Sugar: 5g
- Sodium: 600mg
- Fat: 20g
- Saturated Fat: 8g
- Unsaturated Fat: 12g
- Trans Fat: 0g
- Carbohydrates: 20g
- Fiber: 2g
- Protein: 10g
- Cholesterol: 30mg
Keywords: charcuterie board ideas, cheese board, appetizer ideas


