
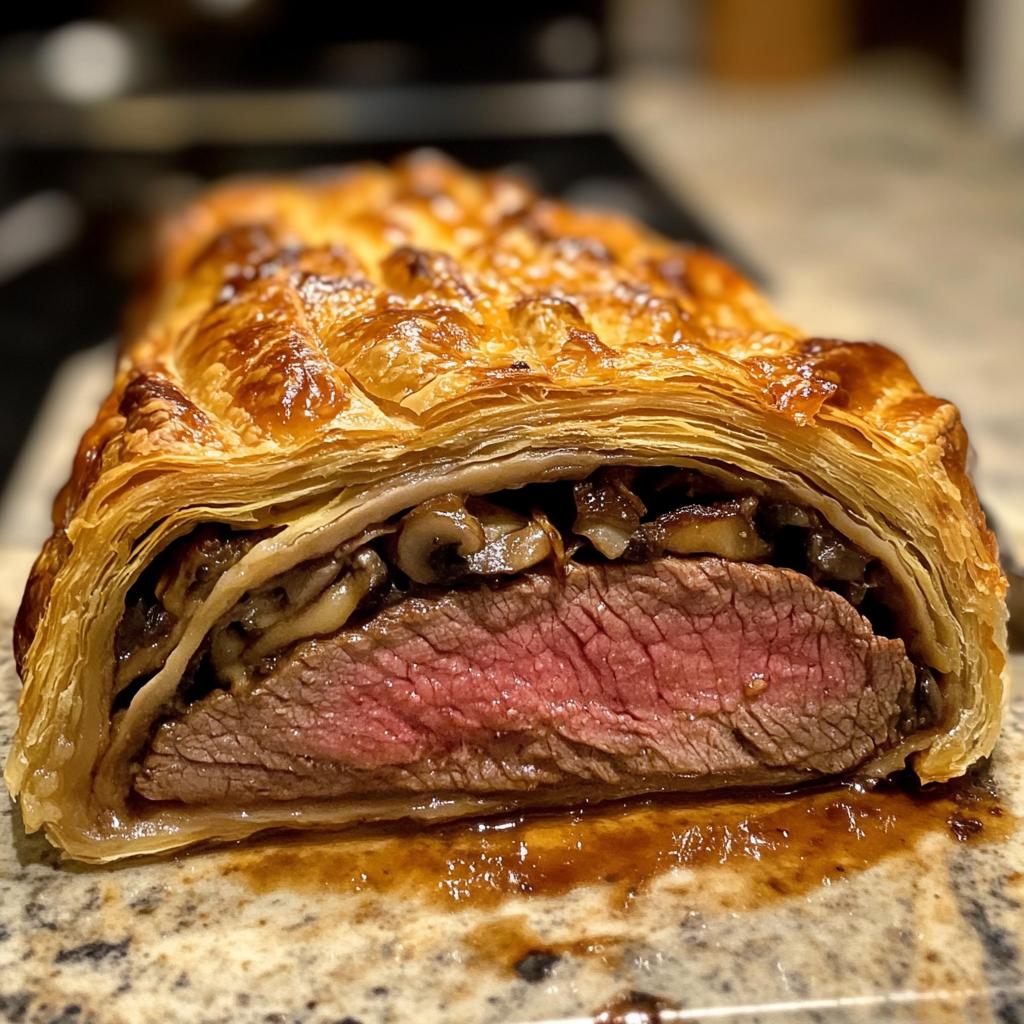
I’ll never forget the first time I made beef Wellington. It was for my husband’s birthday, and I was *terrified*—what if the pastry got soggy? What if the beef overcooked? But when I pulled that golden, flaky masterpiece out of the oven and sliced into it, revealing that perfect pink center… well, let’s just say I’ve been obsessed ever since. There’s something magical about beef Wellington—the way the buttery puff pastry hugs the juicy tenderloin, the earthy mushroom duxelles adding depth, the crisp prosciutto tying it all together. It’s showstopper food, the kind that makes everyone at the table go quiet for a second before the compliments start rolling in.
This classic British dish might seem fancy (thanks, Gordon Ramsay), but trust me, it’s totally doable at home. The secret? Taking it step by step, not skipping the chill time, and—most importantly—using a meat thermometer. Whether it’s a holiday centerpiece or just a “because Tuesday” dinner, beef Wellington turns any meal into an event. And once you nail it? You’ll feel like a kitchen rockstar.
Why You’ll Love This Beef Wellington Recipe
This beef Wellington recipe is my go-to for special occasions (or when I just want to feel fancy on a random Wednesday). Here’s why it’s a winner:
- That crispy, golden puff pastry shatters perfectly with every bite—no soggy bottoms here!
- Juicy beef tenderloin stays pink and tender inside, thanks to a quick sear and precise baking.
- Savory mushroom duxelles adds an earthy depth that makes store-bought puff pastry taste gourmet.
- Surprisingly simple assembly—just layer, roll, and bake. The prosciutto does half the work for you!
- Total showstopper presentation that’ll have guests thinking you trained under Gordon Ramsay.
Ingredients for Beef Wellington
Gathering the right ingredients is half the battle with beef Wellington—but don’t worry, everything’s easy to find. Here’s what you’ll need, broken down so nothing gets missed:
- For the beef:
- 1 (2 lb) beef tenderloin, trimmed (center-cut works best)
- 2 tbsp olive oil (for searing)
- Seasonings:
- 1 tsp kosher salt (plus extra to taste)
- ½ tsp freshly ground black pepper
- 1 tsp Dijon mustard (the secret flavor booster!)
- For the duxelles & wrap:
- 8 oz cremini or button mushrooms, finely chopped (like breadcrumb-small)
- 2 cloves garlic, minced (about 1 tsp)
- 4 slices prosciutto (thin but not shaved)
- For the pastry:
- 1 sheet puff pastry, thawed overnight in the fridge (14 oz package)
- 1 large egg, beaten with 1 tbsp water (for that golden shine)
Ingredient Notes & Substitutions
No prosciutto? Pancetta or very thinly sliced ham works in a pinch, but prosciutto’s saltiness is ideal. Vegetarian? Swap beef for a portobello mushroom cap—just pat it super dry first.
Mushroom mix-up: Cremini give deeper flavor, but white buttons work fine. For luxury mode, toss in a few reconstituted dried porcini. Gluten-free? Use GF puff pastry (check the thaw time—it’s often shorter).
Egg wash hack: Out of eggs? Heavy cream gives decent browning, but it won’t be quite as glossy. And puff pastry tip: If yours feels sticky after thawing, chill it 10 minutes before unrolling—it’ll behave better.
How to Make Beef Wellington
Okay, deep breath—we’re doing this! Making beef Wellington is like building a delicious little present: layer by careful layer. Follow these steps, and you’ll have that golden, flaky masterpiece ready to wow everyone at the table.
Step 1: Sear the Beef Tenderloin
First, pat that beautiful beef dry with paper towels—this helps it get a proper crust. Heat your olive oil in a screaming-hot pan (I wait until it’s just starting to smoke). Sear the tenderloin for 2-3 minutes per side, including the ends, until it’s evenly browned. Don’t move it around—let that crust form!
Transfer the beef to a plate and immediately brush it all over with Dijon mustard. Trust me, this adds such a nice tangy depth. Let it rest while you work on the mushrooms—those juices need to redistribute.
Step 2: Prepare the Mushroom Duxelles
Now for the duxelles—fancy word, simple process. Pulse your mushrooms in a food processor until they’re finely minced (or chop by hand if you need an arm workout). Cook them with the garlic in the same pan you seared the beef, stirring often, until all the liquid evaporates. This takes about 8-10 minutes—you want it dry as the Sahara to avoid soggy pastry later.
Spread the mushroom mixture on a plate to cool quickly. Pro tip: I sometimes add a pinch of thyme here if I’m feeling fancy.
Step 3: Assemble the Beef Wellington
Here’s where the magic happens! Lay out overlapping prosciutto slices on plastic wrap—they should form a rectangle slightly larger than your beef. Spread the cooled duxelles evenly over the prosciutto. Place your mustard-brushed beef in the center.
Using the plastic wrap to help, tightly roll the prosciutto and mushrooms around the beef like a little blanket. Twist the ends of the plastic to compact it. Chill this bundle for 15 minutes—this helps everything hold its shape when you add the pastry.
Step 4: Wrap in Puff Pastry & Bake
Roll out your thawed puff pastry on a lightly floured surface—just enough to wrap around the beef with about an inch overlap. Unwrap your chilled beef bundle and place it in the center. Brush the pastry edges with egg wash, then fold up neatly, sealing the seams.
Transfer to a baking sheet seam-side down, brush all over with more egg wash, and score decorative lines if you’re feeling artistic. Bake at 400°F for 30-40 minutes until deep golden brown. Use a meat thermometer—130°F at the center means perfect medium-rare.
Let it rest 10 minutes before slicing. That first cut revealing the pink beef through all those layers? Pure kitchen triumph.
Tips for Perfect Beef Wellington
After making more Wellingtons than I can count (and yes, a few disasters along the way), here are my hard-earned secrets for getting it right every time:
- Chill twice—once before wrapping in pastry, once after. That 15-minute fridge break firms everything up so your pastry stays crisp and your layers stay tight. No skipping this step!
- Cook those mushrooms until they’re desert-dry. Any moisture left in the duxelles will steam the pastry from inside. I test by dragging a spoon through—if liquid fills the trail, keep cooking.
- Meat thermometer = your best friend. Ovens lie. Pastry color lies. That little gadget tells the truth. Pull at 125°F for rare, 130°F for medium-rare—it’ll climb 5 degrees while resting.
- Rest like it’s a spa day. Letting it sit 10 minutes after baking lets juices redistribute. Cut too soon, and all those gorgeous juices end up on the cutting board instead of in your bite.
- Score smart. If decorating the pastry, use a very sharp knife and light pressure—just through the top layer. Deep cuts can leak juices during baking.
- Slice with a bread knife. The serrated edge glides through crispy pastry without squashing the layers. Wipe the blade between cuts for picture-perfect slices.
Bonus emergency tip: If your pastry starts browning too fast, tent loosely with foil. But honestly? A little extra color just means more flavor to me!
Serving Suggestions for Beef Wellington
Now that you’ve made this gorgeous beef Wellington, let’s talk about how to serve it like you’re hosting a Michelin-starred dinner (without any of the stress). First rule? Keep the sides simple—this dish is the star, after all!
My go-to is creamy mashed potatoes—they’re like edible napkins for catching all those delicious juices. For something lighter, roasted asparagus or honey-glazed carrots add nice color. If it’s a holiday, I’ll go all out with Yorkshire puddings—because why not?
The sauce situation? A quick red wine reduction takes 10 minutes and makes everyone feel fancy. Just deglaze your beef-searing pan with ½ cup wine, simmer with a sprig of thyme, and finish with a pat of butter. Or keep it classic with horseradish cream—that sharp bite cuts through the richness perfectly.
Presentation pro tips: Slice your Wellington at the table for maximum drama—that first reveal of pink beef gets gasps every time. Use a warmed platter to keep everything toasty, and garnish with fresh thyme or microgreens. Leftovers? (Ha, as if!) But if you miraculously have some, cold Wellington slices make an epic next-day sandwich with arugula and grainy mustard.
Storing and Reheating Beef Wellington
Let’s be real – beef Wellington rarely lasts long enough to need storing in my house. But on the off chance you’ve got leftovers (or you’re prepping ahead), here’s how to keep that flaky pastry crisp and beef juicy. First rule? No plastic wrap directly on cut surfaces! That’s a one-way ticket to soggy pastry city.
For storing, let your Wellington cool completely (but don’t leave it out more than 2 hours). Wrap tightly in foil, then slide it into an airtight container. It’ll keep in the fridge for up to 3 days – any longer and the pastry starts getting sad. Want to freeze? Wrap individual slices in foil, then bag them – they’ll last 1 month frozen. Thaw overnight in the fridge before reheating.
Now, reheating is where most folks go wrong. Microwaving is the enemy here – it turns that beautiful pastry into a limp, chewy mess. Instead, preheat your oven to 350°F and place slices on a wire rack over a baking sheet. This lets hot air circulate so the bottom doesn’t get soggy. Heat for 10-15 minutes until warmed through – if the pastry starts getting too dark, tent loosely with foil.
My sneaky trick? For single servings, I use my toaster oven on the “bake” setting – it’s faster and keeps the crust perfect. If you’re reheating a whole Wellington, cover with foil and add 5 minutes to the time. Either way, give it a quick 2-minute blast under the broiler at the end to recrisp the top. Just watch it like a hawk – that gorgeous golden brown can turn to burnt in seconds!
One last pro tip: If your Wellington seems dry when reheating, drizzle a teaspoon of beef broth over the meat before warming. It’s like giving it a little juice boost without making the pastry wet. Now go enjoy your “leftovers” – though I’m betting they won’t last long!
Beef Wellington FAQs
I’ve gotten so many questions about this beef Wellington recipe over the years – here are the ones that pop up most often with my real-world answers:
Can I use a different cut of beef?
Technically yes, but I don’t recommend it. Tenderloin’s the gold standard because it’s lean and cooks evenly – cheaper cuts like sirloin get tough wrapped in pastry. If you must swap, filet mignon works (just tie smaller pieces together). Pro tip: Ask your butcher for the “center-cut” tenderloin – it’s the most uniform thickness for even cooking.
Why does my pastry get soggy?
Nine times out of ten, it’s one of three things: 1) Your duxelles weren’t dry enough (cook until no liquid remains!), 2) You didn’t chill the wrapped beef before adding pastry (those 15 minutes are crucial), or 3) The beef was too wet before searing (pat it bone-dry first). My secret weapon? A light sprinkle of breadcrumbs between the duxelles and pastry – they absorb any sneaky moisture.
Can I prep beef Wellington ahead of time?
Absolutely! You’ve got two great options: 1) Assemble everything (including pastry wrap) up to 24 hours ahead and keep it refrigerated – just add 5-10 minutes to the bake time since it’ll be cold, or 2) Make components separately (seared beef, duxelles) 2 days early, then assemble day-of. Game changer: Freeze unbaked Wellingtons for up to a month – bake straight from frozen, adding 15-20 minutes to the time.
Is it okay if my pastry cracks?
Don’t panic! Small cracks happen – just patch with leftover pastry scraps and egg wash. For big splits, I embrace the “rustic look” and call it artisanal. Prevention tip: Let thawed pastry sit at room temp 5 minutes before rolling – too cold and it cracks, too warm and it sticks.
What if I don’t have a meat thermometer?
You can… but I’ll give you my mom’s worried face. Without one, you’re gambling – but in a pinch, bake 35 minutes for medium-rare (assuming 2″ thick tenderloin). Check by making a tiny slit in the pastry to peek at the beef’s color. Better solution: Grab a $10 digital thermometer – it’s cheaper than ruining a $30 cut of meat!
Still have questions? Drop them in the comments – I check daily and love troubleshooting kitchen adventures with you all!
Nutritional Information
Just so you know what you’re diving into (not that calories count when something tastes this good!)—here’s the nutritional breakdown per serving. As always, these are estimates and may vary based on your exact ingredients and portion sizes.
- Calories: 450 kcal
- Fat: 28g (10g saturated, 15g unsaturated)
- Protein: 35g (hello, beefy goodness!)
- Carbohydrates: 18g
- Fiber: 2g
- Sugar: 1g
- Sodium: 400mg
Not bad for something this indulgent, right? The prosciutto adds some sodium, but you can balance it with lighter sides if you’re watching intake. And remember—nutritional values are estimates and vary based on ingredients. Now go forth and bake with confidence!
Try this beef Wellington recipe and impress your guests!
Print
Perfect 3-Step Beef Wellington Secret
- Total Time: 1 hour 10 minutes
- Yield: 4 servings 1x
- Diet: Low Lactose
Description
A classic beef Wellington is a tender beef fillet wrapped in mushroom duxelles, prosciutto, and puff pastry, then baked to golden perfection.
Ingredients
- 1 (2 lb) beef tenderloin
- 2 tbsp olive oil
- 8 oz mushrooms, finely chopped
- 2 cloves garlic, minced
- 4 slices prosciutto
- 1 sheet puff pastry, thawed
- 1 egg, beaten
- Salt and pepper to taste
- 1 tsp Dijon mustard
Instructions
- Preheat oven to 400°F (200°C).
- Season beef with salt and pepper, then sear in olive oil until browned on all sides. Brush with Dijon mustard.
- Sauté mushrooms and garlic until dry, then set aside.
- Lay prosciutto on plastic wrap, spread mushroom mixture over it, then place beef on top.
- Roll tightly and chill for 15 minutes.
- Wrap the beef in puff pastry, brush with egg wash, and bake for 30-40 minutes.
- Rest for 10 minutes before slicing.
Notes
- Chill the wrapped beef before baking to help the pastry hold shape.
- Use a meat thermometer for medium-rare (130°F).
- Let it rest to retain juices.
- Prep Time: 30 minutes
- Cook Time: 40 minutes
- Category: Main Course
- Method: Baking
- Cuisine: British
Nutrition
- Serving Size: 1 slice
- Calories: 450
- Sugar: 1g
- Sodium: 400mg
- Fat: 28g
- Saturated Fat: 10g
- Unsaturated Fat: 15g
- Trans Fat: 0g
- Carbohydrates: 18g
- Fiber: 2g
- Protein: 35g
- Cholesterol: 120mg
Keywords: beef wellington, beef fillet, puff pastry, classic British dish


